About EcorePOS
What is EcorePOS?
EcorePOS is a thorough retail software solution designed to streamline operations and boost
customer satisfaction across various product types. Whether dealing with General Products or
complex IMEI and Serial Products, our platform efficiently manages all aspects of retail
operations.
What types of businesses can use EcorePOS?
- Super Shops
- Liquor Store
- Mini Super Shops
- Clothing Stores
- Electronic Equipment Sales Centers
- Mobile Shops
- TV, AC, and Freezer Seller Agent Branches
- Installment-based Product Stores
- Servicing Centers
Advanced Features! Handling Special Product Types.
General Product Management: Efficiently manages a diverse range of standard products,
including electronics and apparel, with user-friendly stock tracking and sales management
tools.
Variation Product Support: Easily handle product variations such as size, color, or
style, ensuring precise stock management and smooth order fulfillment.
IMEI Product Tracking: Monitor individual units of IMEI-coded items like mobile
phones or electronic devices from purchase to sale, ensuring accurate stock control and
warranty management.
Serial Product Management: Keep detailed records of serialized items like machinery
or appliances, ensuring traceability for warranty claims and effective after-sales
service.
Medicine and Expiry Product Handling: Protect your customers' health and your
business reputation with features for managing expiry dates and regulatory compliance,
ensuring timely stock rotation and reducing waste.
Installment Product Management: Enable flexible payment options for high-value items
with built-in support for installment plans, benefiting customers and simplifying financial
processes.
Servicing Integration: Improve customer satisfaction and loyalty by integrating
servicing and maintenance functionalities, allowing for easy tracking of service requests
and history for each product sold.
With our retail software, you can optimize operations, enhance stock accuracy, and deliver
exceptional service across all product types, setting your business apart in today's
competitive retail landscape.
Change Profile
To change your profile name, username, email, phone number, or profile photo please follow
these instructions.
Go to the User profile section from the top right bar and click on "Change Profile".
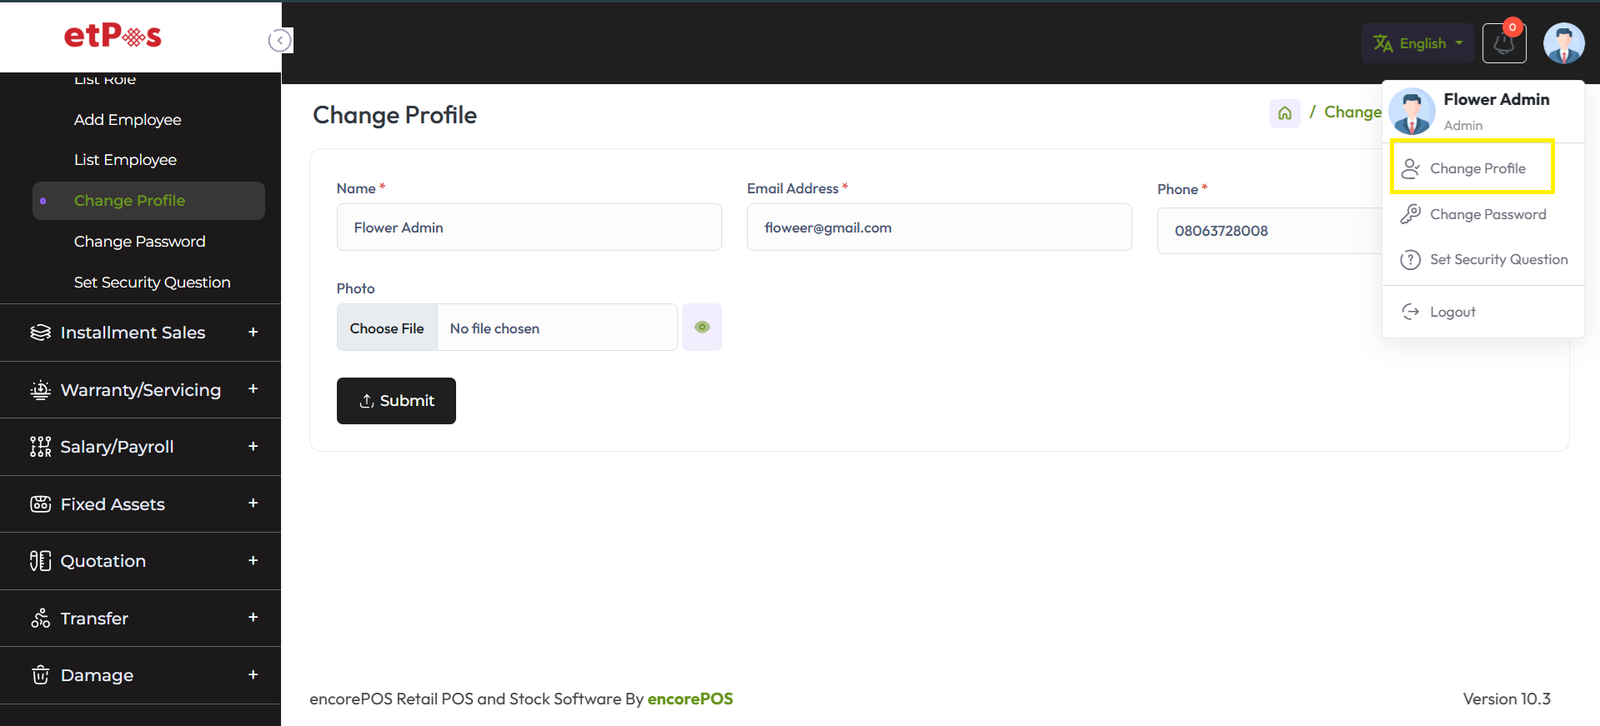
Now you can put the Name, Email, Phone, Username and Profile photo by filling up these
fields.
After successfully updated, it will show a message like this
"Information has been updated successfully!".
Change Password
To change your password, please follow these instructions.
Go to the User profile section from the top right bar and click on "Change Password".
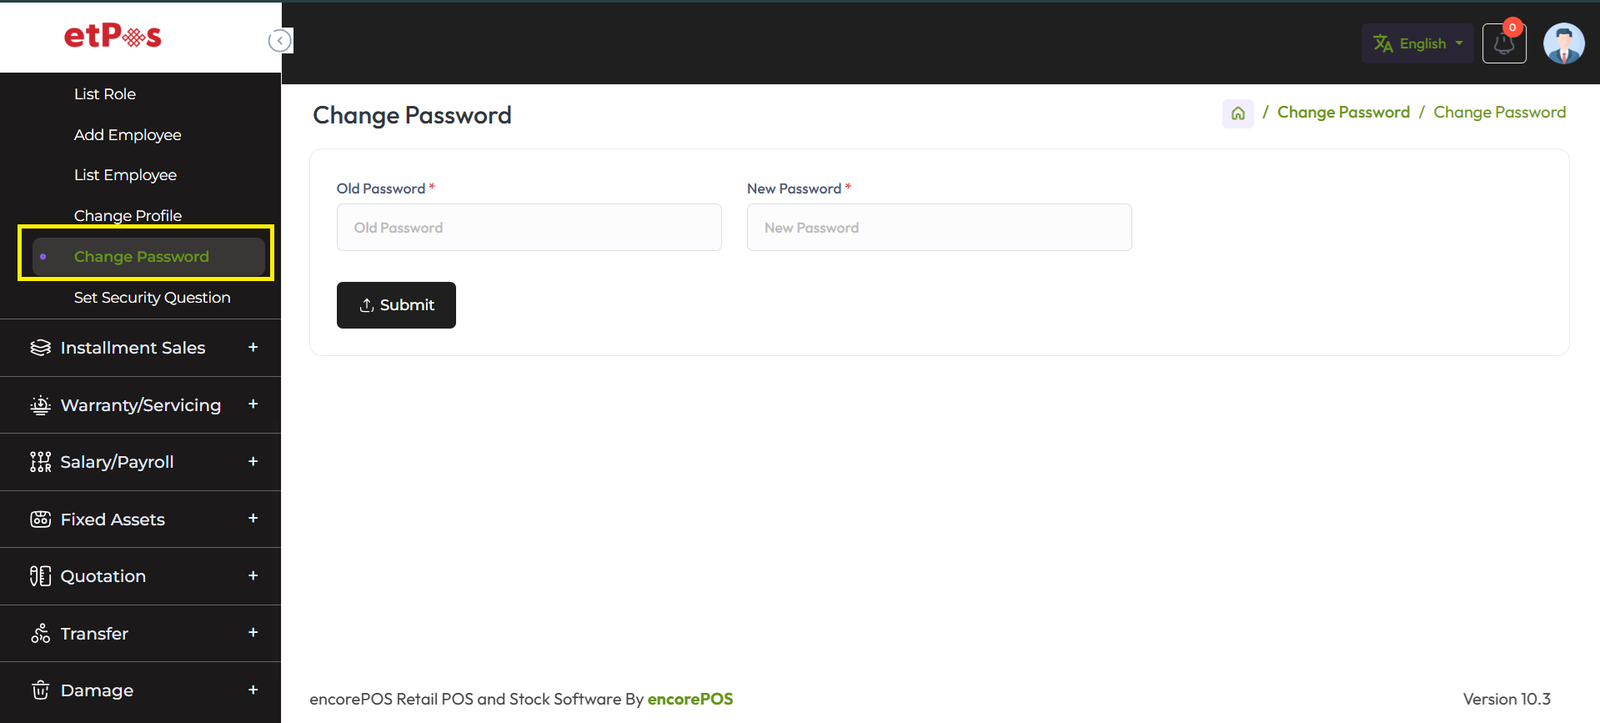
Now you can put the Name, Email, Phone, Username, and Profile photo by filling up these
fields. After it is successfully updated, it will show a message like this "Information has
been updated successfully!".
Set Security Question
Please set a security question on your site by following the below instructions. So that you
can reset your password in case you forget it. Also if you are a newly added user, you will
need to set a security question for you.
Go to the User profile section from the right top bar and click on “Set Security Question”.
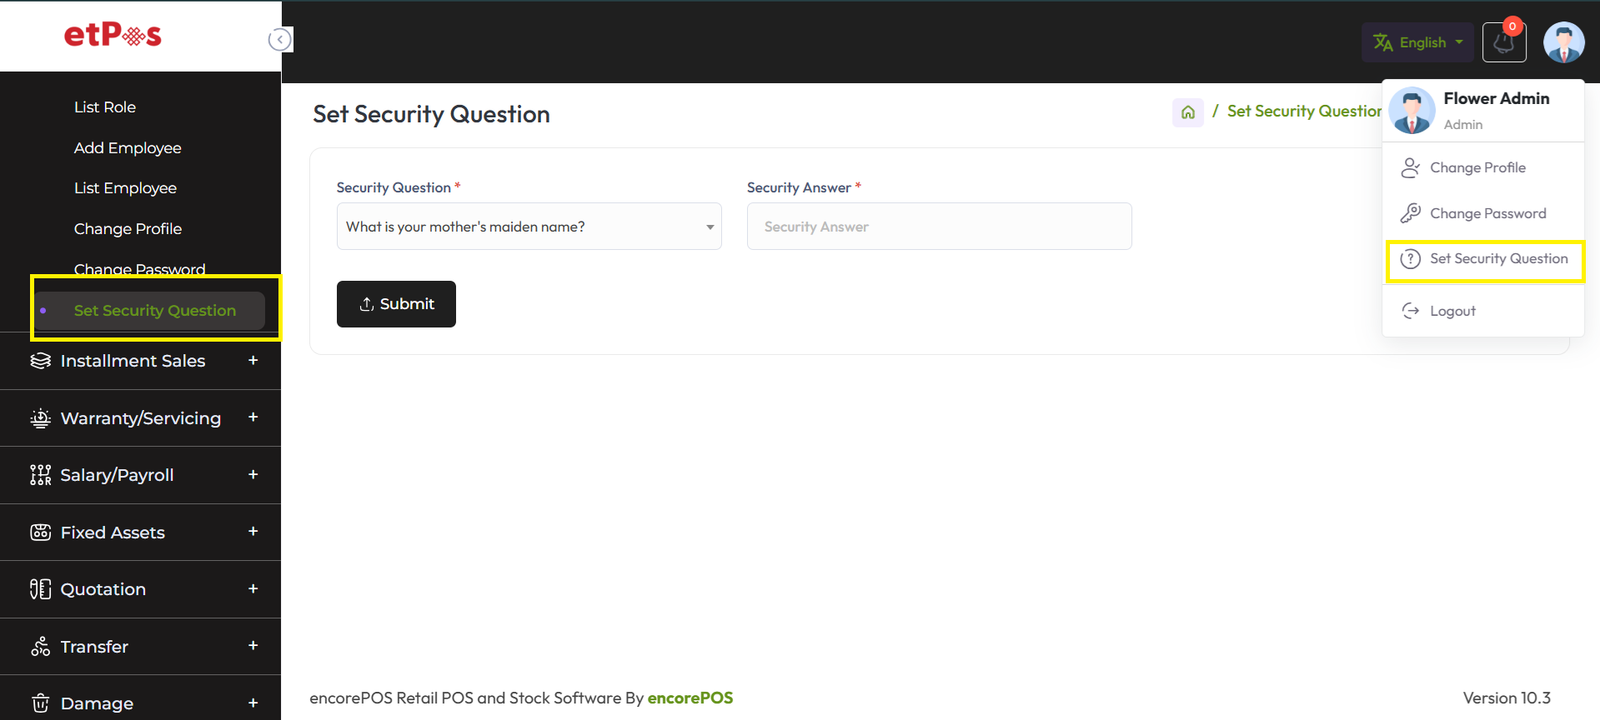
Click the "Question" drop-down and select any of the security questions. Enter the answer to
the question. Click on the "Submit" button to save it.
Forgot Password
In case you forgot your password, you can set a new password without any email or
verification, you just need to follow some steps with the security question that you set
before from the admin panel.
Click "Forgot Password?"

STEP 1:
You need to enter your email address to check that your "Email Address" is registered in the
system and click on “Submit”.

If you entered a valid email address system will redirect to the next step.
Step 2:
Here you need to select your previous set security question and answer then click on submit
again for the next step if both are correct.
Note: If you set security answer previously like: Micky then you should
fill Micky not micky, mIcKy, MICKY, it doesn't accept, Give only what was previously given.

Step 3:
Enter your new password and confirm password and click on the “SUBMIT” button then the
system will redirect in the login page.

Now enter your email and newly created password to login.
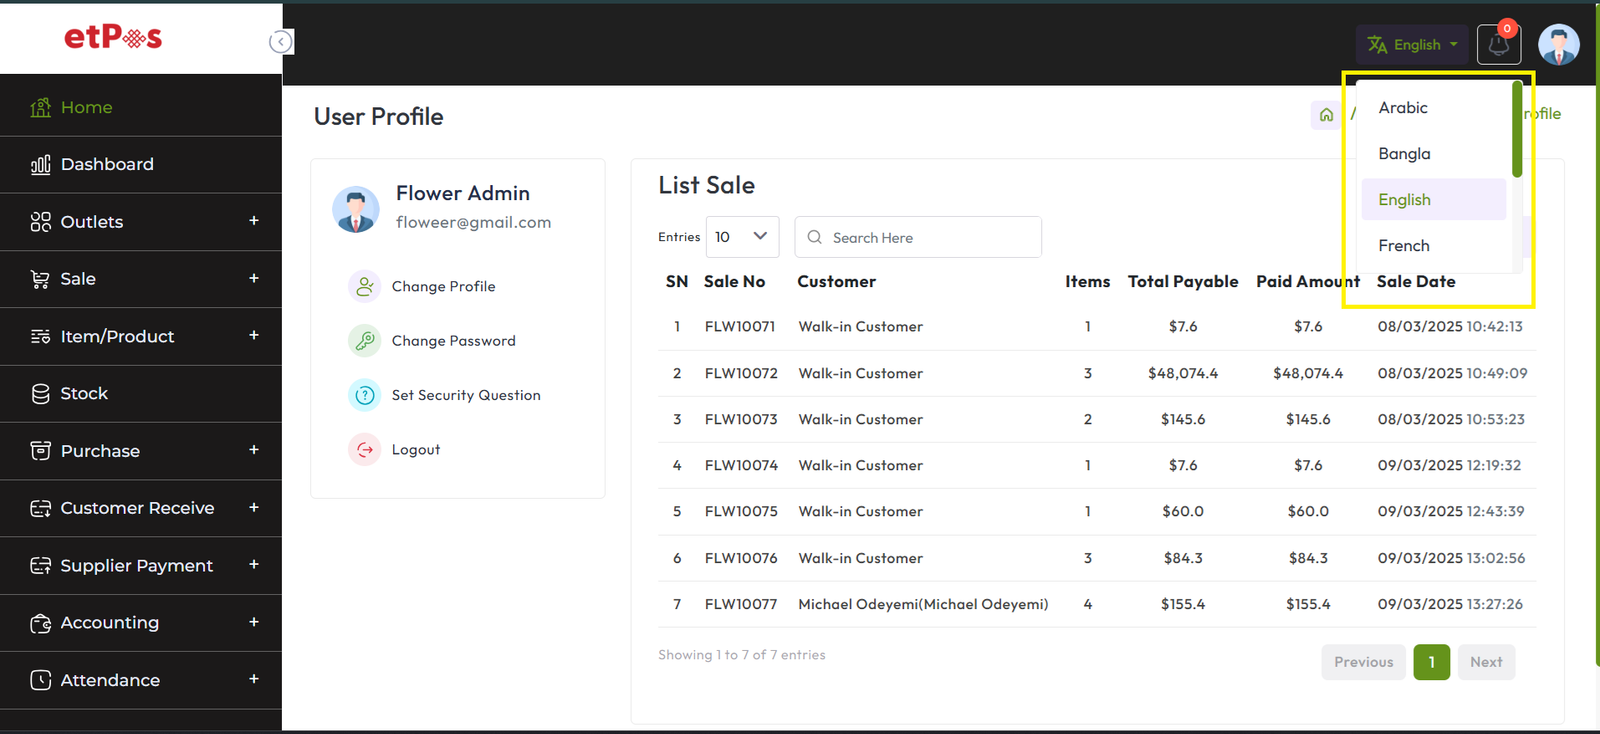
Change Language
To change the language click on the language button and you will get multiple language
options select your desired language
Add Outlet
To create a new outlet expand the Outlets menu from the left sidebar after that click on the
Add Outlet menu.

Fill up this required field and hit the submit button to create an outlet,
after successfully created outlet you will find it in “List Outlet”
List Outlet
To view List Outlet expand the Outlets Menu from the left sidebar, after that click on List
Outlet menu.

You can also edit an Outlet by clicking the Edit button, and delete by clicking
the Delete button.
Enter to an Outlet
From the List outlet Click on the “Enter” button to Do transactional work Like Purchase,
Purchase Return, Sale, Sale Return, Damage, Transfer, etc.
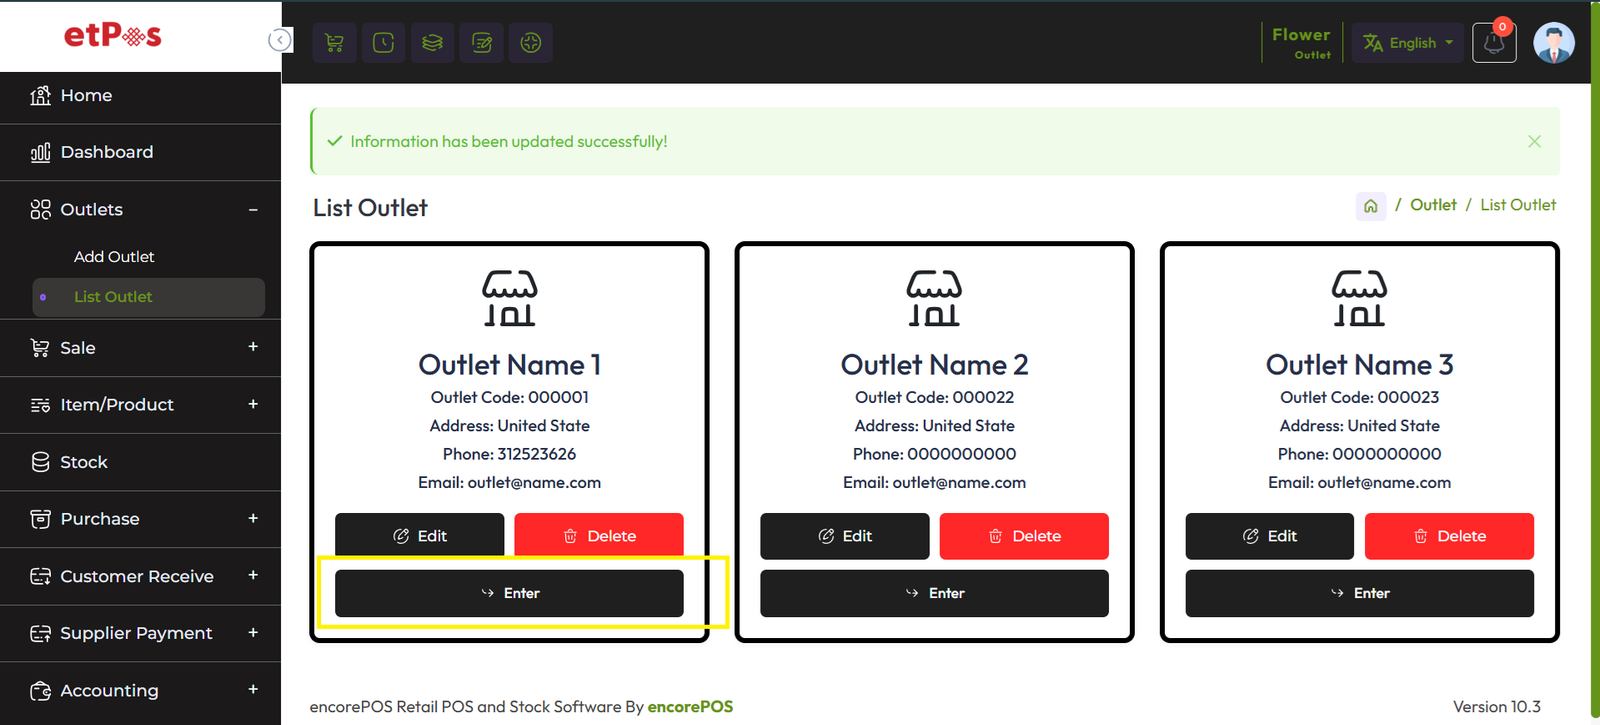
Note: you can’t do any transaction without selecting the
“Enter” button from the outlet list, because it’s a prerequisite of any transaction.
Setting
Expand the Settings menu from the left sidebar and click on the Settings menu to configure
the basic settings of the software.
After clicking on the Setting menu you will get this below interface, Here are
lots of fields, Each field will be described in turn.
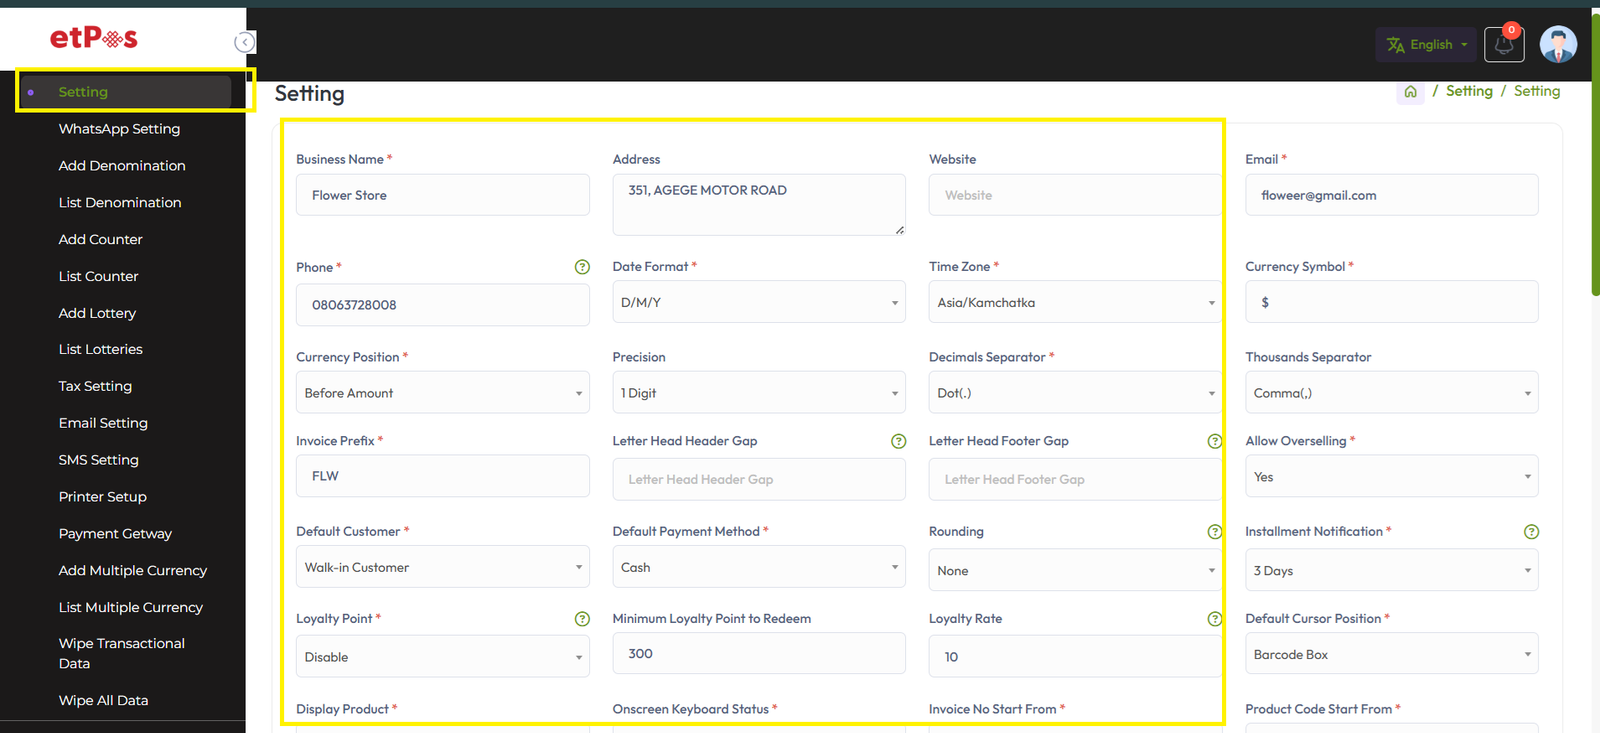
Decimal Separator: The decimal separator is a symbol used to separate the integer part
from the fractional part of a number in decimal notation. In many countries, including the
United States, the decimal separator is a period (.), while in others, such as many European
countries, it is a comma (,). For example:
In the United States: 10.50
In Germany: 10,50.
Thousand Separator: The thousand separator, also known as the thousands separator or
group separator, is a symbol used to separate groups of digits in large numbers, primarily
for readability purposes. the comma (,) is commonly used as the thousand separator.
For example:
1,000 (comma as the thousand separator)
1.000 (period as the thousand separator in some countries)
Invoice Prefix: An invoice prefix is a string of characters that is added at the
beginning of an invoice number to help identify or categorize invoices. It serves as a
unique identifier or marker for invoices generated by a particular entity, department, or
system.
For example: Off-POS-INV-, INV-, Off-POS
Note: Special characters are not allowed in invoice
prefixes, like: !,@,#,$,%,^,&,*
Click here to read about the
Letterhead header gap & Letterhead footer gap.
Overselling is when you don't have the product in stock but you can borrow it from another
store sell it and then return it to that store.
There are two options in the Allow Overselling field 1. "Yes", 2."No"
What happens if select "Yes"!
Overselling Select "Yes" means the product can be sold even if it is not in stock, and
no block will be received while selling.
What happens if select "No"!
Overselling Select "No" means the product can't be sold if it is not in stock a block
will be received during the sale.
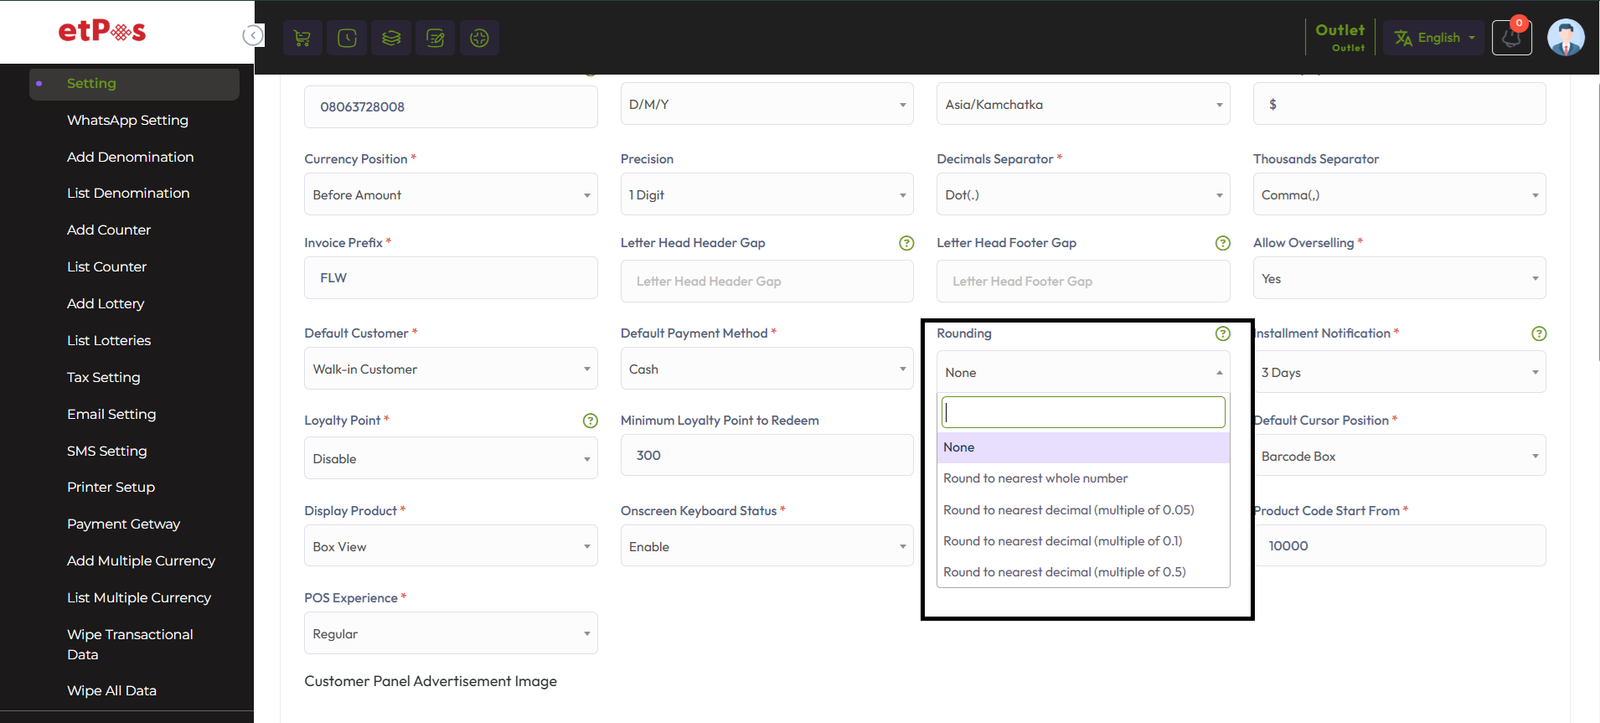
Rounding:
The price of the products can be taken as a whole number or as a rounded decimal value by
selecting the particular roundoff method. If none is selected the value is taken as a whole
number.
Example:
Round to nearest whole number:
2.01 => 2, [2.01-2.49 will be count as 2]
2.50 => 3, [2.50-2.99 will be count as 3]
Round to nearest decimal (multiple of 0.05):
2.11 => 2.10
2.12 => 2.10
2.13 => 2.15';
Installment Notification: We will discuss letter in Installment Product Sale Article
Click here to read the article on Sending
Reminders to Due Installation Customers within 3 days, 7 days, and 15 days.
Click here to read the article on Loyalty Point Setting.

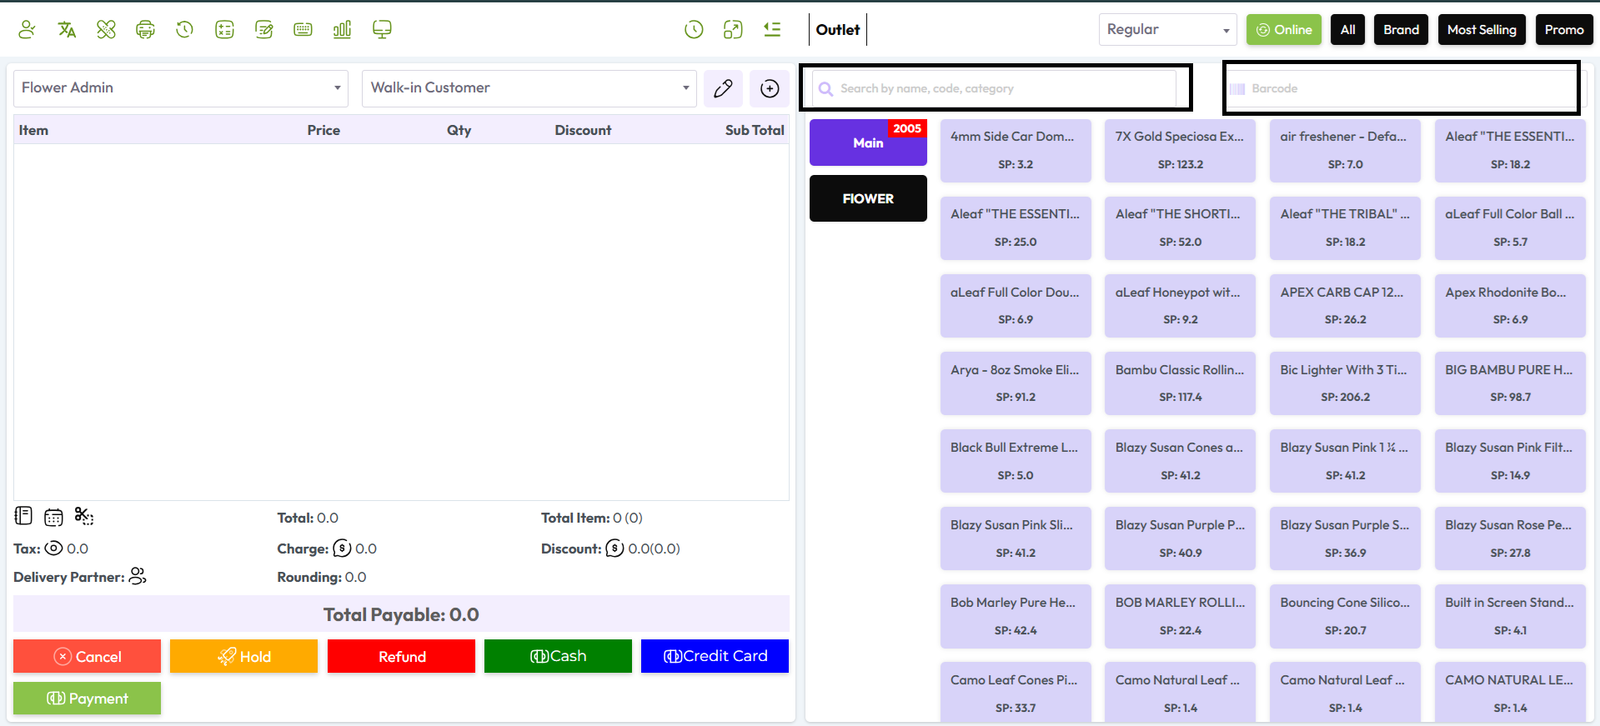
Default Cursor Position: In the shown snapshot below here we can see two search
fields: Name or Generic Name or Code or Category field another is Barcode. Default Cursor
Position means after reloading or after sale entry In which field the cursor will be
positioned.
Display Product: In this Display Product field has two option, one is Image View
another is Box View.
Image View: Image view means in POS screen product will be show with Image.
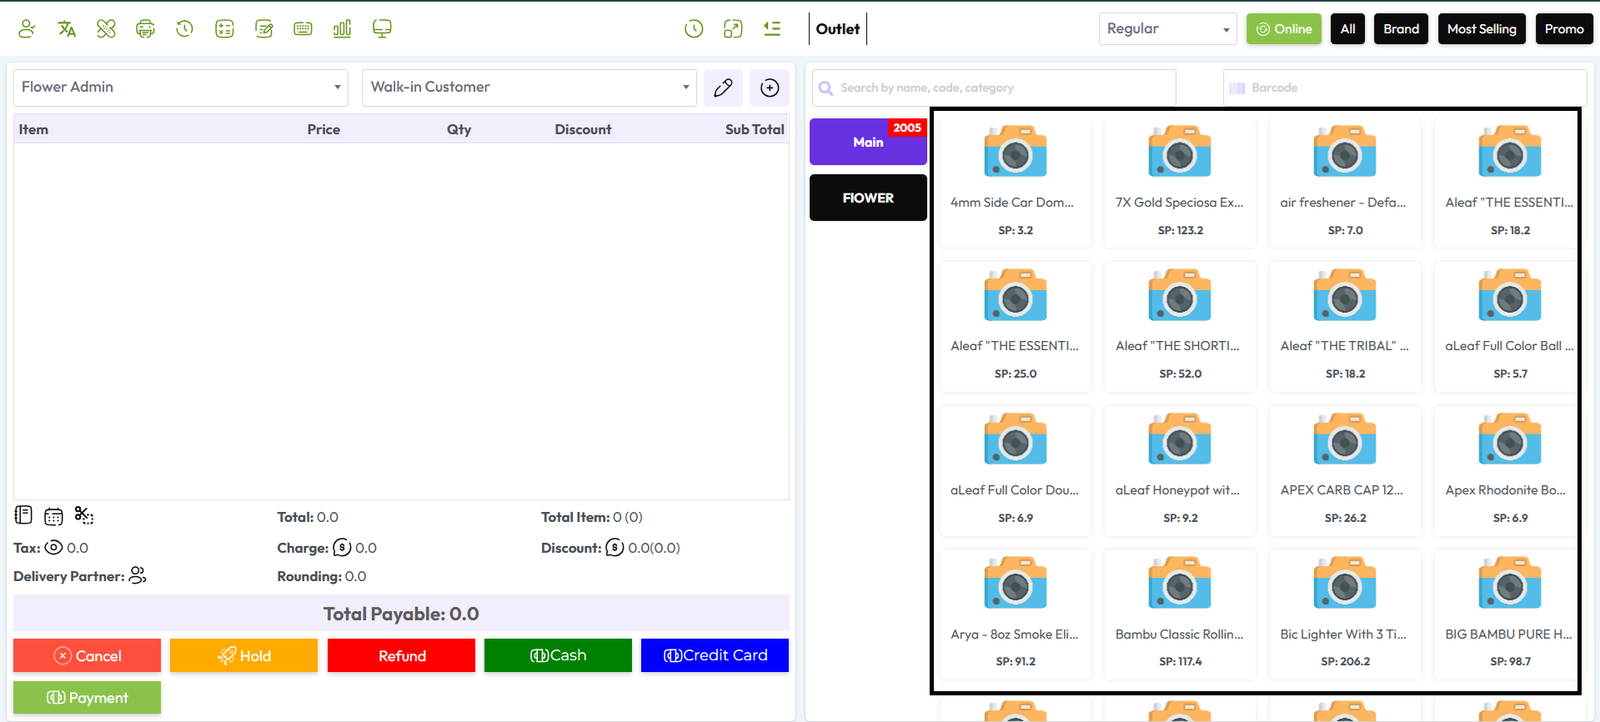
Box View: Box view means in POS screen product will be show without Image, In product
box will be show only Product name, price etc.

API Token: We are providing API for the item and sale module, click the generate
button to generate the API key.
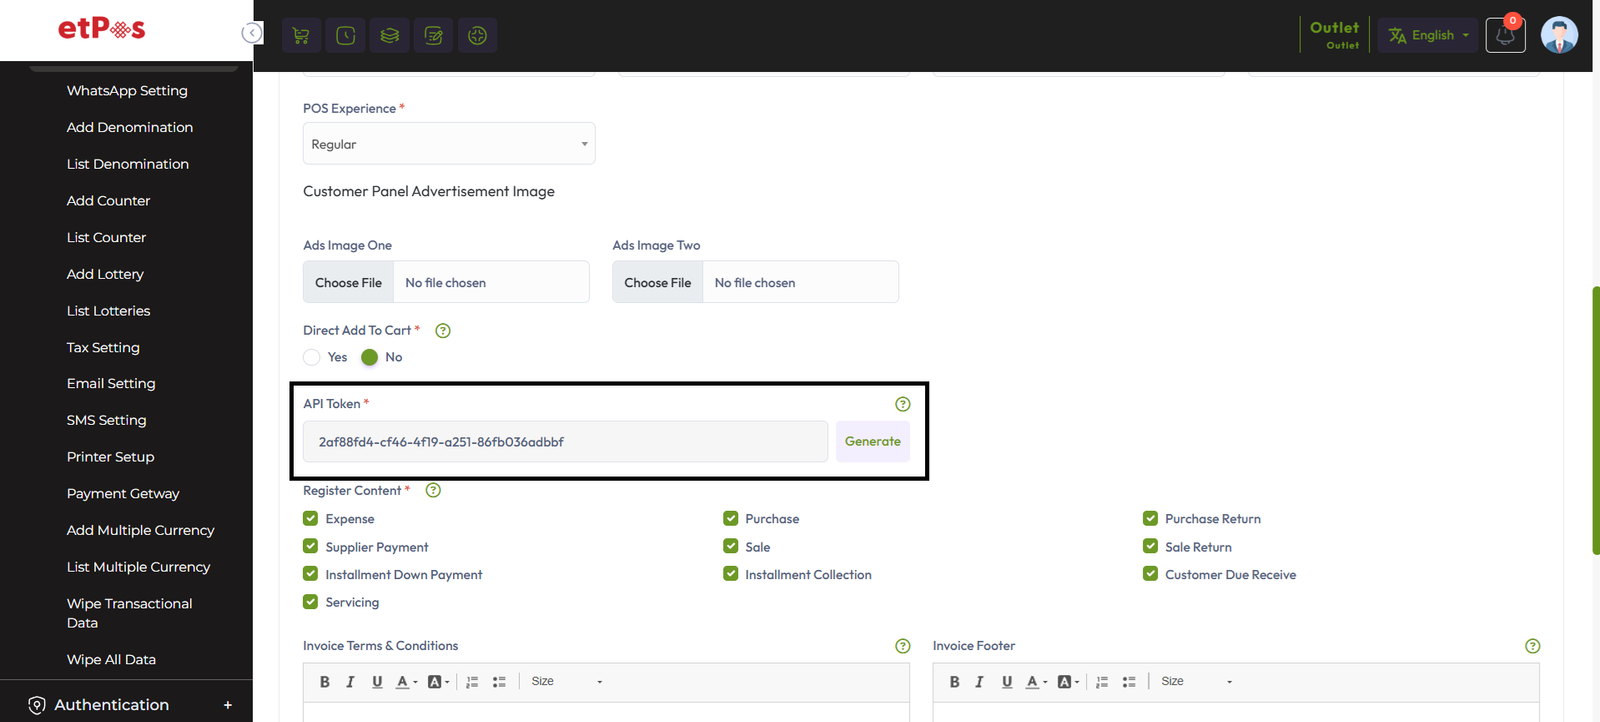
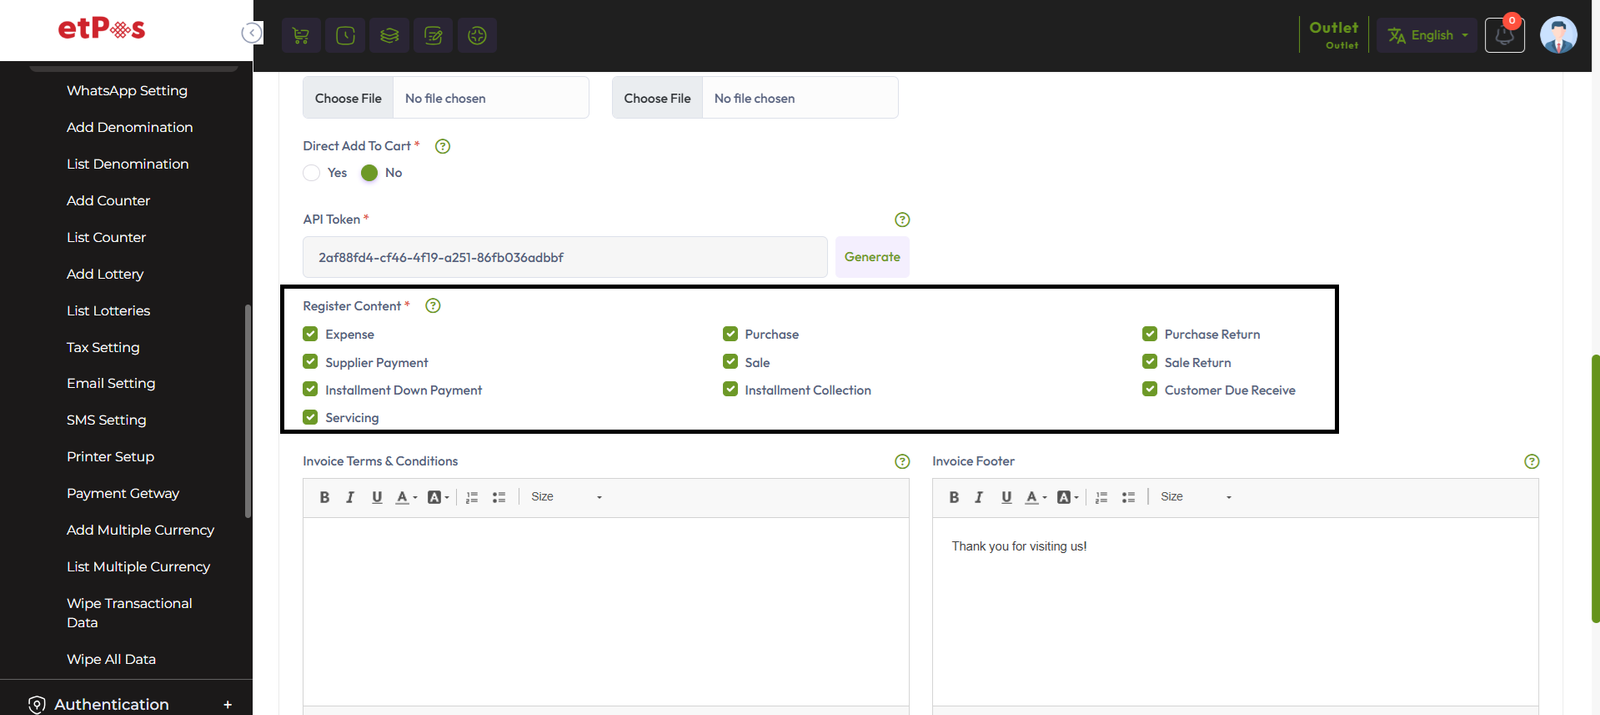
Register Content: Checking the register contents means you cannot access those
options without opening the register.
Direct Add To Cart: Direct add to cart has two option, one is Yes another is No.
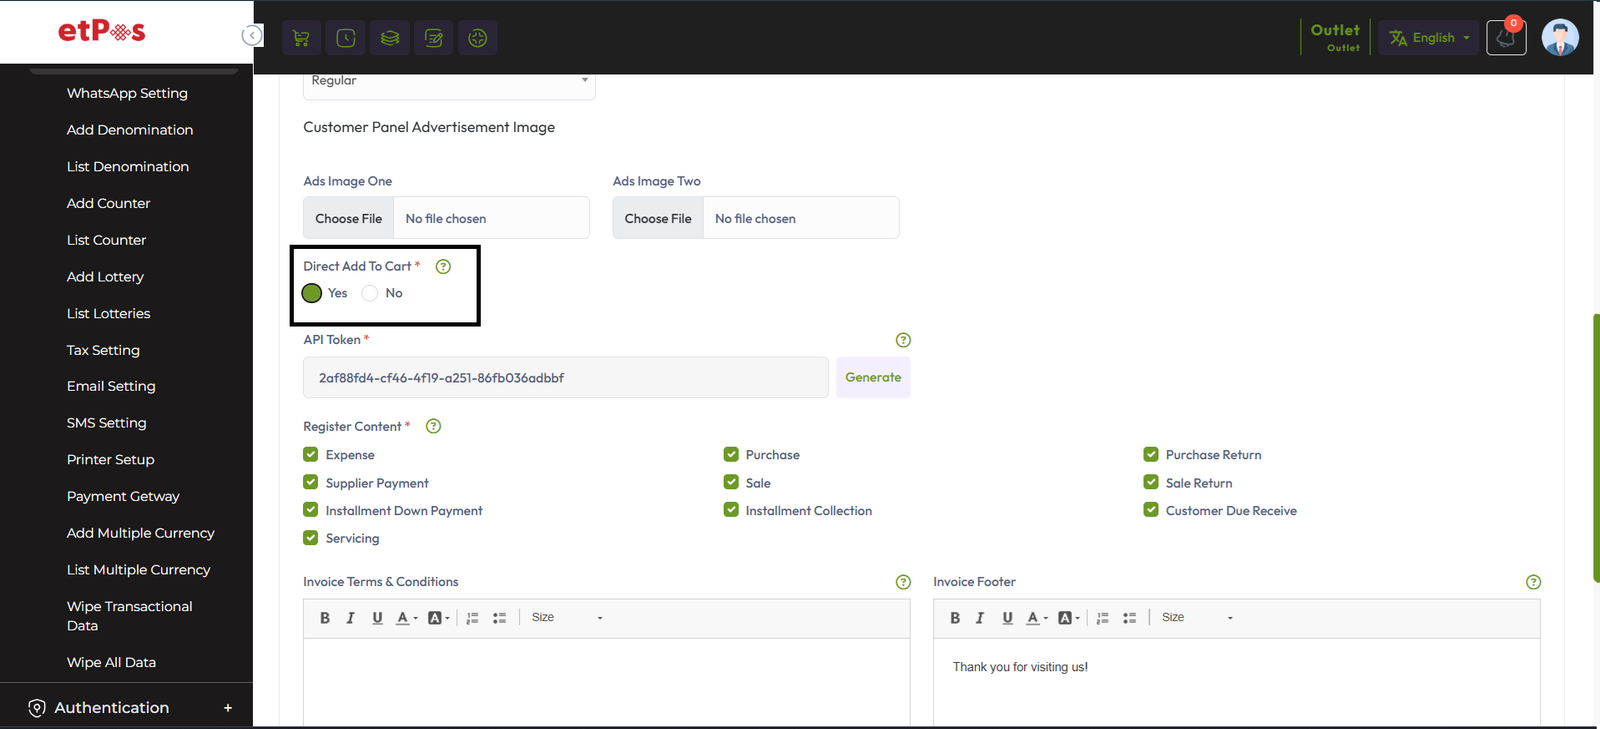
Direct Add To Cart "YES": If you click Direct add to cart is "Yes" that means
whenever you click on the product it will be added to the cart directly.

Direct Add To Cart No: Direct Add to Cart No: If you click on Direct Add to Cart is
"No" It means whenever you click on the product it will open a modal and from that modal,
you can change the price discount. after that Click on the "Add To Cart" button to add this
product to cart.

Note: Direct add to cart is only effective for normal products,
except for normal products you will get a pop-up modal every time you click on the product.
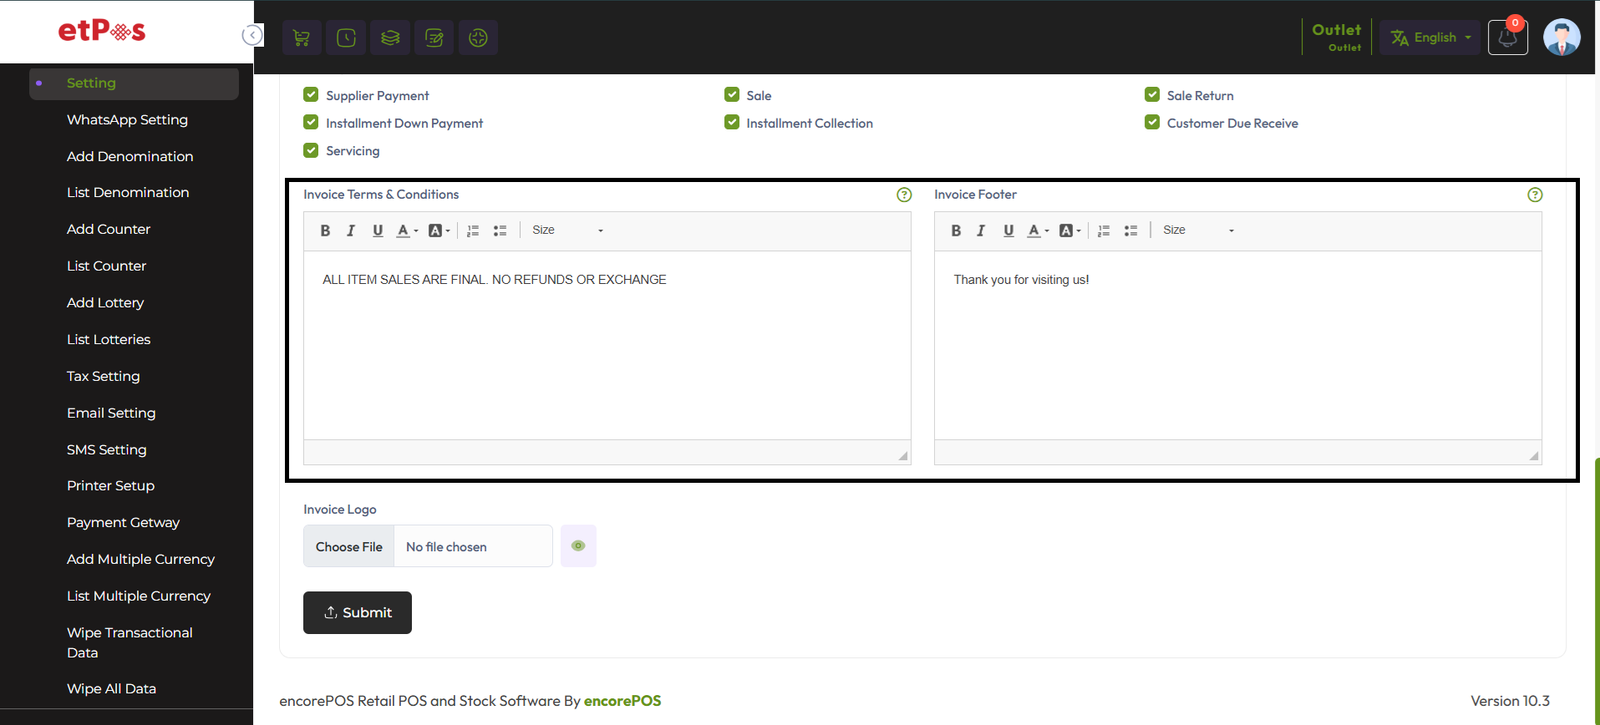
Write your product sale terms and conditions in the Invoice "Terms & Conditions" Field. It
will be shown only the A4 invoice.
Write the Invoice footer description in the "Invoice Footer" field, It will show only
Thermal Printer "56mm and 80mm".
Wipe Transaction Data
Wipe Transaction Data means delete all transactional data by clicking "Wipe Transaction
Data"
Transactional data means Purchase Entry, Purchase Return Entry, Sale Entry, Sale Return
Entry, Damage Entry, Transfer Entry, Stock, Low Stock, Installment Sale, Installment
Collection, Servicing, Salary, Income, Expense, Deposit, Withdraw, Suppleir Payment,
Customer Receive.

Wipe All Data
By clicking the Wipe All Data menu, you can delete all the data of the entire software. Only
without walking customer from Customer Table, admin from User Table, Company from Company
Table and Some Payment method from Payment Method Table.
Add Denomination
To create a new denomination expand the Setting menu from the left sidebar after that click
on the Add Denomination menu.
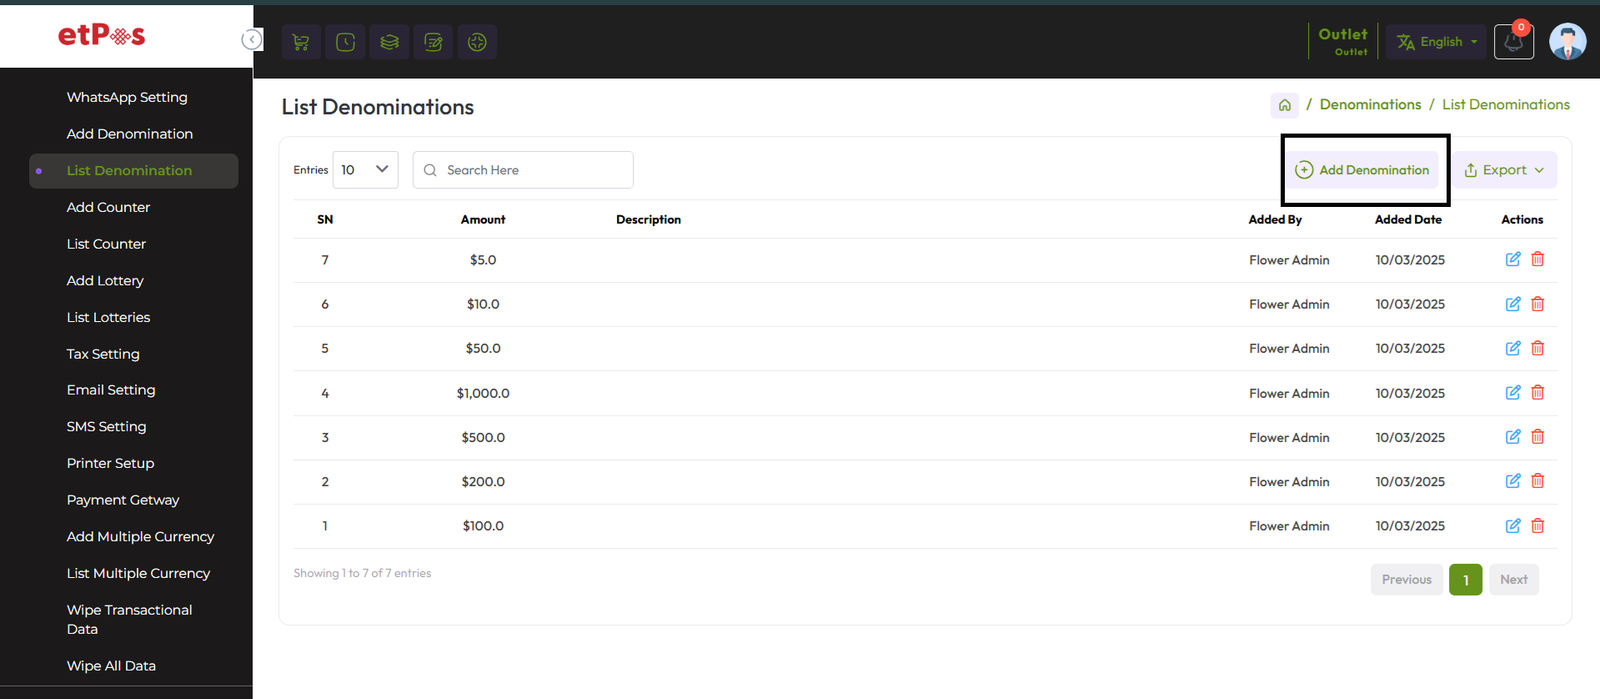
Fillup the required field and hit the submit button to create a denomination
Denomination in POS
How works denomination in POS?
When you come to the "Finalize Sale" model you will see the following interface, in this
section you will see a Denomination section.
Here in this snapshot shown below number 10 clicked 3 times means 10 * 3 = 30, number 20
clicked 3 times means 20 * 3 = 60, number 50 clicked 2 times means 50 * 2 = 100 so result is
30 + 60 + 100 = 190.
Clicking on the denomination number will display the total sum of the denomination in the
Amount field. This is how denominations work.
This amount will be add in payment method section by clicking "Add" Button

Add a Item/Product
To create a new Product expand the Item/Product menu from the left sidebar after that click
on the Add Item/Product menu.

Select a type from the Type field, and enter an "Alternative Name" for this product,
"Alternative Name" for a product typically refers to an additional name or label that can be
used to identify the product in the system, fill up the all required field and hit the
submit button to Add Item/Product.

Make a Sale
To Sales entry or sale product Click on the "POS" button from the top header or expand the
Sale Menu from the left sidebar after that click on the POS menu.

After clicking you will see an interface like below snapshot.
 "Lets try to Sale a Single Product!"
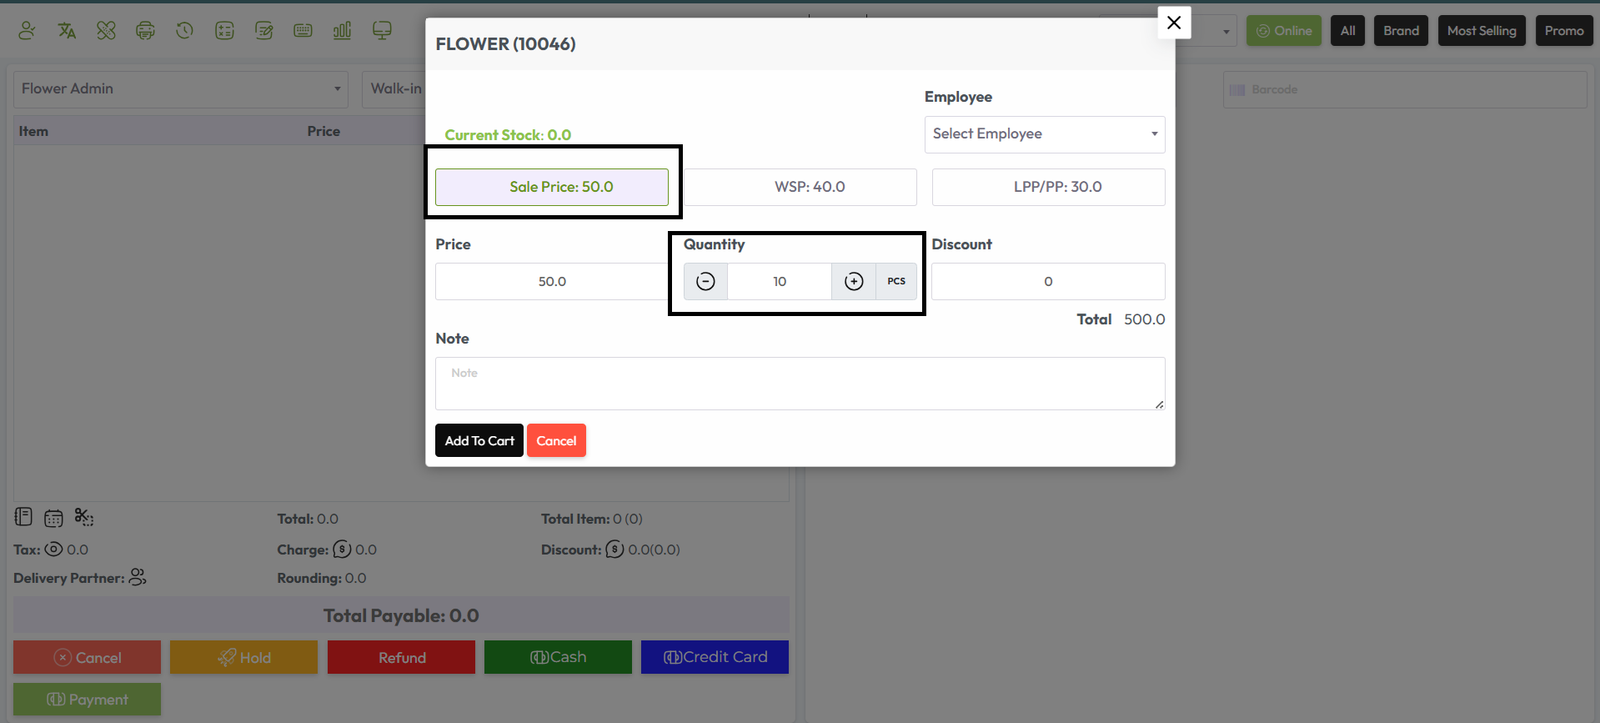
 To sell a product, click on an Item, after clicking that a popup modal will be shown.

Here you will see the current stock of this product, Select Employee from the employee field
if this product sale employee-wise, Change the price if needed, LPP = Last Purchase Price of
this product, WSP=Wholde Sale Price of this product, Increase Quantity if you need, enter
discount if you have permission after that hit "Add To Cart" button to add this product in
the cart.

After Clicking on the "Add to Cart" button Item will be added to the cart, After that Select
Employee from the Employee field, and select Customer from the Customer field.
Total Item 1(1) means 1 Item 1 Quantity.
Click here to read about the Tax Setting article.
Click here to read the article on Discount Permission for Employee.
How to give discoun?
How to work delivery partner?
Click here to read how rounding works on Total Payable?
Click on the "Payment" button for next Step.
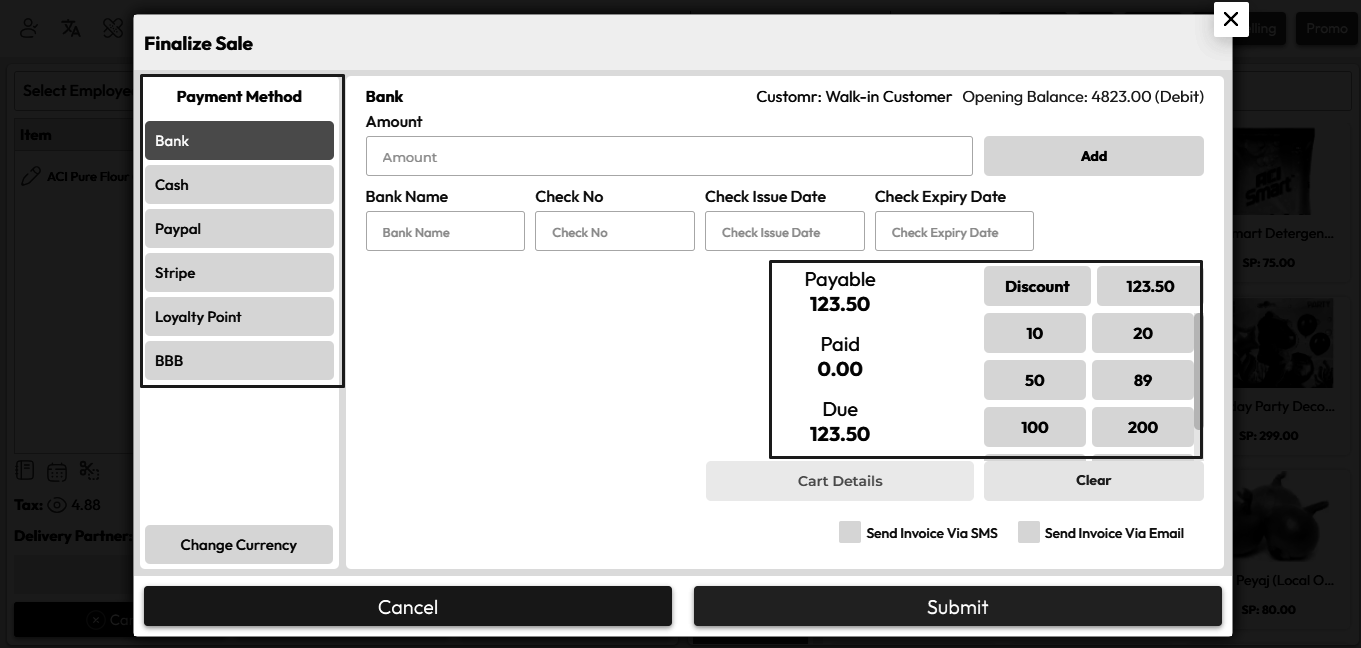
In the finalized sale, you will see payment method options on the left side, select a payment
method option from there, select amount by clicking denomination amount (Note: We have
discuss Denomination breifly in dinomination article) or enter amont in Amount field
and hit the Add Button

After clicking "Add" button payment added in payment section in my case I've select Bank,
after that select Send Invoice Via SMS, Send Invoice Via Emal, Send Invoice Via Whatsapp as
per your need and hit the submit button to Sale this product
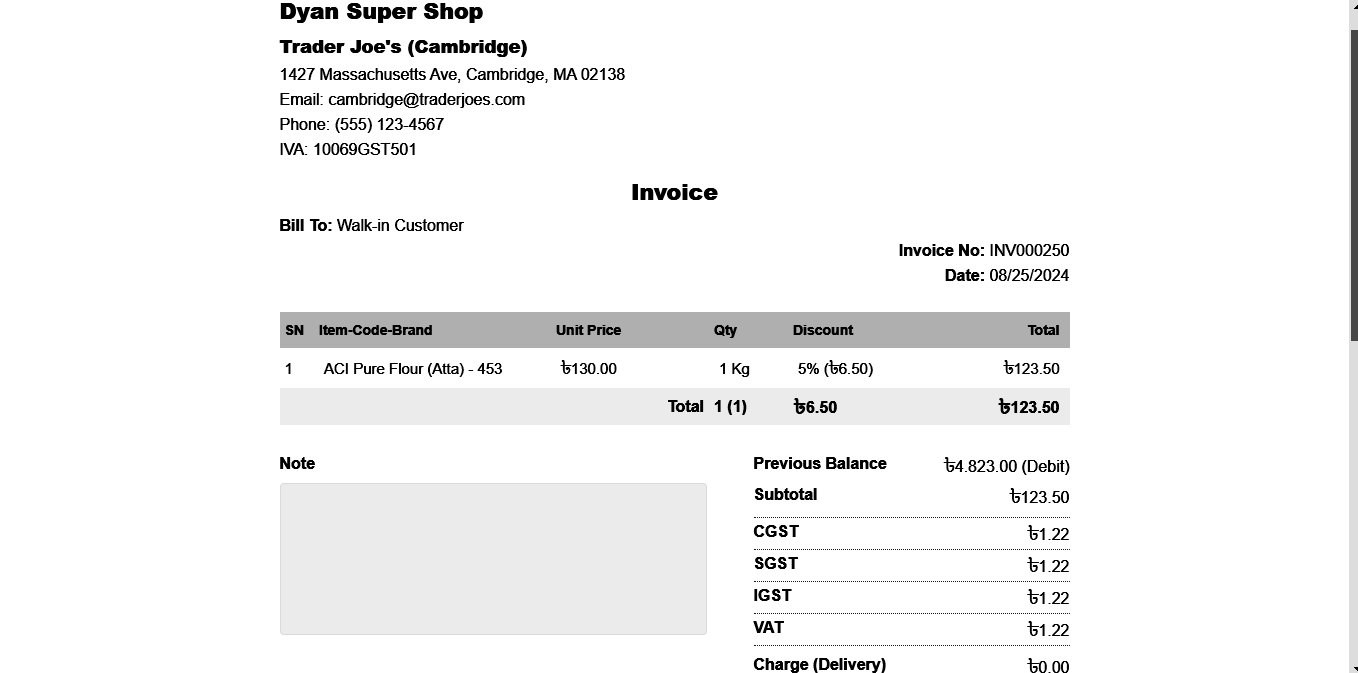
After Sale Success you will get an invoice, according to printer setting
Add Role
What is Role?
Role means designation, like Admin, Manager, Cashier, Register etc.
Before Employee add you need to create Role, To create role Expand Authentication Menu from
the left sidebar and click on the Add Role menu
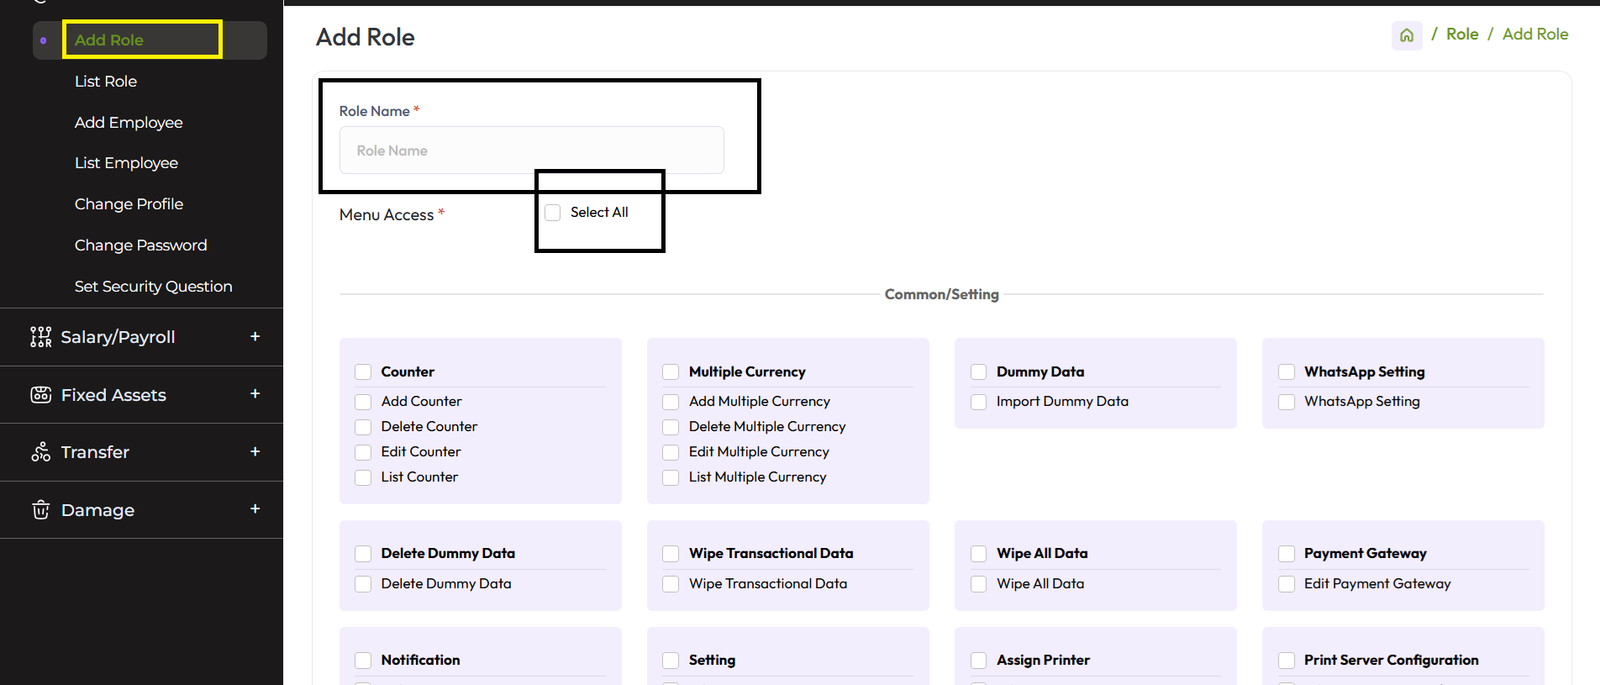
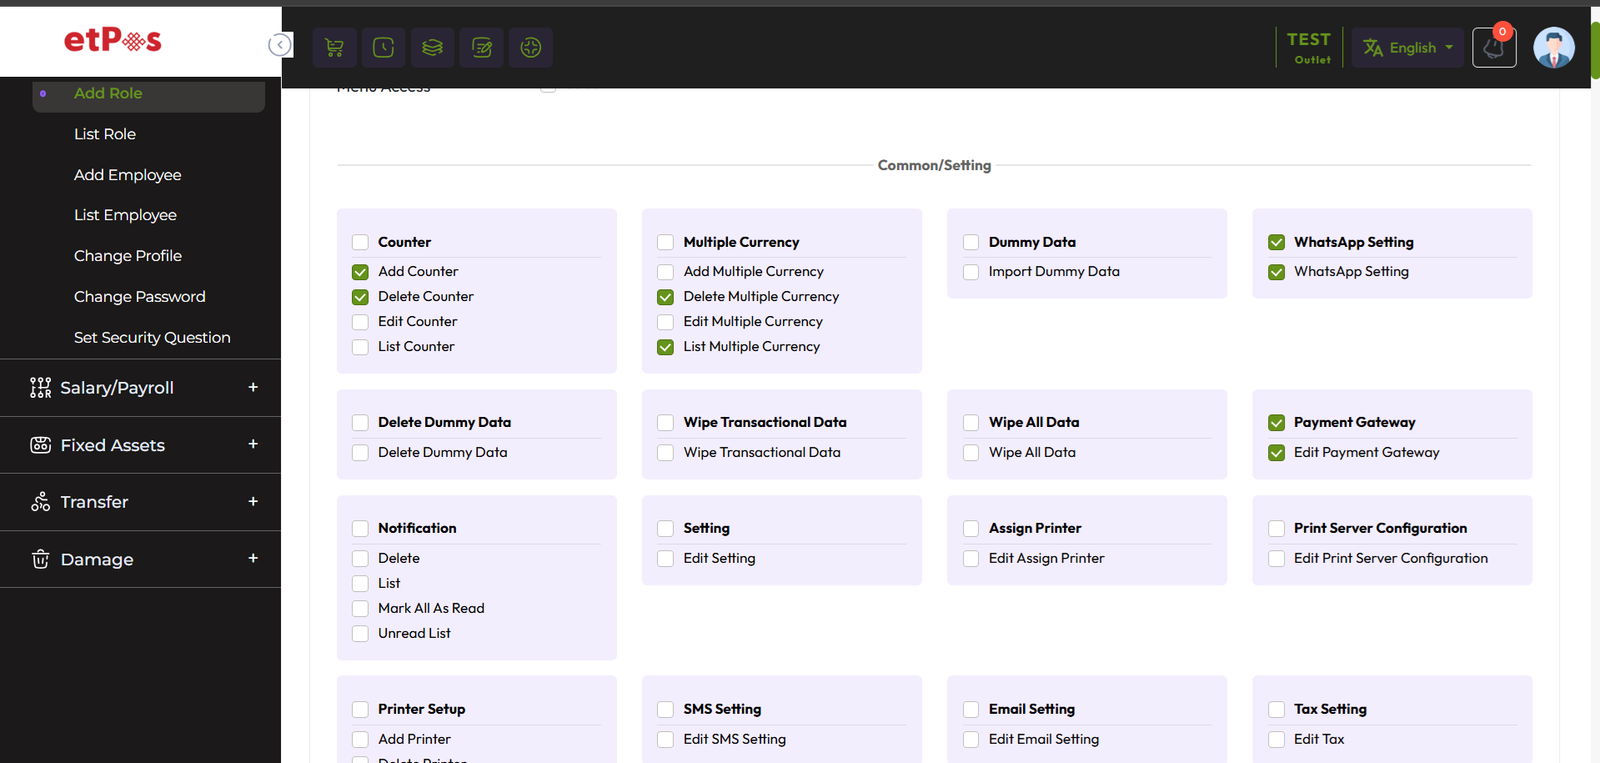
Enter the Role name and select Menu access, "Select All" if you want to set for this role all
access, or select single menu for individual access
Add Employee
To add an employee Expand Authentication Menu form the left sidebar, and click on Add
Employee menu<. /p>
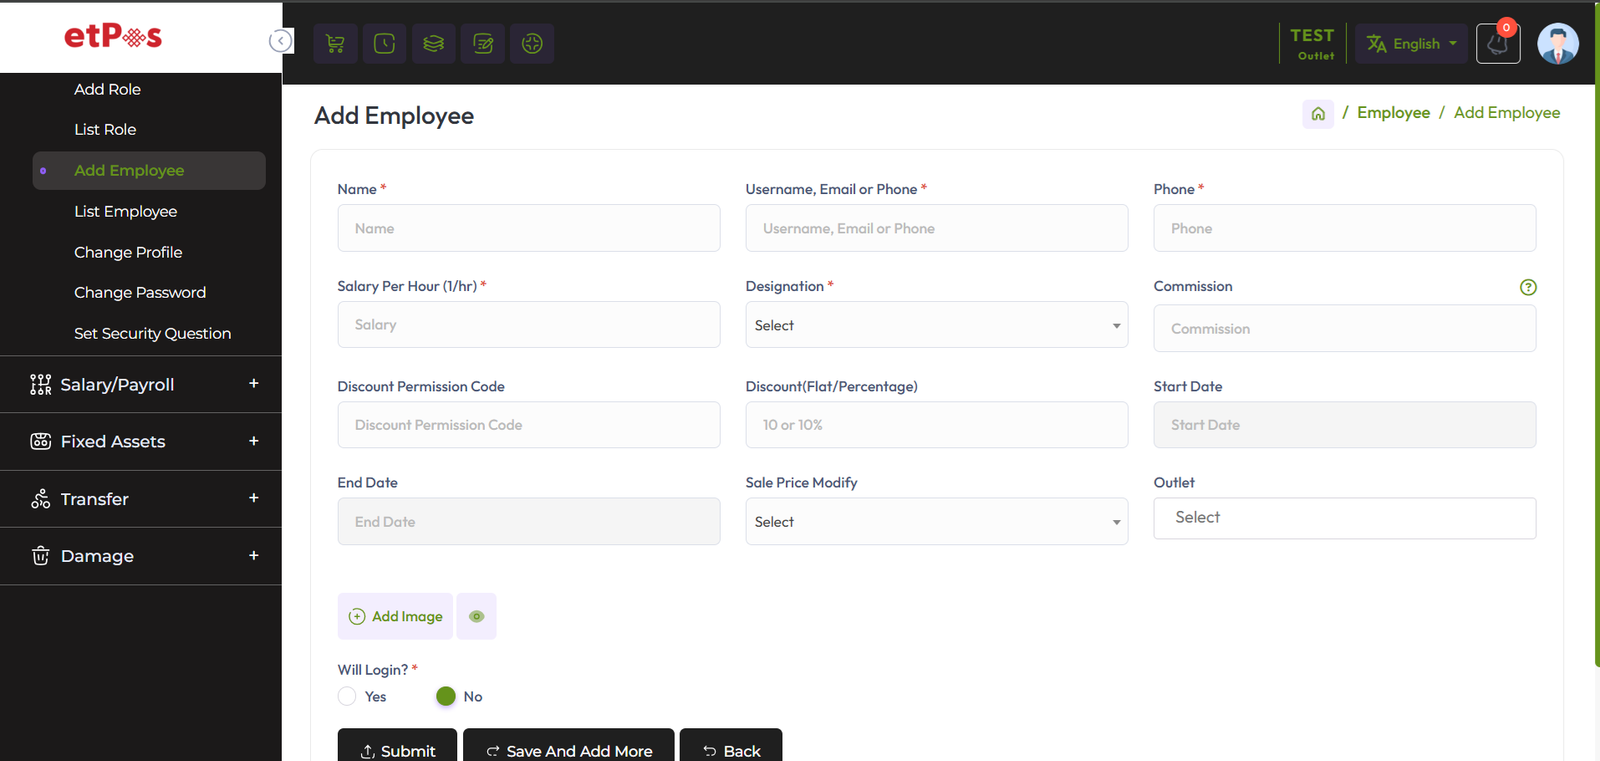
"Salary" Enter Salary amount of this employee,
"Designation" Earlier we explain about
Role here you can selecty A role of this employee, this employee can be access those menu
which is set for this Role
"Commission" If you set commission for this employee then he
will get commission on every sale if the sell is under that employee.
Click here to read the article on Discount Permission for
Employee.
"Sale Price Modify" the sale price modify has two option "Yes" or "No" if you select "Yes"
that means you are able to modify sale price from POS screen. example shown in below
snapshot

If you select Sale Price Modify "No" that means you are not able to modify sale price from
POS screen, example shown below snapshot

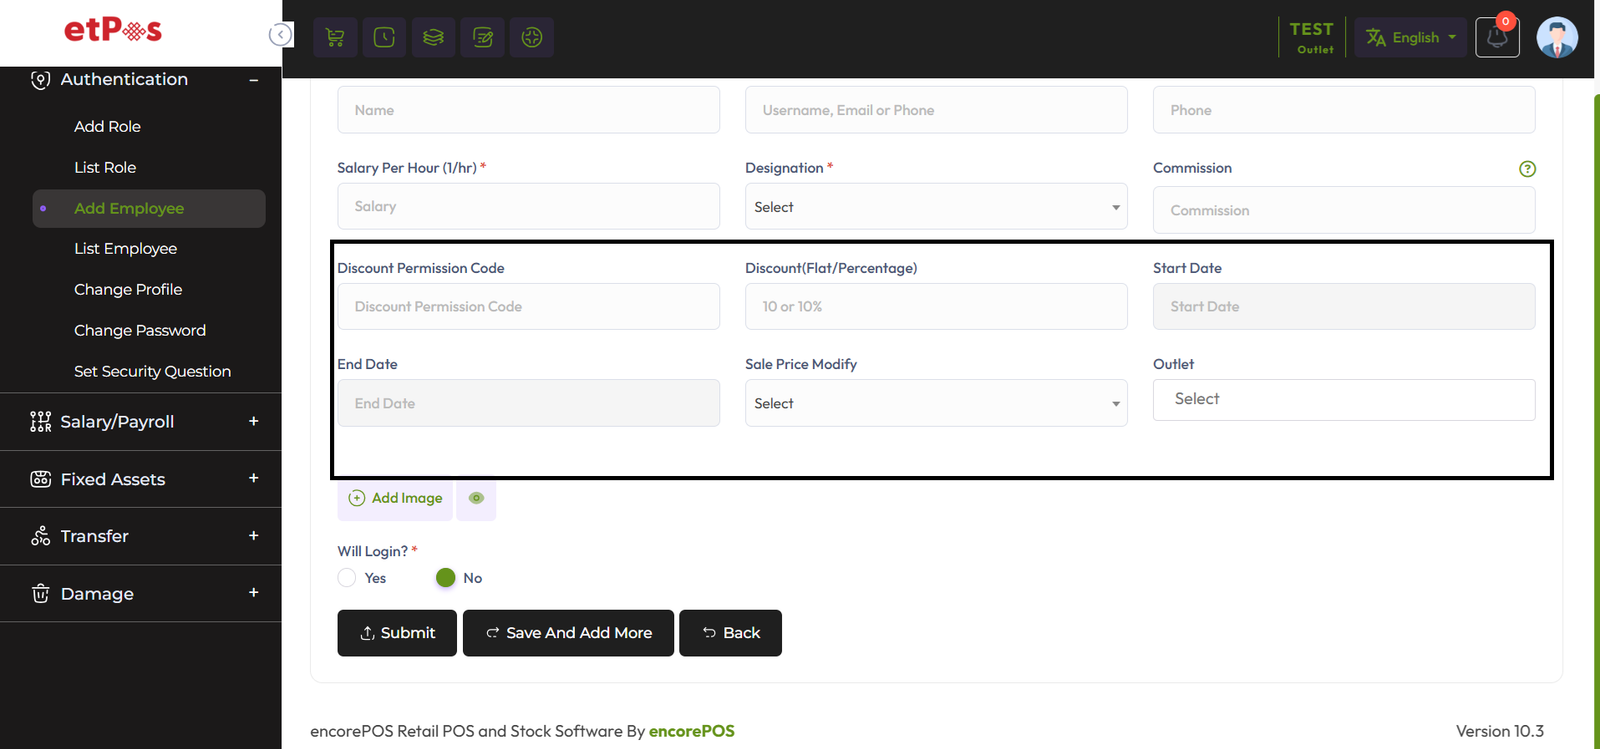
Discount Permission for Employee
You can control the percentage or amount of discount an employee can give during the sale.
For that set the code in the Discount Permission Code field, you can set any code. Then
enter the discount in the Discount field.If you want to give it within specific dates,
provide start date and end date for it.
First click on selected area to give discount.

Then a popup modal will open. Enter your valid discount code here.
In my case the discount code is "WA69" You enter your code and click on the submit button.

After submitting with discount code you will see another field. Enter your discount here, and
click the submit button.

Fill up the required field and hit the submit button.
Add Attendance
To create a new attendance expand the Attendance menu from the left sidebar after that click
on the Add Attendance menu.

If you are not able to access for Add Attendance Menu you just click the Checkin/Checkout
button from the top header go to the checkout page and update your attendance.

Update Attendance
To Update your attendance time go to Attendance List click on Update Time and update your
attendance.


Fill up the required field and hit the enter button to update your attendance.
Attendance Report
To view the Attendance Report expand the Report Menu from the left sidebar and click on
Attendance Report. select a date to view the report within a specified date if needed.
select Employee from the employee field to filter report According to the Employee.

Tax Setting
To Set your tax for your business Click the Setting menu from the left sidebar and click on
Tax Menu.

Here this is your Business tax setting, Read the tax document sequentially

I Collect Tax: No
I collect tax no means you're not applied any tax over the product.
I Collect Tax: Yes
I collect tax yes means you're trying to apply tax over the product.
Let's try to understand more deeply!
Here we can see "Tax Type" has two options, One is Exclusive Tax, Inclusive Tax.
Inclusive Tax: Inclusive tax means that the tax amount is included in the displayed
price of the product or service. The customer pays the total amount displayed, which
includes both the base price and the tax. In this case, the tax is not listed separately on
the receipt because it's already included in the total price.
Exclusive Tax: Exclusive tax, on the other hand, means that the tax amount is not
included in the displayed price of the product or service. Instead, the tax is added to the
base price at the time of purchase, and the customer pays the total amount, which includes
both the base price and the separately listed tax amount. The tax is listed on the receipt
to show how much was charged for the product or service and how much was charged for taxes.
Tax Title & Tax Registration No: Tax Title and Tax Registration No will be shown in
invoice for example: Local Tax: 10069
My Tax Is GST: Yes
If you dont enter customer's GST number, system will apply CGST and SGST
But for this you have to add CGST, SGST, IGST and VAT in Tax Fields
In POS, when selecting customer you will get option to set customer's GST Number and system
will match your state code with customer's state code, if these match, system will apply
CGST and IGST, if does not, system will apply CGST and SGST
My Tax Fields: How it works?
All of these input fields will be appeared in each of your Item profile. You can then set
amount application for all of these for that specific item. If an item does not have any of
these's tax, you just put that\'s value 0. Like if you use GST and the item is an alchohol
item you will set value in only VAT field and leave other field blank, then only VAT will be
applicable for that item. If you are using GST, you should put value in all CGST, SGST and
IGST, system will determine where to select SGST or IGST as you have chosen My Tax is GST
above.
And if you are dealing with a single Tax amount, just add one field here. Note that which
names you add here, will be appeared in your invoice.
Click "Add More" button if you need extra Tax or any custome and hit the submit
button to save this.

Tax In Item Profile
You must have seen or will see that there is an option to add the tax to the item profile, In
this lesson, we will describe how works tax in item profiles in detail.

You may remember that we had an option in our tax settings called "I Collect Tax" You can
attach tax to items in the item profile whenever "I collect tax" is set to "Yes". According
to your business setting you will see the taxes field and amount, CGST, IGST, SGST, VAT, and
so on, also you can customize any tax amount from the item profile.
Tax In Sale
How does Tax calculated in selling time on a product?
Earlier we mentioned in the "Tax Item Profile" article how tax applies to a product.
We know that there is an option to pay tax on the product while adding the product, Those
taxes will be effective at the time of sale according to the amount of tax given in the
product profile.
Let's make an example:
Step 1: Let's assume a product's price is 103, and the applied tax is CGST = 1%, SGST =
1 %, IGST = 1% and VAT = 1% respectively
So, Tha tax calculation formula will be ((Total Tax percentage * Product Price) / 100),
According to this formula the amount will be for CGST, SGST, IGST = ((4 * 80) / 100) =
3.20
NB: Note that this formula only applicable for when customer
is Different state, If customer is same sate Tax Calculation formula will be same but tax
will be applied only "CGST, SGST, VAT"

Tax in Invoice
Taxes applied at the time of sale will be shown on the invoice.

Tax Report
To view the Tax Report expand Report Menu from the left sidebar and click Tax Report menu.
select a date to view the report within a specified date if needed. select outlet from the
outlet field to filter report according to outlet.

Add Account
To create a new account expand the Account menu from the left sidebar after that click on the
Add Account menu.

Fillup the required fields and select an "Account Type" from Account Type field, and hit the
submit button.
List Account
To view List Account expand the Account Menu from the left sidebar, after that click on List
Account menu. and you can see the current balance of each account from the account list.

Deposit/Withdraw
To add a new Deposit/Withdraw expand the Account menu from the left sidebar after that click
on the Add Deposit/Withdraw..

Fill up the required field and Select an option from the Deposit and Withdraw field,
"Deposit" option for deposit money, "Withdraw" for withdrawing money, Select the account
from which you are going to Deposit/Withdraw the money.
Add Category
To create a new Item Category expand the Item/Product menu from the left sidebar after that
click on the Add Item Category menu.

Fillup the required fields and hit the submit button.
Add Unit
To create a new unit expand the Item/Product menu from the left sidebar after that click on
the Add Unit menu.

Fillup the required fields and hit the submit button.
Add a General Product
Based on the type of business and the product, 7 types of product types are maintained in
EcorePOS namely General Products, Variation Products, IMEI Products, Serial Products,
Medicine/Expiry Product, Installment Products, Servicing.
Here we will discuss only "General Product"
To create a new general item/product expand the Item/Product menu from the left
sidebar after that click on the Add Item/Product menu.
In this lesson, we will show only how to add General Product.
Select "General Product" type from the Type field and enter an "Alternative Name" for this
product, "Alternative Name" for a product typically refers to an additional name or label
that can be used to identify the product in the system.
To set opening stock for every outlet click on the "Opening Stock" field after
clicking that you will see an outlet list, set opening for individual outlets.
How to add loyalty points to an item? Click here to read the
article.


Single unit and double unit can be applied on the product as per business
requirement.
The unit type is a very crucial part of the product management system, let's
try to understand the unit type system!
In this system, we have 2 types of unit system, 1st "Single Unit" and 2nd
"Double Unit".
What is "Single Unit" or "Double Unit"? How it works?
Single Unit Type
When you select Unit Type "Single Unit" then you should select Unit also from the Unit field.
In our system, it means You purchase this product in a Unit and sale this product in the same
unit.

Double Unit Type
When you select Unit Type "Double Unit" then you see an additional 3 fields, Purchase Unit,
Sale Unit, and Conversion rate respectively.
Select Purchase Unit from the "Purchase Unit" field, Select Sale Unit from the "Sale Unit"
field, and enter conversion rate to convert purchase unit to sale unit.
Lets try to understand double unit type with a example
Let's assume you select "Purchase Unit" as "Box", and "Single Unit" as "PCS" It means you
purchased this product Box and you want to sell "PCS"
For example:if a box contains 12 pens, and you want to convert each pen as a "Single
Unit" then you should convertion rate "12" 12/12=1, Now Single pen you can sale as "Single
Unit"
if you convert a Box Pen into 6 "Pare" that means 2 pen = 1 pare then you should enter
convertion rate 6,
A box pen = 12, convertion rate 6, 12/6=2, now you can sale 1 pare = 2 pen as a Sinle Unit.
NB: As you purchased a box of pens, you enter the purchase
price of the entire box of pens in the Purchase Price field, not just the purchase price of
one pen.

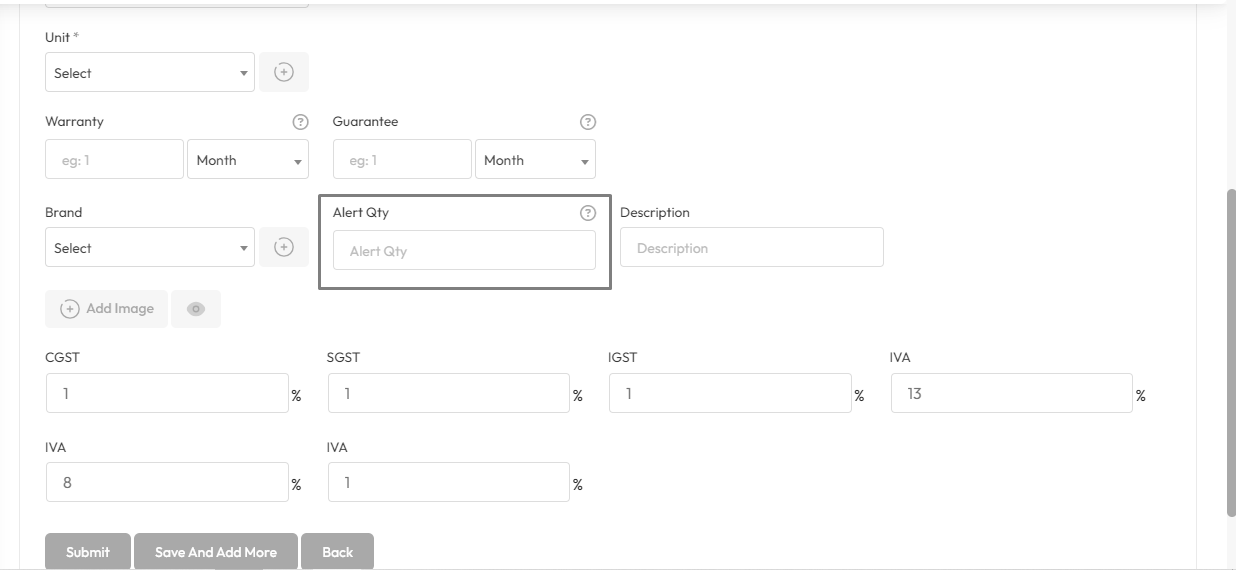
If you have a Warranty Or Gurantee of a product then you should enter amount Warranty and
Warranty Type like Day,Month or Year. If you select Warranty 6 month that means 6 months
will be counted from when the product is sold. This will work for the rest and the
guarantee.

Warranty Gurantee Show in invoice.

Alert Quantity: It refers to the minimum quantity of a product or item that triggers an alert
or informs the relevant personnel that the stock level has reached a predefined threshold

Click here to read about the Tax Setting article.

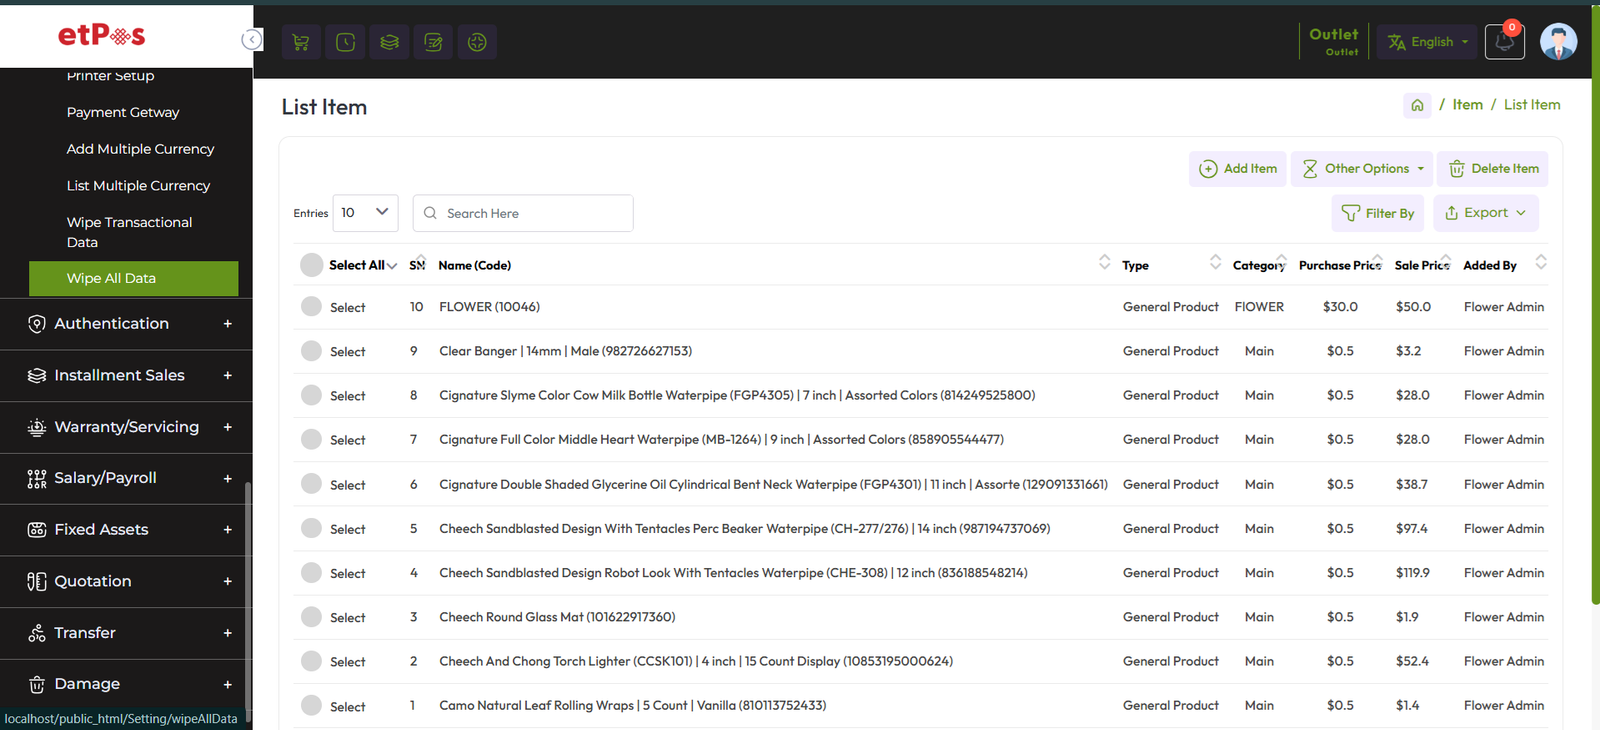
List Item
To view List Item expand the Item/Product Menu from the left sidebar, after that click on
List Item menu.

You can filter items by Category And Supplier from List Items, You can also print barcodes,
print barcode labels, and view Item details also.

Item Bulk Upload
To Item Bulk Upload for general product expand Item/Product from the left sidebar, Click on
the List Item menu, and Click on the "Other Option" button after that click on Upload Item.

Download A Sample Excel file by clicking the "Download Sample" Button, Read the Excel file
guidelines carefully.


If you check "Remove all previous data, before uploading new data." in uploading time All
items will be deleted.
Item Image Bulk Upload
To Item Image Bulk Upload for general product expand Item/Product from the left sidebar,
Click on the List Item menu, and click on the "Other Option" button after that click on
"Item Image Bulk Upload".

You will see a field "Image File Name" in the V column in the Item_Upload.xlsx excel file.
Here you will see the names of the images of the item

Click on the upload field.

Rename the images that you want to upload as the name given in Excel, each image must be
according to that name.

You can select/upload multiple images, after selecting that hist the submit button to save
this images
Delete Bulk Item
To Item Bulk Delete for general product expand Item/Product from the left sidebar, Click on
the List Item menu.

Select the products you want to delete. Click "Select All" to delete all, after that click
the Delete Items button to delete selected items.
Product Profit Report
A Product Profit Report is a document that provides a summary of the financial performance of
individual products or product lines within a business.
To view the Product Profit Report expand the Report Menu from the left sidebar and click on
Product Profit Report. select a date to view the report within a specified date if needed.
select an item from the item field, select your costing method.
Whit is AVG Costing of Last 3 Purchase ?
If the item is purchased before then the system will calculate the average of the last 3
purchases and that will be the Unit Price but if there are only 2 purchases there, the
system will calculate the average of that two, or if there is only one purchase, the system
will consider that purchase price as Unit Price.
Loat Purchase Price ?
In retail business the current market price is usually considered as the product price and
the costing should price should be depended on that. So retailers usually considers Last
Purchase Price as the product cost. To choose this option please make sure all products has
at least one purchase or it has purchase price set when it was added.

Item Movement Report
To view the Item Movement Report expand the Report Menu from the left sidebar and click on
Item Movement Report. select a date to view the report within a specified date if needed.
select an item from the item field

An item movement report is a report through which all history or transactional statements of
a product can be seen.
Example: Such as when the item was Purchased, Sale, Purchase Return, Sale Return, Damage,
Transfer etc.
Add a Variation Product
Based on the type of business and the product, 7 types of product types are maintained in
EcorePOS namely General Products, Variation Products, IMEI Products, Serial Products,
Medicine/Expiry Product, Installment Products, Servicing.
Here we will discuss only "Variation Product"
Variation Product Best applicable for Fashion & Dressing.
To create a new variation item/product expand the Item/Product menu from the
left sidebar after that click on the Add Item/Product menu.
In this lesson, we will show only how to add Variation Product.
Select "Variation Product" type from the Type field and enter an "Alternative Name" for this
product, "Alternative Name" for a product typically refers to an additional name or label
that can be used to identify the product in the system.

How to add loyalty points to an item? Click here to read the
article.

Single unit and double unit can be applied on the product as per business
requirement.
The unit type is a very crucial part of the product management system, let's
try to understand the unit type system!
In this system, we have 2 types of unit system, 1st "Single Unit" and 2nd
"Double Unit".
What is "Single Unit" or "Double Unit"? How it works?
Single Unit Type
When you select Unit Type "Single Unit" then you should select Unit also from the Unit field.
In our system, it means You purchase this product in a Unit and sale this product in the same
unit.
Double Unit Type
When you select Unit Type "Double Unit" then you see an additional 3 fields, Purchase Unit,
Sale Unit, and Conversion rate respectively.
Select Purchase Unit from the "Purchase Unit" field, Select Sale Unit from the "Sale Unit"
field, and enter conversion rate to convert purchase unit to sale unit.
Lets try to understand double unit type with a example
Let's assume you select "Purchase Unit" as "Box", and "Single Unit" as "PCS" It means you
purchased this product Box and you want to sell "PCS"
For example: if a box contains 12 Shirt, and you want to convert each Shirt as a
"Single Unit" then you should convertion rate "12" 12/12=1, Now Single Shirt you can sale as
"Single Unit"
if you convert a Box Shirt into 6 "Pare" that means 2 Shirt = 1 pare then you should enter
convertion rate 6,
A box Shirt = 12, convertion rate 6, 12/6=2, now you can sale 1 pare = 2 Shirt as a Sinle
Unit.
NB: As you purchased a box of Shirt, you enter the purchase
price of the entire box of Shirt in the Purchase Price field, not just the purchase price of
one Shirt.
If you have a Warranty Or Gurantee of a product then you should enter amount Warranty and
Warranty Type like Day,Month or Year. If you select Warranty 6 month that means 6 months
will be counted from when the product is sold. This will work for the rest and the
guarantee.
Warranty Gurantee Show in invoice.
You will see an interface similar to the snapshot below for the Variation product.
Here you will see two fields, one is the variation attribute, and another is attribute value.
Example of Variation Attribute is: color like White,Green,Blue etc.
Example of Variation Value is: size like S,M,L,XL,XXL etc.

Select an attribute from Variation Attributes.
Select a value from Variation Value, you can select multiple values simultaneously.
Click the generate button to generate this combination.

After generating the variation attribute and variation values combination you will see the
interface below.

Fill up the required fields for the variation item.

Click on the delete icon above the variation combination you want to delete.

Outlet-wise stock needs to be set separately for each variation item.
Click on the Outlet field to set the stock.

After clicking on the outlet field you will see a modal like below.
Enter the quantity in the quantity field under the outlet to set the stock per outlet.
Submit after giving the quantity.

Click image icon to provide image for variation item.

Alert Quantity: It refers to the minimum quantity of a product or item that triggers an alert
or informs the relevant personnel that the stock level has reached a predefined threshold

Click the Back to Attributes button to generate the variation again.

Click the Add Variation Attribute button to create a new variation.

After clicking the Add Variation Attribute button, you will see an interface like below.

Short summary of variation products.


Click here to read about the Tax Setting article.
List Item
To view variation product List Item expand the Item/Product Menu from the left sidebar, after
that click on List Item menu. after that click on the selected areas button.

Then you will see the modal, where the list of variation products will be there.

You can filter items by Category And Supplier from List Items, You can also print barcodes,
print barcode labels, and view Item details also.
Add a Product
Based on the type of business and the product, 7 types of product types are maintained in
EcorePOS namely General Products, Variation Products, IMEI Products, Serial Products,
Medicine/Expiry Product, Installment Products, Servicing.
Here we will discuss only "IMEI Product"
IMEI Product Best applicable for mobile phone devices, or similar products that
contain IMEI Number.
To create a new IMEI item/product expand the Item/Product menu from the left
sidebar after that click on the Add Item/Product menu.
In this lesson, we will show only how to add IMEI Product.
Select "IMEI Product" type from the Type field and enter an "Alternative Name" for this
product, "Alternative Name" for a product typically refers to an additional name or label
that can be used to identify the product in the system.

To set opening stock for every outlet click on the "Opening Stock" field after
clicking that you will see an outlet list
How to add loyalty points to an item? Click here to read the
article.
Enter the quantity in the quantity field under the outlet for which you want to set the
opening IMEI Number.

If you want, you can click on the plus button to increase one field at a time, where IMEI
Number can be provided.
Click the Delete button to delete the IMEI Number.

Select the unit from the unit field as per your need.
NB: IMEI products only work with single units.

If you have a Warranty Or Gurantee of a product then you should enter amount Warranty and
Warranty Type like Day,Month or Year. If you select Warranty 6 month that means 6 months
will be counted from when the product is sold. This will work for the rest and the
guarantee.
Warranty Gurantee Show in invoice.
Alert Quantity: It refers to the minimum quantity of a product or item that triggers an alert
or informs the relevant personnel that the stock level has reached a predefined threshold
Click here to read about the Tax in Item Profile article.
Add a Product
Based on the type of business and the product, 7 types of product types are maintained in
EcorePOS namely General Products, Variation Products, IMEI Products, Serial Products,
Medicine/Expiry Product, Installment Products, Servicing.
Here we will discuss only "Serial Product"
IMEI Product Best matches for computer or electronics devices, or similar
products that contain Serial Number.
To create a new serial item/product expand the Item/Product menu from the left
sidebar after that click on the Add Item/Product menu.
In this lesson, we will show only how to add Serial Product.
Select "Serial Product" a type from the Type field and enter an "Alternative Name" for this
product, "Alternative Name" for a product typically refers to an additional name or label
that can be used to identify the product in the system.

To set opening stock for every outlet click on the "Opening Stock" field after
clicking that you will see an outlet list
How to add loyalty points to an item? Click here to read the
article.
Enter the quantity in the quantity field under the outlet for which you want to set the
opening Serial Number.

If you want, you can click on the plus button to increase one field at a time, where Serial
Number can be provided.
Click the Delete button to delete the Serial Number.

NB: Serial products only work with single units.
Select the unit from the unit field as per your need.
If you have a Warranty Or Gurantee of a product then you should enter amount Warranty and
Warranty Type like Day,Month or Year. If you select Warranty 6 month that means 6 months
will be counted from when the product is sold. This will work for the rest and the
guarantee.
Warranty Gurantee Show in invoice.
Alert Quantity: It refers to the minimum quantity of a product or item that triggers an alert
or informs the relevant personnel that the stock level has reached a predefined threshold
Click here to read about the Tax in Item Profile article.
Add a Product
Based on the type of business and the product, 7 types of product types are maintained in
EcorePOS namely General Products, Variation Products, IMEI Products, Serial Products,
Medicine/Expiry Product, Installment Products, Servicing.
To create a new medicine/expiry item/product expand the Item/Product menu from
the left sidebar after that click on the Add Item/Product menu.
Here we will discuss only "Medicine/Expiry Product"
Medicine/Expiry Product Best matches for medicine, or similar products that
contain Expiry Date.
In this lesson, we will show only how to add medicine/expiry Product.
Select a type from the Type field and enter an "Alternative Name" for this product,
"Alternative Name" for a product typically refers to an additional name or label that can be
used to identify the product in the system.
Rack: Medicines are often stored in "Rack" by brand name in pharmacy systems, So
select the "Rack" you want to store the medicine in.
Generic name: A generic name refers to the official, non-proprietary name of a
product, especially a pharmaceutical drug, that is not subject to trademark. It is the
standardized name assigned to a medication or substance, typically reflecting its chemical
composition, and is used universally irrespective of the brand name or manufacturer. For
example, "Paracetamol" is the generic name for a drug commonly known by the brand name
"Napa." Generic names ensure consistency and clarity in identifying medications across
different regions and manufacturers.
Enter the generic name in the Generic Name field.

To set opening stock for every outlet click on the "Opening Stock" field after
clicking that you will see an outlet list.
How to add loyalty points to an item? Click here to read the
article.
Click on the plus button to increase one field, where Quantity & Expiry date
can be provided.

After clicking on the plus button you will see an interface like the below snapshot.

Here enter the quantity in the quantity field. Then select an expiry date from Expiry Date.

After entering the quantity and expiry date, the interface will look like the snapshot below.


Single unit and double unit can be applied on the product as per business
requirement.
The unit type is a very crucial part of the product management system, let's try to
understand the unit type system!
In this system, we have 2 types of unit system, 1st "Single Unit" and 2nd "Double Unit".
What is "Single Unit" or "Double Unit"? How it works?
Single Unit Type
When you select Unit Type "Single Unit" then you should select Unit also from the Unit field.
In our system, it means You purchase this product in a Unit and sale this product in the same
unit.
Double Unit Type
When you select Unit Type "Double Unit" then you see an additional 3 fields, Purchase Unit,
Sale Unit, and Conversion rate respectively.
Select Purchase Unit from the "Purchase Unit" field, Select Sale Unit from the "Sale Unit"
field, and enter conversion rate to convert purchase unit to sale unit.
Lets try to understand double unit type with a example
Let's assume you select "Purchase Unit" as "Box", and "Single Unit" as "PCC" It means you
purchased this product Box and you want to sell "PCS"
For example:if a box contains 12 pens, and you want to convert each pen as a "Single
Unit" then you should convertion rate "12" 12/12=1, Now Single pen you can sale as "Single
Unit"
if you convert a Box Pen into 6 "Pare" that means 2 pen = 1 pare then you should enter
convertion rate 6,
A box pen = 12, convertion rate 6, 12/6=2, now you can sale 1 pare = 2 pen as a Sinle Unit.
NB: As you purchased a box of pens, you enter the purchase
price of the entire box of pens in the Purchase Price field, not just the purchase price of
one pen.
If you have a Warranty Or Gurantee of a product then you should enter amount Warranty and
Warranty Type like Day,Month or Year. If you select Warranty 6 month that means 6 months
will be counted from when the product is sold. This will work for the rest and the
guarantee.
Warranty Gurantee Show in invoice.
Alert Quantity: It refers to the minimum quantity of a product or item that triggers an alert
or informs the relevant personnel that the stock level has reached a predefined threshold
Click here to read about the Tax in Item Profile article.
Add a Product
Based on the type of business and the product, 7 types of product types are maintained in
EcorePOS namely General Products, Variation Products, IMEI Products, Serial Products,
Medicine/Expiry Product, Installment Products, Servicing.
Here we will discuss only "Medicine/Expiry Product"
Installment Product Best matches for TV,AC,Freez, or products that can be sold in
installments.
To create a new installment item/product expand the Item/Product menu from the left sidebar
after that click on the Add Item/Product menu.
In this lesson, we will show only how to add Installment Product.
Select a type from the Type field and enter an "Alternative Name" for this product,
"Alternative Name" for a product typically refers to an additional name or label that can be
used to identify the product in the system.

To set opening stock for every outlet click on the "Opening Stock" field after
clicking that you will see an outlet list, set opening for individual outlets.
How to add loyalty points to an item? Click here to read the
article.
NB: Serial products only work with single units.
Select the unit from the unit field as per your need.
If you have a Warranty Or Gurantee of a product then you should enter amount Warranty and
Warranty Type like Day,Month or Year. If you select Warranty 6 month that means 6 months
will be counted from when the product is sold. This will work for the rest and the
guarantee.
Warranty Gurantee Show in invoice.
Alert Quantity: It refers to the minimum quantity of a product or item that triggers an alert
or informs the relevant personnel that the stock level has reached a predefined threshold
Add a Product
Based on the type of business and the product, 7 types of product types are maintained in
EcorePOS namely General Products, Variation Products, IMEI Products, Serial Products,
Medicine/Expiry Product, Installment Products, Servicing.
Here we will discuss only "Service Product"
Service Product Best matches for servicing or service like: Mobile Servicing, Freeze
Servicing, AC Servicing, Cleaning Servicing, Car Servicing etc.
To create a new service item/product expand the Item/Product menu from the left sidebar after
that click on the Add Item/Product menu.
In this lesson, we will show only how to add Service Product.
Select a type from the Type field and enter an "Alternative Name" for this product,
"Alternative Name" for a product typically refers to an additional name or label that can be
used to identify the product in the system.

How to add loyalty points to an item? Click here to read the
article.
Click here to read about the Tax in Item Profile article.

Stock
To view general product Stock click Stock menu from the left sidebar. Here you can see the
current stock quantity of the general products. Here "Coca Cola" is a general type product
stock.

You also filter by product code, category, brand, item, supplier also from the stock.

How Double Unit Works
Let's make it simplify.
For example: If a "Box" of pens is purchased and sold per "Piece", then the "Box" is
the purchase unit and the "Piece" is the sale unit, and this system is called a double unit
system.

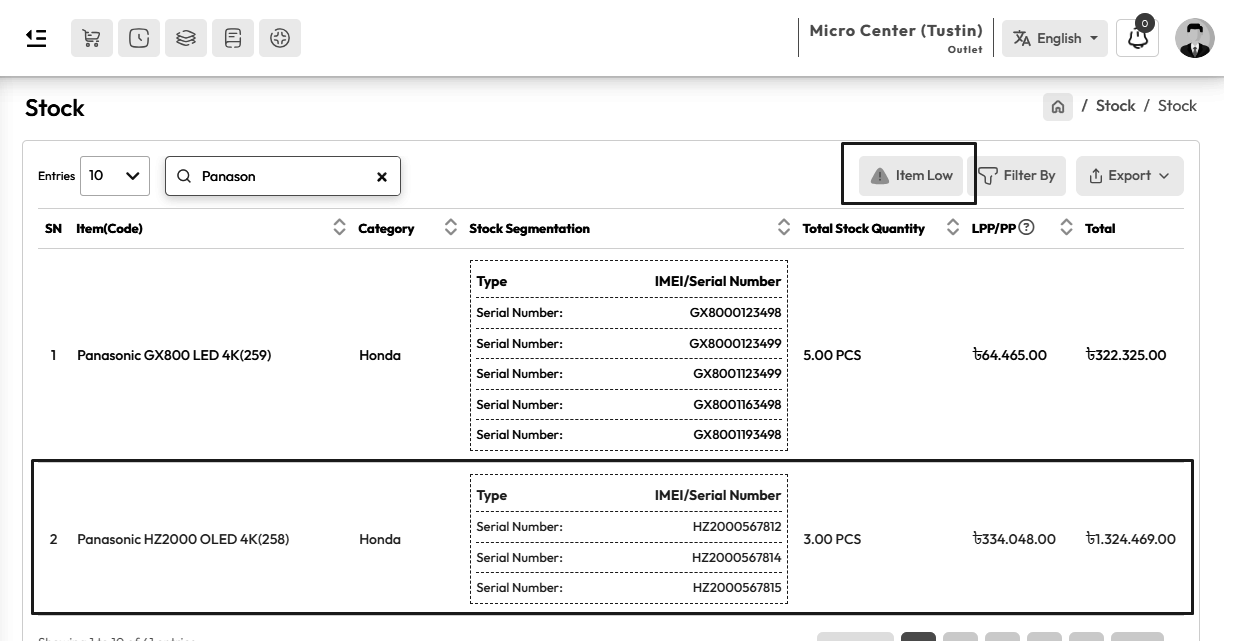
Low Stock
Click on stock menu from left sidebar to view low-stock of general type products, after that
Click "Item Low" button to view low stock items. Products marked in red have gone below the
alert quantity.

Redmarked item in stock will show as low stock.

You also filter by product code, category, brand, item, supplier also from the Low Stock.

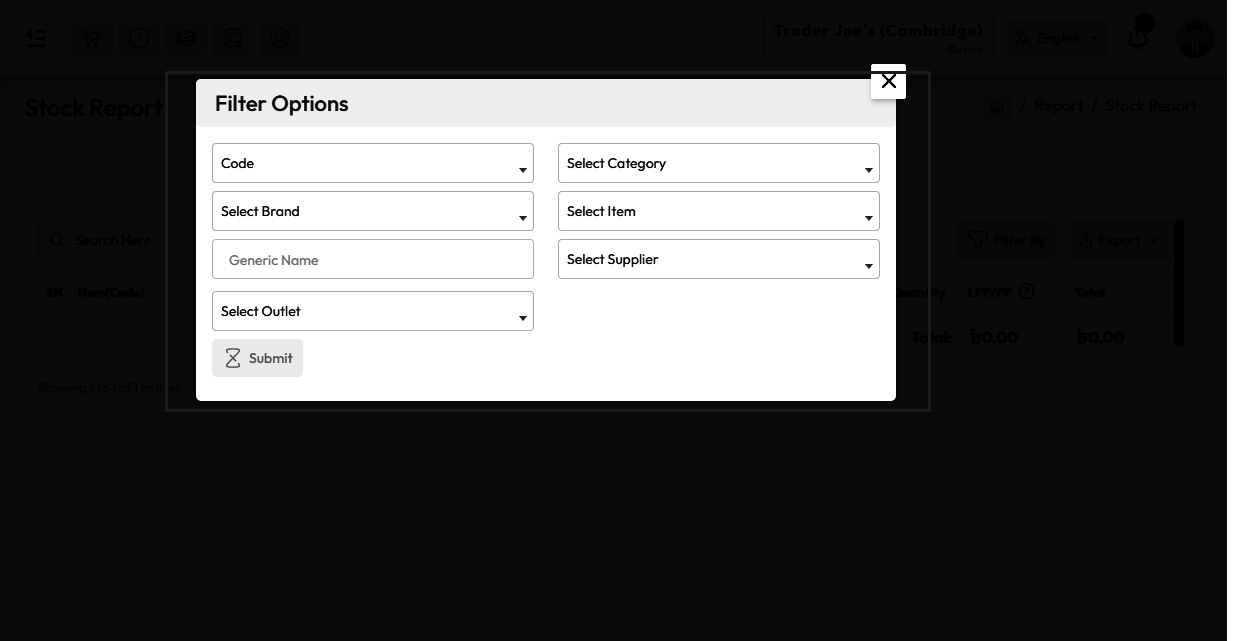
Stock Report
To view the "Stock Report" expand the "Report" menu from the left sidebar and click on the
"Stock Report" menu.
You can also filter by product code, category, brand, item,
supplier and outlet also from the Stock Report.
Low Stock Report
To view the "Low Stock Report" expand the "Report" menu from the left sidebar and click on
the "Low Stock Report" menu.
You can also filter by product code, category, brand,
item, supplier and outlet also from the Stock Report.

Stock
To view variation product Stock click Stock menu from the left sidebar. Here you can see the
current stock quantity of the variation products. Here "T-Shirt" is a variation type product
stock.

You also filter by product code, category, brand, item, supplier also from the stock.
How Double Unit Works
Let's make it simplify.
For example: Suppose you bought 1 bundle of T-Shirt where 1 bundle = 10 pieces, the
purchase unit of which was bundle and the unit of sale was piece. This means buying a bundle
of T-Shirt and selling them as individual pieces. and this system is called a double unit
system.

Low Stock
Click on stock menu from left sidebar to view low-stock of variation type products, after
that Click "Item Low" button to view low stock items. Products marked in red have gone below
the alert quantity.

Redmarked item in stock will show as low stock.

You also filter by product code, category, brand, item, supplier also from the Low Stock.
Stock Report
To view the "Stock Report" expand the "Report" menu from the left sidebar and click on the
"Stock Report" menu.
You can also filter by product code, category, brand, item, supplier and outlet also from
the Stock Report.
Low Stock Report
To view the "Low Stock Report" expand the "Report" menu from the left sidebar and click on
the "Low Stock Report" menu.
You can also filter by product code, category, brand, item, supplier and outlet also from
the Stock Report.
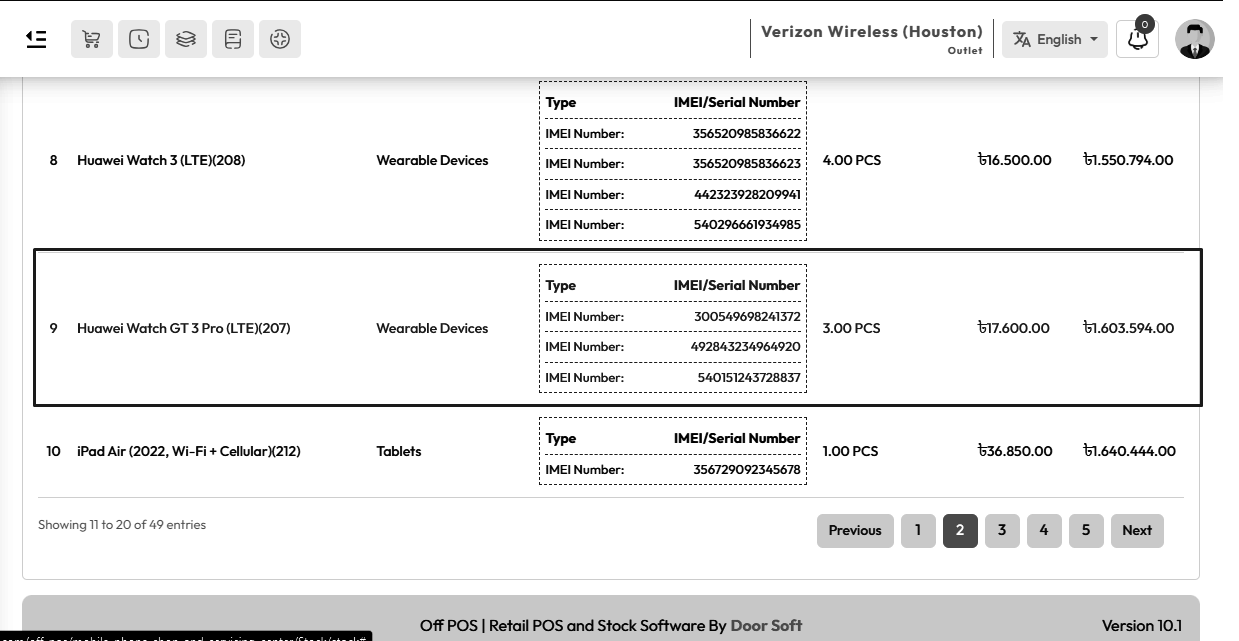
Stock
To view IMEI product Stock click Stock menu from the left sidebar. Here you can see the
current stock quantity of the IMEI products. Here "POCO-M2" is a IMEI type product stock.

You also filter by product code, category, brand, item, supplier also from the stock.
Low Stock
Click on stock menu from left sidebar to view low-stock of IMEI type products, after that
Click "Item Low" button to view low stock items. Products marked in red have gone below the
alert quantity.
Redmarked item in stock will show as low stock.

You also filter by product code, category, brand, item, supplier also from the Low Stock.
Stock Report
To view the "Stock Report" expand the "Report" menu from the left sidebar and click on the
"Stock Report" menu.
You can also filter by product code, category, brand, item, supplier and outlet also from
the Stock Report.
Low Stock Report
To view the "Low Stock Report" expand the "Report" menu from the left sidebar and click on
the "Low Stock Report" menu.
You can also filter by product code, category, brand, item, supplier and outlet also from
the Stock Report.
Stock
To view serial product Stock click Stock menu from the left sidebar. Here you can see the
current stock quantity of the serial products. Here "Blander Machine" is a serial type
product stock.
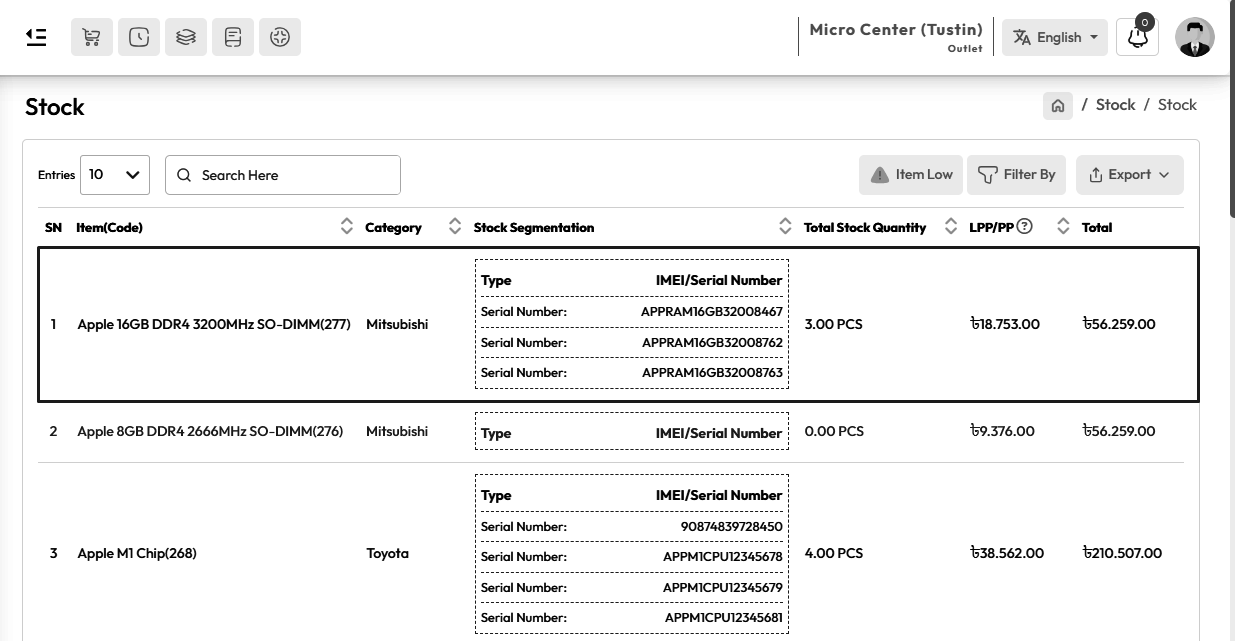
You also filter by product code, category, brand, item, supplier also from the stock.
Low Stock
Click on stock menu from left sidebar to view low-stock of serial type products, after that
Click "Item Low" button to view low stock items. Products marked in red have gone below the
alert quantity.
Redmarked item in stock will show as low stock.

You also filter by product code, category, brand, item, supplier also from the Low Stock.
Stock Report
To view the "Stock Report" expand the "Report" menu from the left sidebar and click on the
"Stock Report" menu.
You can also filter by product code, category, brand, item, supplier and outlet also from
the Stock Report.
Low Stock Report
To view the "Low Stock Report" expand the "Report" menu from the left sidebar and click on
the "Low Stock Report" menu.
You can also filter by product code, category, brand, item, supplier and outlet also from
the Stock Report.
Stock
To view medicine product Stock click Stock menu from the left sidebar. Here you can see the
current stock quantity of the medicine products. Here "A-Flox" is a medicine type product
stock.

You also filter by product code, category, brand, item, generic name, supplier also from the
stock.
How Double Unit Works
Let's make it simplify.
For example: Suppose you bought 5 box of "Napa Tablet" where 1 box = 510 PCS, the
purchase unit of which was box and the unit of sale was PCS. This means buying a box of Napa
and selling them as individual PCS, and this system is called a double unit system.

Low Stock
Click on stock menu from left sidebar to view low-stock of medicine type products, after that
Click "Item Low" button to view low stock items. Products marked in red have gone below the
alert quantity.

Redmarked item in stock will show as low stock.

You also filter by product code,category, brand, item, generic name, supplier also from the
Low Stock.
Stock Report
To view the "Stock Report" expand the "Report" menu from the left sidebar and click on the
"Stock Report" menu.
You can also filter by product code, category, brand, item, supplier and outlet also from
the Stock Report.
Low Stock Report
To view the "Low Stock Report" expand the "Report" menu from the left sidebar and click on
the "Low Stock Report" menu.
You can also filter by product code, category, brand, item, supplier and outlet also from
the Stock Report.
Stock
To view Installment product Stock click Stock menu from the left sidebar. Here you can see
the current stock quantity of the Installment products. Here "Walton Freez" is a Installment
type product stock.

You also filter by product code, category, brand, item, supplier also from the stock.
Low Stock
Click on stock menu from left sidebar to view low-stock of general type products, after that
Click "Item Low" button to view low stock items. Products marked in red have gone below the
alert quantity.

Redmarked item in stock will show as low stock.

You also filter by product code, category, brand, item, supplier also from the Low Stock.
Stock Report
To view the installment product Stock Report expand the Report Menu from the left sidebar
and click on Stock Report. You can also filter by product code,category, brand, item,
generic name, supplier and outlet also from the Stock Report.
Low Stock Report
To view the installment product Low Stock Report expand the Report Menu from the left sidebar
and click on Low Stock Report. You can also filter by product code,category, brand, item,
generic name, supplier and outlet also from the Stock Report.
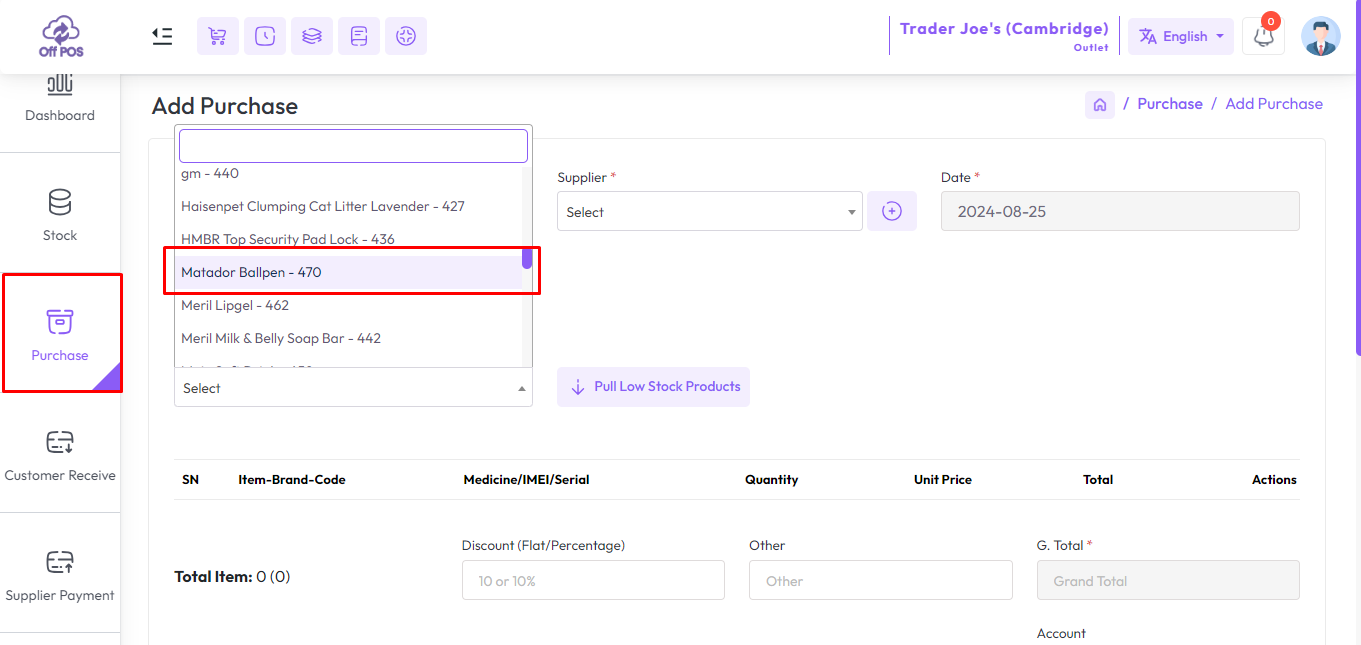
Add Purchase
To purchase "General Products" click on the "Purchase" menu from the left sidebar and then
click on the "Add Purchase" menu.

Expand the "Items" field and select a "General Type Product" In my case "Matador Ballpen" is
a General Type Product.
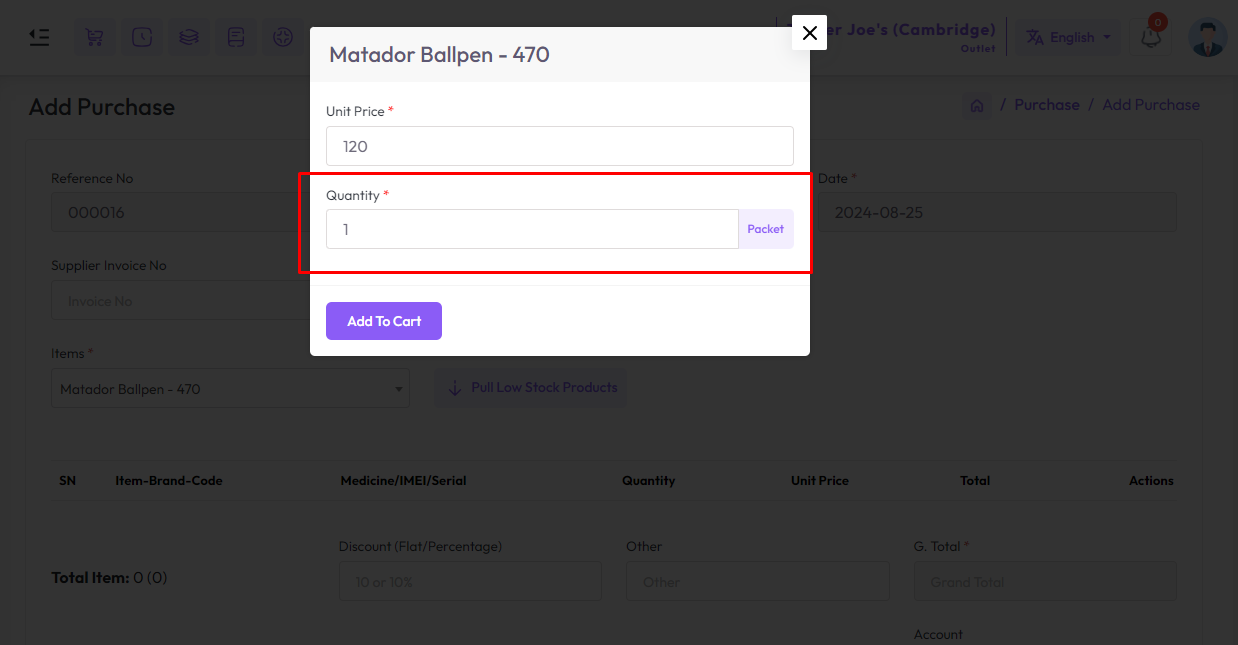
After selecting the "General Type" product you will see a popup modal, Enter the Quantity in
the Quantity field and enter the purchase price in the Unit Price field.
Suppose you want to buy a product whose price per unit is 120
amount, So if you purchase 10 quantity then just put 120 amount in unit field not 1200
amount.
NB: You just put the single unit price of the product.
After adding the products to the cart, the cart will look like the snapshot below.

To pay your purchase select an account option, after selecting you will get a field to enter
your payment, also you can attach an Image or PDF in purchasing time.

Fill up the required field, After that hit the "Submit" button to save this purchase.
List Purchase
To view a list of purchases expand the "Purchase" menu from the left sidebar, and click on
the "List Purchase" menu.
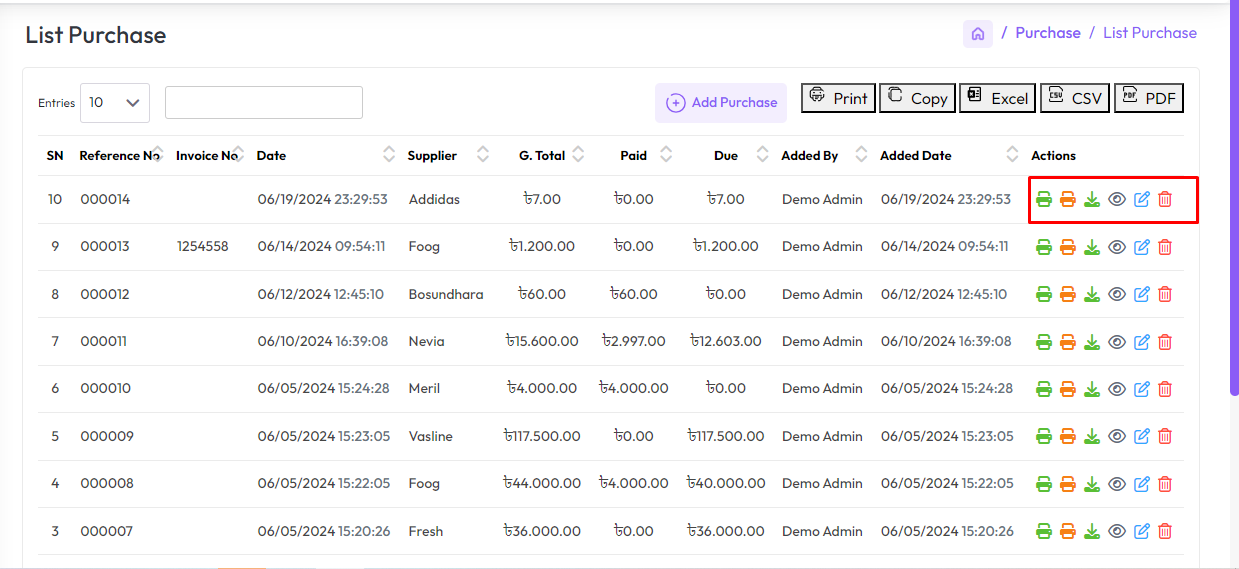
Click on the "Print Invoice" and "Download Invoice" buttons from Actions to print and
download the "Purchase Invoice".
Also, you can print a barcode of an item by clicking the "Print Barcode" button.
If there is an attachment attached to the invoice, you can download the attachment by
clicking on the "Download Attachment" button.
Pull Low Stock Items
What is pull low stock items? How it works?
As you may remember, there is a field on the Add Item form called "Alert Qty" Alert quantity
means if the product's current stock is equal to or less than the alert quantity, it will be
red-marked in the stock.
Whenever the pull low stock product is clicked during the purchase, products equal to or
lower than that alert quantity will be added to the cart for purchase.
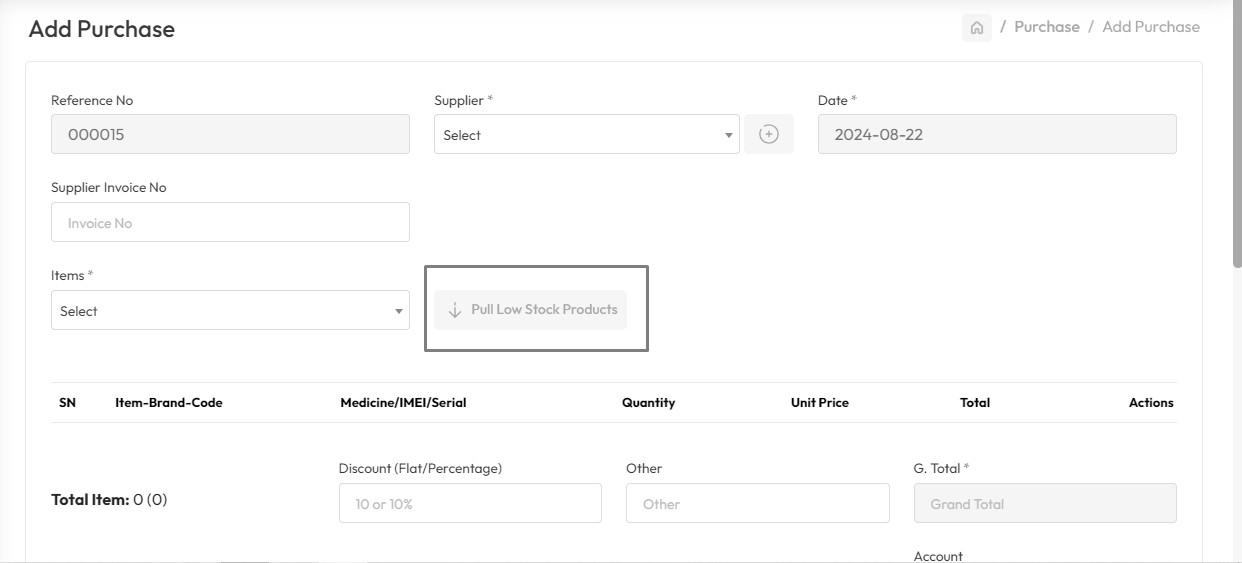
When you click on pull low stock product with supplier selected then all products under that
supplier will be added to the cart.

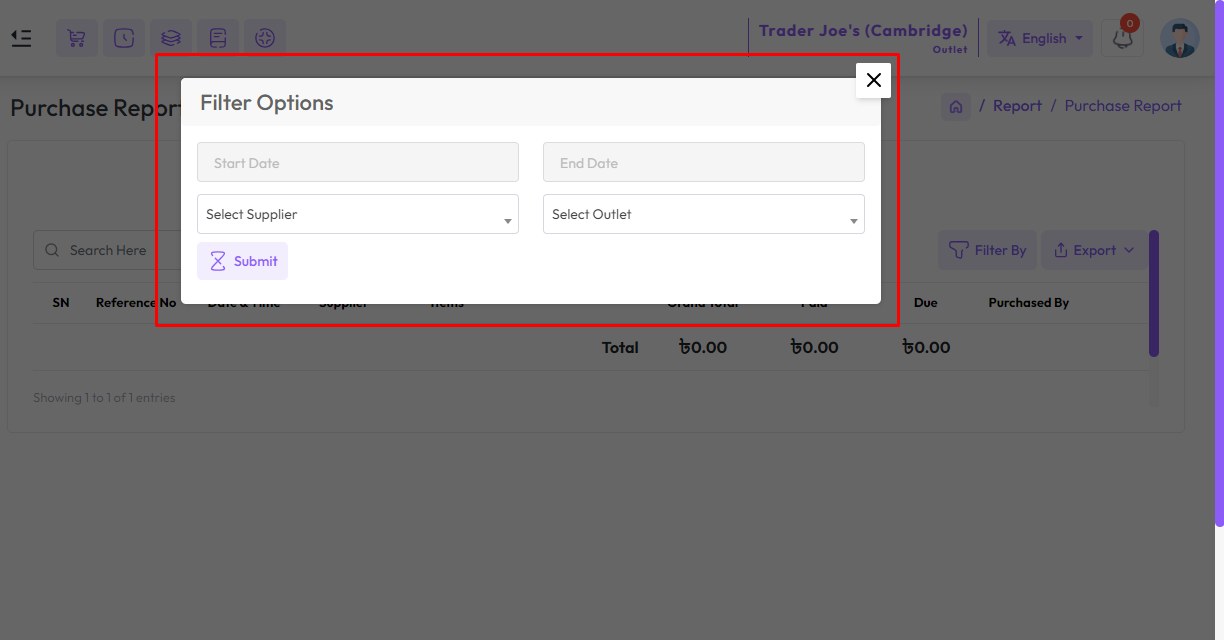
Purchase Report
To view the "Purchase Report" expand the "Report" menu from the left sidebar and click on the
"Purchase Report" menu.
Select a supplier, also you can select outlet from the outlet field to filter report
according to outlet.
Product Purchase Report
To view the "Product Purchase Report" expand the "Report" menu from the left sidebar and
click on the "Product Purchase Report" menu.
Select a date to view the report within a specified date if needed. select a supplier,
product, also you can select outlet from the outlet field to filter report according to
outlet.

Add Purchase
To purchase "Variation Products" click on the "Purchase" menu from the left sidebar and then
click on the "Add Purchase" menu.
Expand the "Items" field and select a "Variation Type Product" In my case "EASY KARCHUPI
PANJABI" is a Variation Type Product.

After selecting the "Variation Type" product you will see a popup modal, Enter the Quantity
in the Quantity field and enter the purchase price in the Unit Price field.
Suppose you want to buy a bundle of "EASY KARCHUPI PANJABI" whose
price per bundle is 2000 amount, if you purchase 10 bundles quantity then just put 2000
amount in the unit field not 20000 amount.
NB: You just put the single unit price of the product.

After adding the products to the cart, the cart will look like the snapshot below.

To pay your purchase select an account option, after selecting you will get a field to enter
your payment, also you can attach an Image or PDF in purchasing time.

Fill up the required field, After that hit the "Submit" button to save this purchase.
Add Purchase
To purchase "IMEI Products" click on the "Purchase" menu from the left sidebar and then click
on the "Add Purchase" menu.
Expand the "Items" field and select a "IMEI Type Product" In my case "Huawei nova 8i(128GB,
Moonlight Silver)" is a IMEI Type Product.

After selecting IMEI product you will get a popup modal, Enter the purchase price in the Unit
Price field.
Suppose you want to buy 2 pieces of IMEI product whose price per
piece is 19351 amount, for 3 pieces of IMEI product just put 19351 amount only in the
unit field not 38702 amount.
NB: You just put the single unit price of the product.
Enter the quantity in the Quantity field for how many IMEIs you want to purchase, below field
will be generated according to quantity number. Enter the IMEI number in the IMEI field.
Then click the Add to Cart button to add these items to the cart.

To increase the new IMEI field click on the plus button.

After adding the products to the cart, the cart will look like the snapshot below.

To pay your purchase select an account option, after selecting you will get a field to enter
your payment, also you can attach an Image or PDF in purchasing time.


Fill up the required field, After that press the "Submit" button from the purchase form.
Add Purchase
To purchase "Serial Products" click on the "Purchase" menu from the left sidebar and then
click on the "Add Purchase" menu.
Expand the "Items" field and select a "Serial Type Product" In my case "Blander Machine" is a
Serial Type Product.

After selecting Serial product you will get a popup modal, Enter the purchase price in the
Unit Price field.
Suppose you want to buy 2 pieces of Serial product whose price per
piece is 50283 amount, for 2 pieces of Serial product just put 50283 amount only in the
unit field not 100566 amount.
NB: You just put the single unit price of the product.
Enter the quantity in the Quantity field for how many Serials you want to purchase, below
field will be generated according to quantity number. Enter the Serial number in the Serial
field. Then click the Add to Cart button to add these items to the cart.

To increase the new Serial field click on the plus button.

After adding the products to the cart, the cart will look like the snapshot below.

To pay your purchase select an account option, after selecting you will get a field to enter
your payment, also you can attach an Image or PDF in purchasing time.


Fill up the required field, After that press the "Submit" button from the purchase form.
Add Purchase
To purchase "Medicine Products" click on the "Purchase" menu from the left sidebar and then
click on the "Add Purchase" menu.
Expand the "Items" field and select a "Medicine Type Product" In my case "Ace Syrup" is a
Medicine Type Product.

After selecting medicine product you will get a popup modal, Enter the purchase price in the
Unit Price field.
Suppose you want to purchase quantities of 10, and 25 with
different expiry dates respectively, Then you enter the unit price of one quantity
only.
NB: You just put the single unit price of the product.
Enter the quantity in the Quantity field from the left for how many medicines you want to
purchase, select an expiry date, the expiry date of which you want to purchase the product.
Then click the Add to Cart button to add these items to the cart.

To increase the new Medicine/expiry date and Quantity field click on the plus button.

After adding the products to the cart, the cart will look like the snapshot below.

To pay your purchase select an account option, after selecting you will get a field to enter
your payment, also you can attach an Image or PDF in purchasing time.


Fill up the required field, After that press the "Submit" button from the purchase form.
Add Purchase
To purchase "Installment Products" click on the "Purchase" menu from the left sidebar and
then click on the "Add Purchase" menu.
Expand the "Items" field and select a "Installment Type Product" In my case "LGT7281NDDLG" is
a Installment Type Product.

After selecting the "Installment Type" product you will see a popup modal, Enter the Quantity
in the Quantity field and enter the purchase price in the Unit Price field.
Suppose you want to buy a product whose price per unit is 120
amount, So if you purchase 10 quantity then just put 120 amount in unit field not 1200
amount.
NB: You just put the single unit price of the product.

After adding the products to the cart, the cart will look like the snapshot below.

To pay your purchase select an account option, after selecting you will get a field to enter
your payment, also you can attach an Image or PDF in purchasing time.


Fill up the required field, After that hit the "Submit" button to save this purchase.
Printer Driver Installation and Configuration
Install the printer driver first. After that go to control panel. After that, you will see an
interface like below, from there click on Devices and Printers Option.

Then right click on your desired printer, And then click on Printer Preferences.

After that set the printer type and width height size etc.


Print Barcode for Multiple Item
To Print Barcode for Multiple Items Expand Item/Product from the left sidebar, Click on the
List Item menu, and click on the "Other Option" button after that click on Print Barcode.

After clicking "Print Barcode" you will see a List of Items, the same as the below snapshot.
Select the items whose barcode you want to print and increase the barcode print quantity.
after items are selected and increasing the barcode quantity hit the submit button to print
the item barcode.

After clicking the "Submit" button from the "Print Barcode" page you will see a List of
barcodes, the same as the below snapshot. to print this barcode click on the print button.

Print Label for Multiple Item
To Print Label for Multiple Items Expand Item/Product from the left sidebar, Click on the
List Item menu, and Click on the "Other Option" button after that click on Print Label.

After clicking "Print Label" you will see a List of Items, the same as the below snapshot.
Select the items whose barcode you want to print and increase the barcode print quantity.
after items are selected and increasing the barcode quantity hit the submit button to print
the item barcode.

After clicking the "Submit" button from the "Print Label" page you will see a List of
barcodes, the same as the below snapshot. to print this barcode click on the print button.
NB:Each image will be printed on separate page.

Print Multiple Quantity of Barcode of an Item
To Print Multiple Quantity of Barcode of an Item Expand Item/Product from the left sidebar,
Click on the List Item menu, and Click on "Print Barcode" from the action column.

After Clicking on "Print Barcode" you will see a popup modal, enter the barcode number of the
print quantity in the How Many fields, and after that hit the Generate button.

After Generating the barcode you will see a list of barcodes like the below snapshot.

You can also print the barcode by clicking the print button.
Print Multiple Quantity of Label of an Item
To Print Multiple Quantity of Barcode of an Item Expand Item/Product from the left sidebar,
Click on the List Item menu, and Click on "Print Label" from the action column.

After Clicking on "Print Label" you will see a popup modal, enter the barcode number of the
print label quantity in the How Many fields, and after that hit the Generate button.

After Generating the barcode you will see a list of barcodes label like the below snapshot.

You can also print the barcode by clicking the print button.
NB:Each image will be printed on separate page
Print barcode of a purchase
To Print Barcode of a Purchase Expand Purchase menu from the left sidebar, Click on the List
Purchase menu, and Click on "Print Barcode" from the action column.

After clicking on the "Print Barcode" button barcode will be generated for this purchase.
NB:It should be noted that different barcodes will be printed for
all the products under that purchase. Example shown below snapshot.

Click on the Print button to print barcodes.
Supports for Printer and Printing Facility
- 56mm and 80mm Thermal Printer Support: System is able to print in 56mm and 80mm thermal
printers.
- Network Printer Support with Print Server: System is to print in network printer
directly using print server.
- A4 Printer and A5 Printer supported: System is able to print in a4 print and a5 print.
- Letterhead Print supported: System is able to print Letterhead Print.
- Network Printer Support with Print Server: System is to print in network printer
directly using print server.
Our print server supported printers are:
- 3nStar RPT-008
- Approx APPPOS80AM
- AURES ODP-333
- AURES ODP-500
- Bematech-4200-TH
- Bematech LR2000E
- Birch PRP-085III
- Bixolon SRP-350III
- Bixolon SRP-350Plus
- Black Copper BC-85AC
- CHD TH-305N
- Citizen CBM1000-II
- Citizen CT-S310II
- Dapper-Geyi Q583P
- Daruma DR800
- DR-MP200 (manufacturer unknown)
- EPOS TEP 220M
- Elgin i9
- Epson EU-T332C
- Epson FX-890 (requires feedForm() to release paper).
- Epson TM-T20
- Epson TM-T20II
- Epson TM-T70
- Epson TM-T70II
- Epson TM-T81
- Epson TM-T82II
- Epson TM-T88II
- Epson TM-T88III
- Epson TM-T88IV
- Epson TM-T88V
- Epson TM-U220
- Epson TM-U295 (requires release() to release slip).
- Epson TM-U590 and TM-U590P
- Equal (EQ-IT-001) POS-58
- Everycom EC-58
- Excelvan HOP-E200
- Excelvan HOP-E58
- Excelvan HOP-E801
- Gainscha GP-2120TF
- Gainscha GP-5890x (Also marketed as EC Line 5890x)
- Gainscha GP-U80300I (Also marketed as gprinter GP-U80300I)
- gprinter GP-U80160I
- HOIN HOP-H58
- Ithaca iTherm 28
- Hasar HTP 250
- Metapace T-1
- Metapace T-25
- Nexa PX700
- Nyear NP100
- OKI RT322
- OKI 80 Plus III
- Orient BTP-R580
- P-822D
- P85A-401 (make unknown)
- Partner Tech RP320
- POSLIGNE ODP200H-III-G
- QPOS Q58M
- Rongta RP326US
- Rongta RP58-U
- Rongta RP80USE
- SAM4S GIANT-100DB
- Senor TP-100
- Sewoo SLK-TS400
- SEYPOS PRP-96
- SEYPOS PRP-300 (Also marketed as TYSSO PRP-300)
- SNBC BTP-R880NPIII
- Solux SX-TP-88300
- Sicar POS-80
- Silicon SP-201 / RP80USE
- SPRT SP-POS88V
- Star BSC10
- Star TSP100 ECO
- Star TSP100III FuturePRNT
- Star TSP-650
- Star TUP-592
- TVS RP45 Shoppe
- Venus V248T
- Xeumior SM-8330
- Xprinter F-900
- Xprinter XP-365B
- Xprinter XP-58 Series
- Xprinter XP-80C
- Xprinter XP-90
- XPrinter XP-Q20011
- Xprinter XP-Q800
- Zjiang NT-58H
- Zjiang ZJ-5870
- Zjiang ZJ-5890 (Also sold as POS-5890 by many vendors; ZJ-5890K, ZJ-5890T also work).
- Zjiang ZJ-8220 (Also marketed as Excelvan ZJ-8220)
- Zjiang ZJ-8250
Note: in case your printer is not in the above list then you need to make
sure that your printer supports the network connection and ESC/POS command.
- Browser Popup Printing: In case you don't have any network printer, you may choose
browser popup printing.
- USB Printing Support: You can also use a USB Printer for printing.
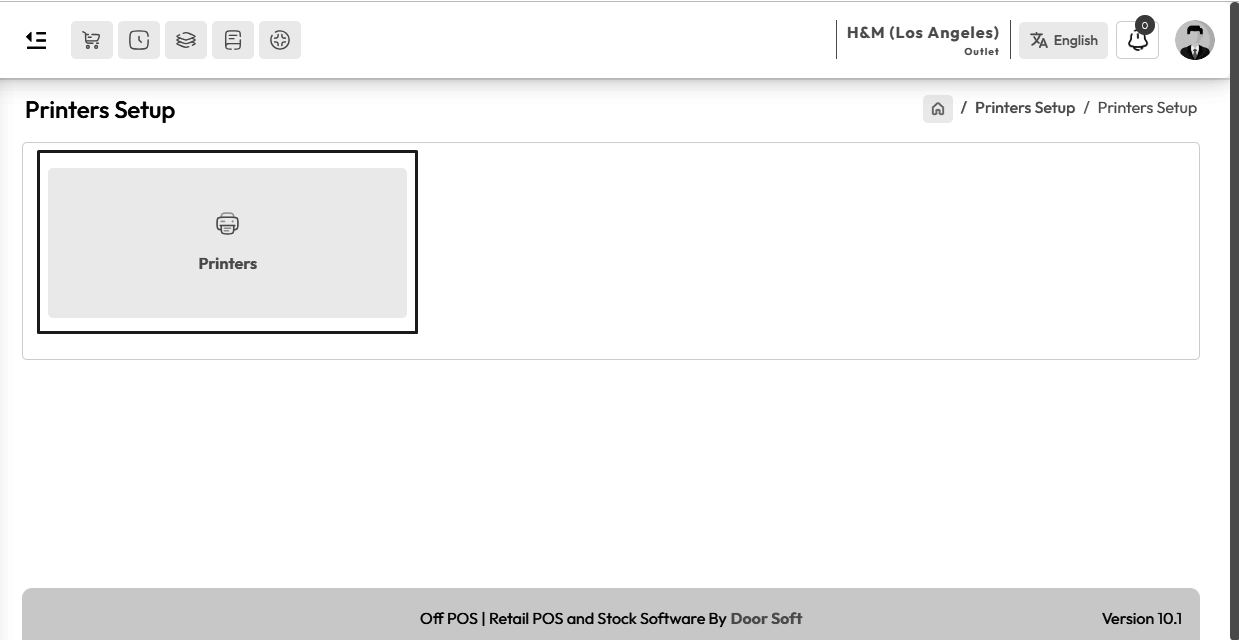
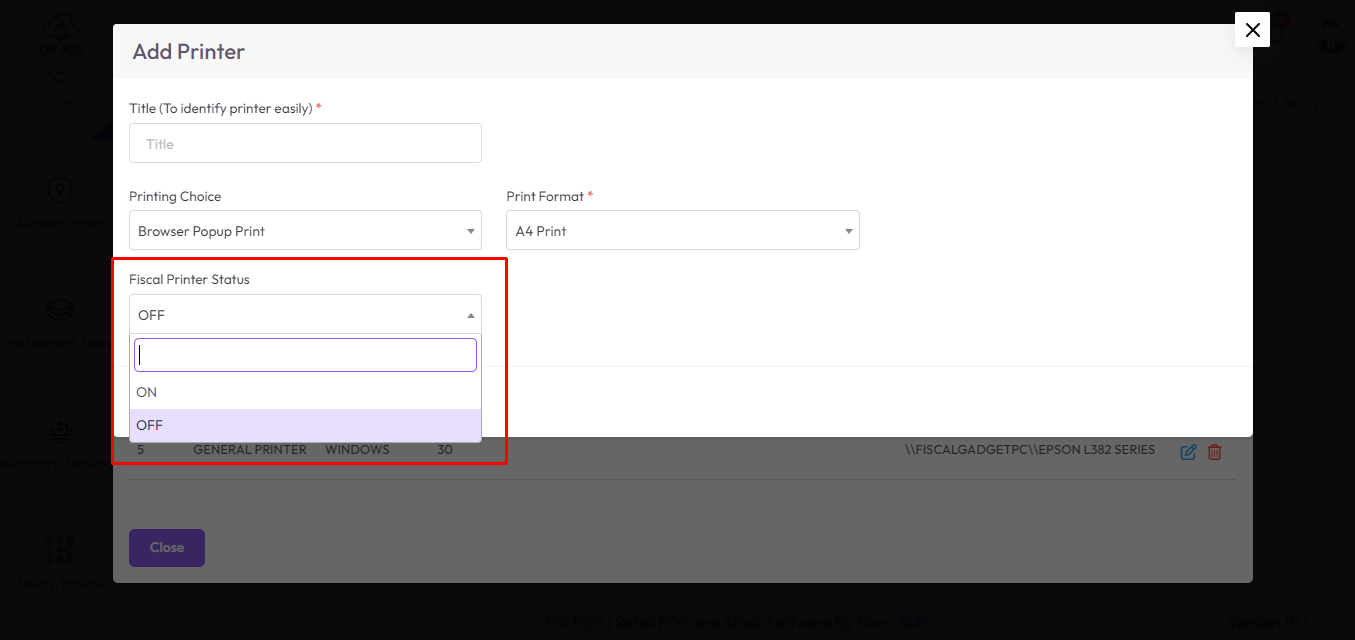
Add Printer
To Setup Printer or Add Printer expand "Setting" menu click on the "Printer Setup" menu from
the left sidebar after clicking that you will see an interface like below snapshot.
Click on the "Printer" Card
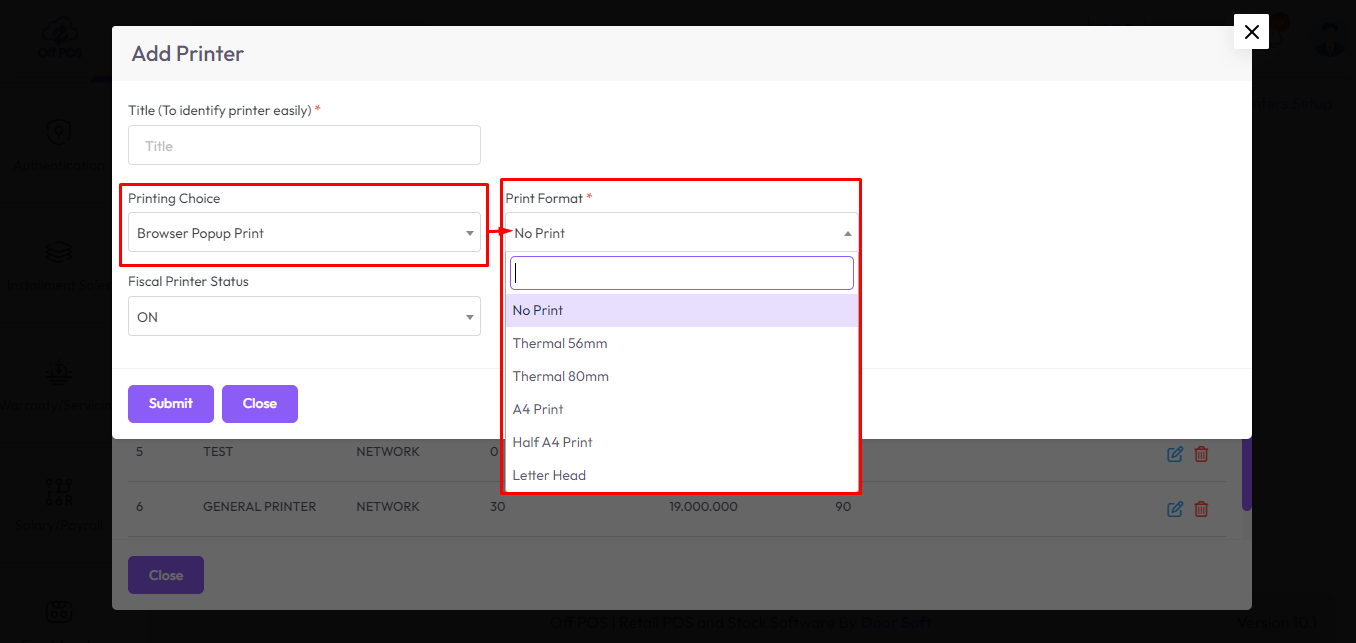
Click the Add Printer button to Add a new Printer.

After clicking the Add Printer button, you will see an interface similar to the
snapshot below.
Select the printer type from the Printing Choice field.
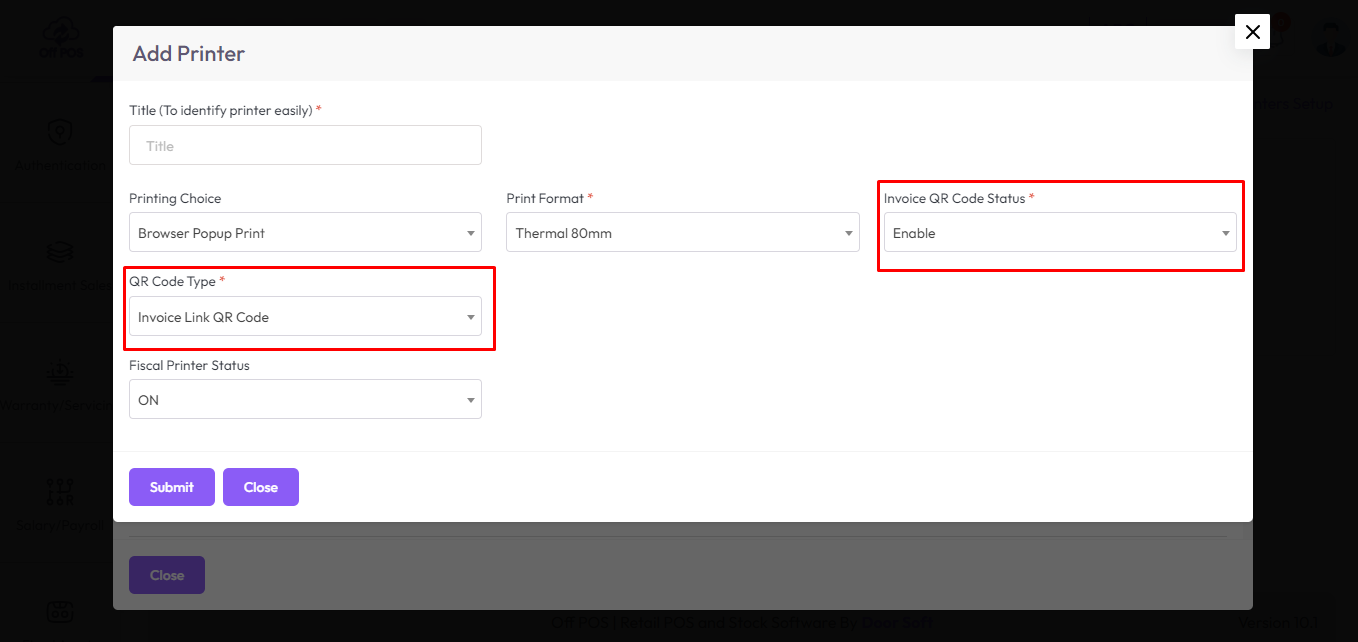
After selecting Thermal 56 or 80mm you will see two additional fields, Invoice QR Code Status
and QR Code Type, Invoice QR Code Status and QR Code Type doesn't work a4,Half A4 Print and
Letter Head.
Select Enable from Invoice QR Code Status field, to show QR code in 56mm and 80mm only.
Select a type from QR Code Type field.
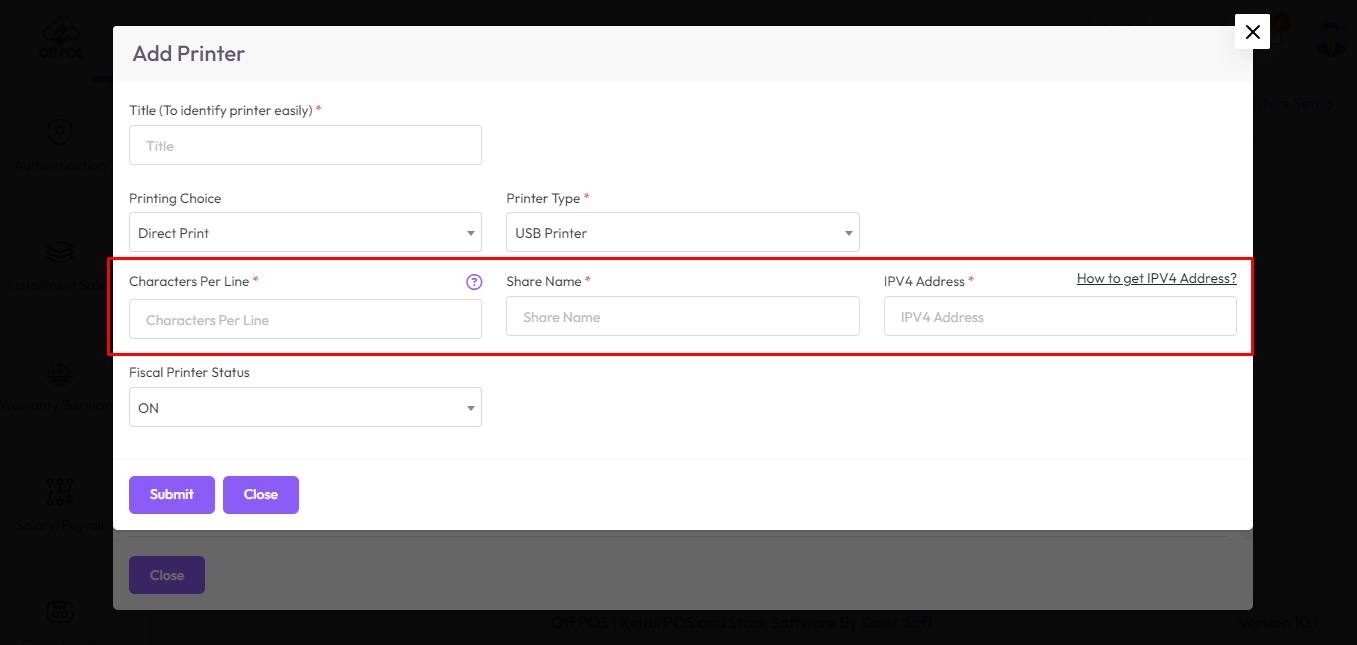
Select Direct Print from the Printing Choice field.
After selecting Direct Print you will see another field name as Printer Type, Select an
option from Printer Type, after selecting Network Printer you will see four fields,
i,Printer IP Address, ii,Printer Port Address, iii, Character Per Line, iv, IPV4 Address.

Enter the IP address in the IP address field.
Enter the Printer Port Address in the Printer Port Address field.
Enter the Character Per Line in the Character Per Line field.
Enter the IPV4 in the IPV4 field.

After selecting USB Printer you will see three fields, i,Character Per Line, ii,Share Name,
iv, IPV4 Address.

Enter the Character Per Line in the Character Per Line field.
Enter the Share in the Share field.
Enter the IPV4 in the IPV4 field.
Keep Enable to print via fiscal printer.
Setup Print Server for USB Printer
"If your script is running on localhost using xampp/wamp or any other’s
server then you can skip this step"
Install Xampp: XAMPP is a web server solution, we need to install xampp due to run print
server script.
Download xampp from this link as per your operating system.
https://www.apachefriends.org/download.html

After download- install the xampp in any drive except C: (for safety), you may install it in
D:, E: etc.
ou may check this link for how to install xampp (before checking the link- you need to watch
this video beginning at 9:15s) - ow
to install xampp?
Now click on the Config button and then click Apache (httpd.conf) for some changes.

Search denied and replace with granted, you may get 3 or 4 denied in this
file so replace all with granted.

After changes look like

Finally save this file.
Now click on the Config button and then click PHP (php.ini) for some changes.

We need to enable the intl extension from here, so search intl and remove
the comma sign from first of this line to save this file.

After changes look like

System will auto start after opening the xampp server if you set this setting otherwise you
need to start manually.

Now close the window.

And open again.

Now the Apache and MySQL Server will start automatically because of the previous setting that
we did.

If your system does not open automatically then click on this button to
start both.

Now we will run the print server script so click on the Explorer

Put the print server script in the following path: xampp/htdocs/
You will get the script of our project root path just copy and paste here.

Now we will check the test print.
Note: You must make sure your printer is successfully connected otherwise
the system will not work.
If your Network Printer is connected with ethernet then you may check connection status.

Open your browser and hit this URL: http://localhost/print_server/ and it will looks like
below

- Enter IPv4 address.
- Select https or http as per your server installation URL.
- Select Printer Type, in case your printer is network type then you need to select
Network Printer or USB printer.
- If your printer is Network Printer then you need to add Printer IP address, how to get
the Printer IP Address- First make sure your printer successfully connected with Network
then print a test print paper from your printer as per your printer model and then you
will get Printer IP address and Printer Port Address.
In maximum case the Printer Port Address is 9100 but in case it is different please do a test
print from your printer after turning it on, you will get the Printer Port Address in that
test print paper.
- If your printer is USB then you need to put Share Name
Note: Please follow all instructions carefully in this form.

Please do a Test Print. If everything is ok, you will get a test print out otherwise check
all of the steps again.
In USB printing Arabic language is not supported.
Setup Letter Head Printer
To setup letterhead heading gap and footer gap expand "Setting" menu from the left sidebar
after clicking on Setting menu you will see the below interface, enter letterhead header Gap
in "Letter Head Header Gap" field, enter Letterhead footer gap in "Letter Head Footer Gap"
field
Enter the "px" after the number, just giving the number will not work.
Example: enter 100px or 300px, don't leave only numbers like 100, 200.

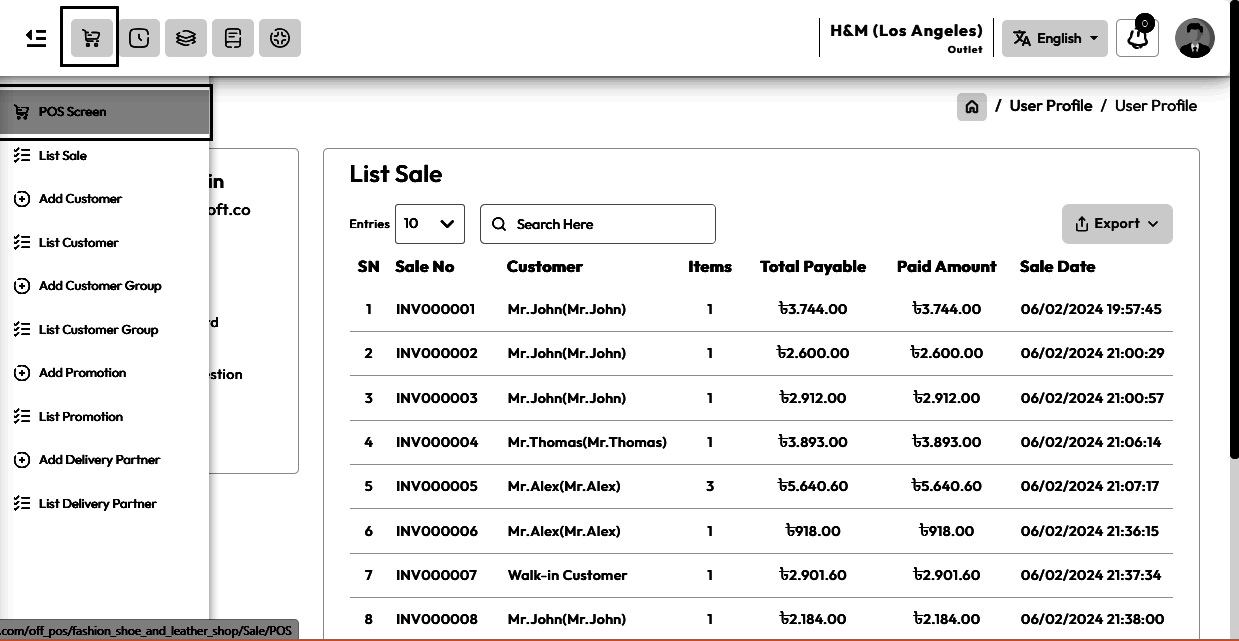
Introduce To POS Interface
To access the POS interface, expand the "Sale" menu from the left sidebar and click on the
"POS Screen" menu, Or click the POS button from the header.
The Point of Sale (POS) screen is the central interface where transactions are
conducted and managed in a retail environment. It serves as the primary tool for sales staff
to process purchases, manage stock, and provide customer service efficiently.
The key features of POS screen
Recent Sale: This feature displays a list of recent transactions, allowing staff to
quickly reference and retrieve past sales information if needed. Some important and
necessary features have been added here, options to search by date, customer and invoice
number. This will speed up the work of a seller.
Hold Sale: Hold Sale functionality enables sales staff to temporarily
suspend a transaction while attending to other customers or addressing inquiries. It allows
them to maintain flexibility and provide better service without losing the current sale
progress.
Print Last Sale Invoice: This feature allows for the printing of the
invoice or receipt from the most recent completed sale. It ensures that customers have a
physical record of their purchase.
Calculator: Integrated calculator functionality simplifies the process
of calculating totals, discounts, or change during transactions. It enhances accuracy and
speeds up the checkout process, especially for complex transactions.
Customer Display: Customer displays provide real-time information to
customers during the checkout process, such as item names, prices, and total amounts. It
enhances transparency, reduces errors, and can also be used for promotional messaging.
Keyboard Shortcut: An important key board shortcut feature is provided
here, So that the work speed of a seller increases.
Filtering Product Options: This feature allows staff to quickly locate
products by various criteria, enhancing efficiency and customer service. Filtering options
such as by category, brand, most selling, and less selling.

Add To Cart Modal
To sell "General Type" products click on the "General Type" product, in my case "Coca Cola"
is a "General Type" product.
After selecting General product you will get a popup modal.
Here you will see the current stock of this product, Enter the quantity in the quantity field
or increase the quantity by clicking the plus button.
Select Employee from the Employee field if this product sale Employee-wise, Change the price
if needed, LPP = Last Purchase Price of this product, WSP=Wholde Sale Price of this product,
Increase Quantity if you need, enter discount if you have permission after that hit "Add To
Cart" button to add this product in the cart.
After adding the products to the cart, the cart will look like the snapshot below.

Register
A "Register" in a super shop or supermarket usually refers to a checkout counter or station
where customers complete their purchases and pay for their selected items. A registrar
enters the customer's sales information into the software.
How does the register work?
A prerequisite for selling is to open a register.
To open a new Register expand the Sale menu from the left sidebar after that click on the POS
menu.
After clicking the Submit button, you will see an interface similar to the snapshot below.
Set the opening balance according to the payment method, and select a counter from the
counter field. after that hit the submit button.
NB: If the register interface does not appear after clicking the
"POS" menu, it means that the register is already open.

Click here to read about the "What is counter?
how does work?" article.
Payment Method Description
Click the Payment button to pay for a sale.

In the finalized sale, you will see payment method options on the left side, select a payment
method option from there, select the amount by clicking denomination amount (Note: We
have discussed Denomination in detail in the dinomination
article) , or enter the amount in the Amount field and hit the Add Button.

After clicking the "Add" button payment is added in the payment section in my case I've
select Bank, after that select Send Invoice Via SMS, Send Invoice Via Emal, Send Invoice Via
Whatsapp as per your need and hit the submit button to Sale this product.
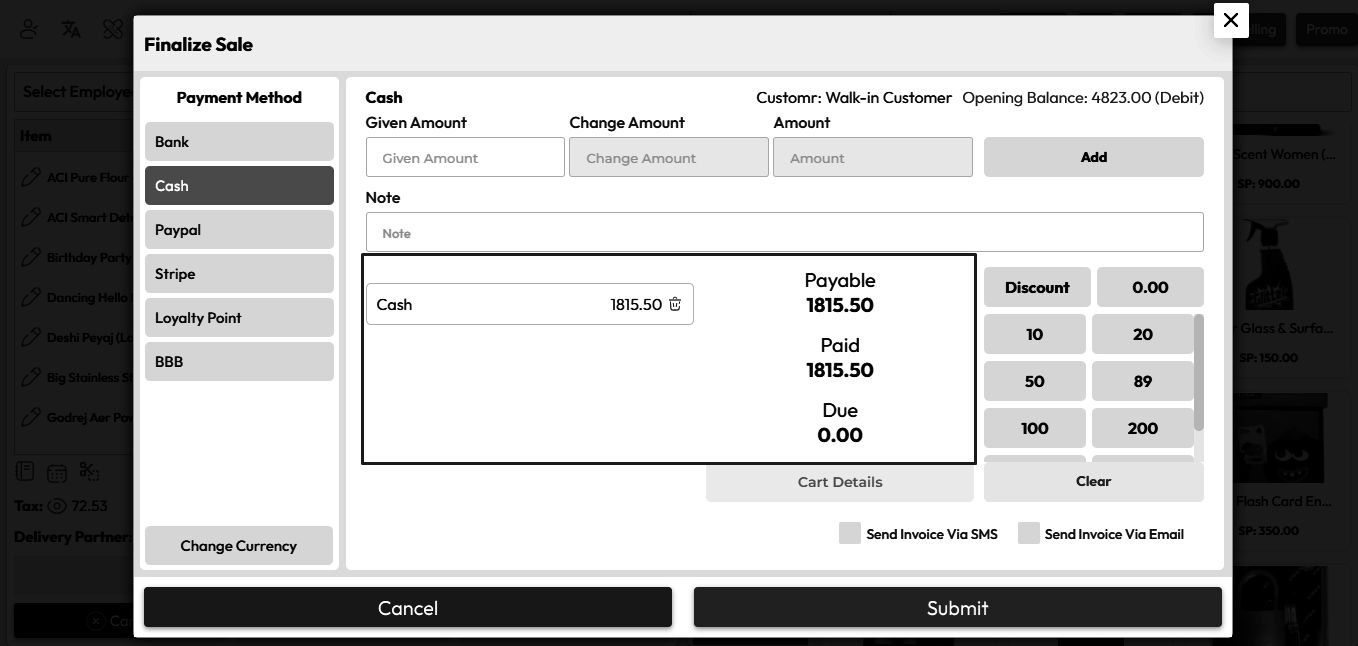
After the sell Success, you will get an invoice.

Print Challan from Recent Sale
To simplify the working speed of sellers we have put an option called Recent Sale, You can
see the list of products that have already been sold from the POS screen. And from there you
can print the challan and invoice of the sales, and edit the sales.
Click on recent sale button.
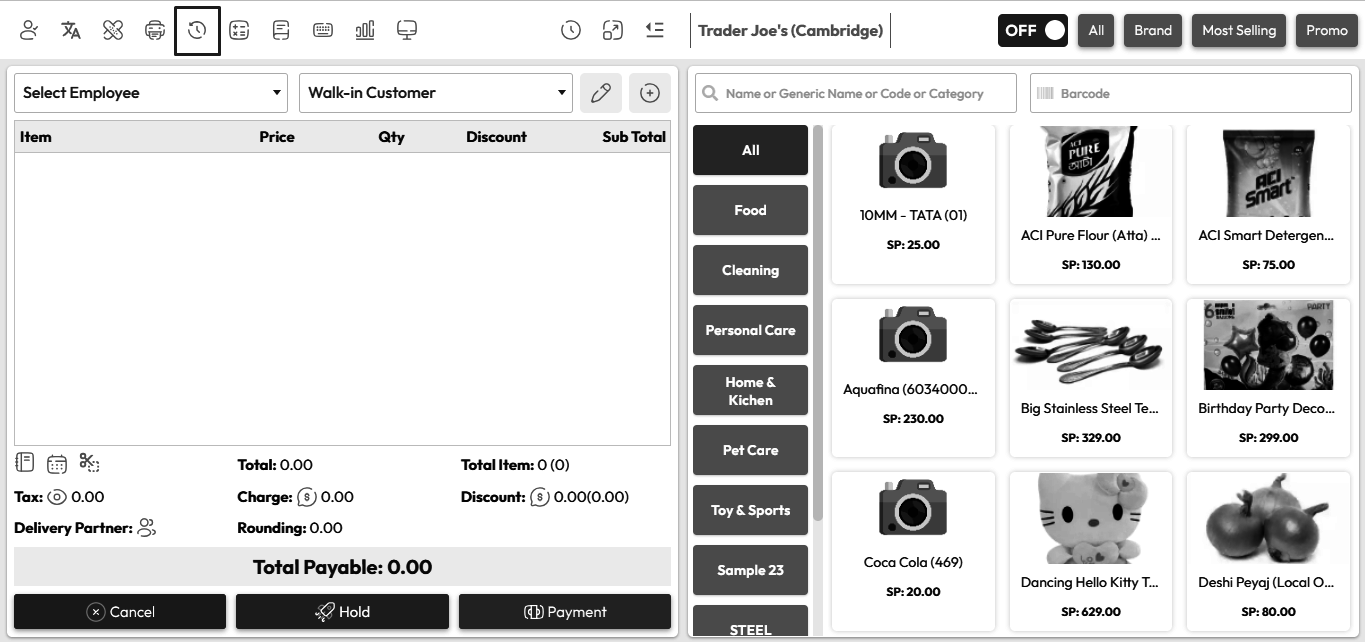
After clicking on recent sale button you will see a popup modal like below snapshot.
Click a sell from the sell list.

After clicking on the sale it will be added to the cart on the right, you can edit, delete,
print and invoice if you want.

Print Invoice from Recent Sale
Print Invoice from Recent Sale is same procedure as like "Print Challan from Recent Sale"
just click on "Print Invoice" button instead of "Print Challan" button.
Customer Display
Customer displays provide real-time information to customers during the checkout process,
such as item names, prices, and total amounts. It enhances transparency, reduces errors, and
can also be used for promotional messaging.
Sometimes there may be a need to show the customer real time when you add a
product to the cart at checkout.
In that case the use of customer display may be required.

Customer Display Pannel, Customer display will work in real time, whenever you
add or delete a product or modify anything in the cart of POS screen, the customer can see
it in real time.

Show Stock Before & After Sale
The number of stocks before sale is shown in the snapshot below.

Here I have given 9 quantity sale entries.

Current stock status after sale. Before selling 9 quantity the stock was 49, and after
selling 9 net quantity the current stock is 40.
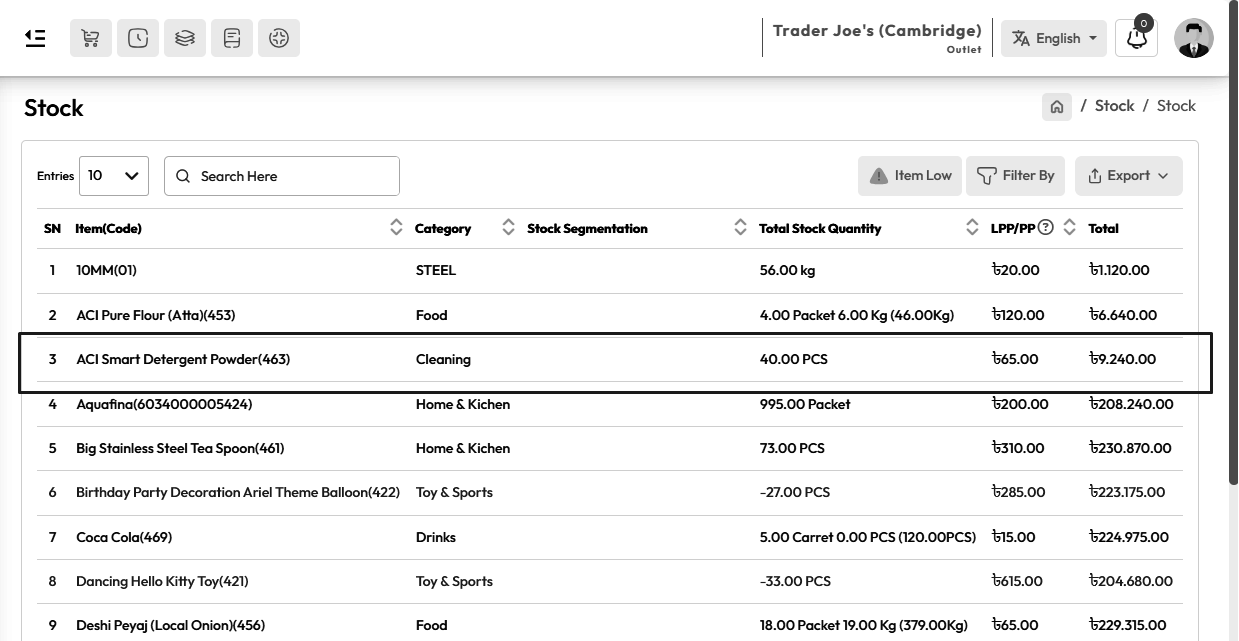
Sale Report
To view the Sale Report expand the Report Menu from the left sidebar and click on Sale
Report. select a date to view the report within a specified date if needed. select outlet
from the outlet field to filter report according to outlet.

Employee Sale Report
Employee Sale Report is a combination of multiple features, Depending on the type of
business, there are two ways to select employees while selling products, One is for the
entire invoice, and the other is for each individual product listed on the invoice.
How to select an employee on the entire invoice?

How to select one employee on each item?
Click on the marked space or pencil icon to set each item wise employee.

After clicking on the pencil icon you will see a modal.
Then select an employee from the modal.

Difference between invoice-based employee and item-based employee selection. Here on the
left, an employee is selected on the invoice, and on the right the employee is selected per
product.

To view the "Employee Sale Report" expand the "Report" menu from the left sidebar and click
on the "Employee Sale Report" menu.
Select a date to view the report within a specified date if needed. select an employee from
the employee field, select outlet from the outlet field to filter report according to
outlet.
Select the "Sale Wise" option to view the invoice wise employee report as described above.
Select the "Item Wise" option to view the item wise employee report as described above.

Product Sale Report
To view the Product Sale Report expand Report Menu from the left sidebar and click Product
Sale Report menu. select a date to view the report within a specified date if needed. select
an item, select a customer.
NB: The Product Sales report only works on one product, for which it is mandatory to
select a product from the product list.

Detailed Sale Report
To view the Detailed Sale Report expand Report Menu from the left sidebar and click Detailed
Sale Report menu. select a date to view the report within a specified date if needed. select
an employee also you can select outlet from the outlet field to filter report according to
outlet.
NB: Detailed Sale Report contains details of the sale, such as how many products were
under a sale, quantity, price, etc.
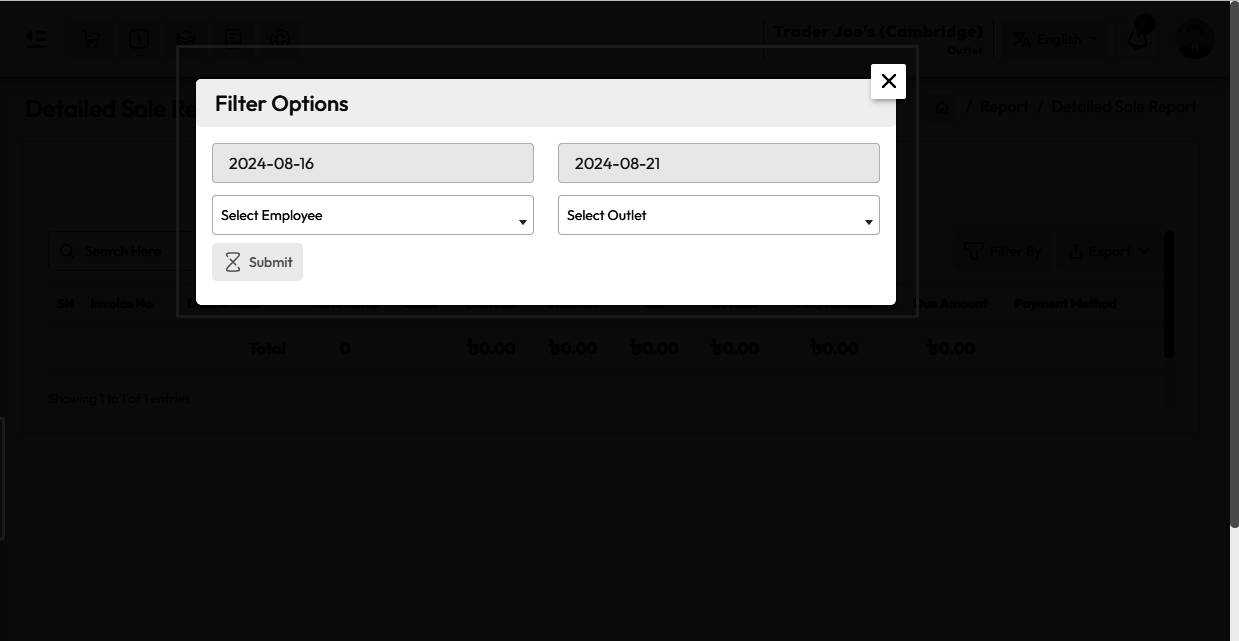
Add To Cart Modal
To sell "Variation Type" products click on the "Variation Type" product, in my case
"Exclusive-T-Shirt" is a "Variation Type" product.

After clicking on Variation product you will get a popup modal.
Here you can see all the variations of "Exclusive-T-Shirts".

Click on the item you want to sell.
After clicking on any item of variation you will see the stock of that product.
Enter the quantity in the quantity field, or increase the quantity by clicking the plus
button.
Select Employee from the Employee field if this product sale Employee-wise, Change the price
if needed, LPP = Last Purchase Price of this product, WSP=Wholde Sale Price of this product,
Increase Quantity if you need, enter discount if you have permission after that hit "Add To
Cart" button to add this product in the cart.

After adding the products to the cart, the cart will look like the snapshot below.

After the sale you will see an invoice like the snapshot below.
Alternative names are used especially in Arab countries.
Warranties and guarantees can be found on the invoice.
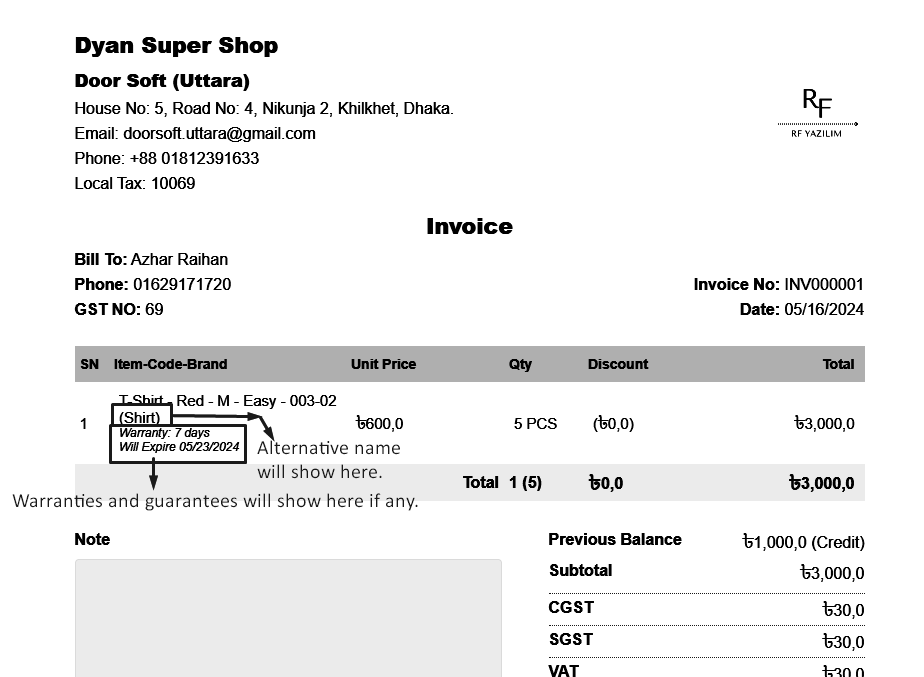
Show Stock Before & After Sale
The number of stocks before sale is shown in the snapshot below, As shown below 5 bundles =
60 pieces.

Here I have given 5 quantity sale entries.

Current stock status after sale.
Before selling 5 quantity the stock was 5,0 Bundle 0,0 PCS, and after selling 5 net quantity
the current stock is 4,0 Bundle 7,0 PCS.

Add To Cart Modal
To sell "IMEI Type" products click on the "IMEI Type" product, in my case "Huawei Nova 8i" is
a "IMEI Type" product.

After clicking on IMEI product you will get a popup modal.
Here you can see the current stock of IMEI products.
Here the current stock is showing 2 and 1 is added to the quantity field. So the total
quantity is 2+1 = 3.
Now you will see 3 IMEIs in the Available IMEI field, select the IMEI you want to sell.
Select Employee from the Employee field if this product sale Employee-wise, Change the price
if needed, LPP = Last Purchase Price of this product, WSP=Wholde Sale Price of this product,
enter discount if you have permission after that hit "Add To Cart" button to add this
product in the cart.

After adding the products to the cart, the cart will look like the snapshot below.

After the sale you will see an invoice like the snapshot below.
Alternative names are used especially in Arab countries.
Warranties and guarantees can be found on the invoice.

Show Stock Before & After Sale
The number of stocks before sale is shown in the snapshot below, Here is 3 IMEI products.

Here I have given 1 quantity sale entries, where IMEI number is "POCO-M3-0003"
Current stock status after sale.

Add To Cart Modal
To sell "Serial Type" products click on the "Serial Type" product, in my case "Samsung QN90A
Neo QLED 4K" is a "Serial Type" product.

After clicking on Serial product you will get a popup modal.
Here you can see the current stock of Serial products.
Here the current stock is showing 2 and 1 is added to the quantity field. So the total
quantity is 2+1 = 3.
Now you will see 3 Serials in the Available Serial field, select the Serial you want to sell.
Select Employee from the Employee field if this product sale Employee-wise, Change the price
if needed, LPP = Last Purchase Price of this product, WSP=Wholde Sale Price of this product,
enter discount if you have permission after that hit "Add To Cart" button to add this
product in the cart.

After adding the products to the cart, the cart will look like the snapshot below.

After the sale you will see an invoice like the snapshot below.
Alternative names are used especially in Arab countries.
Warranties and guarantees can be found on the invoice.
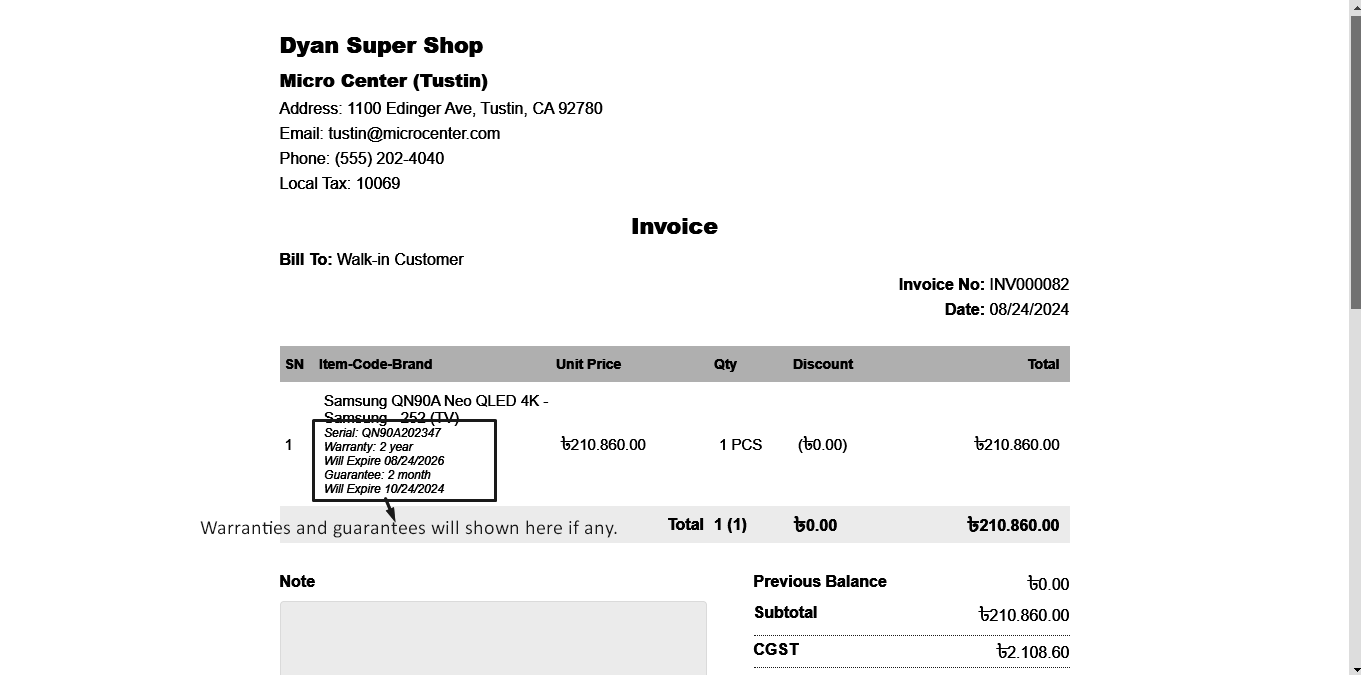
Show Stock Before & After Sale
The number of stocks before sale is shown in the snapshot below, Here is 3 Serial products.

Here I have given 1 quantity sale entries, where Serial number is "QN90A202347"
Current stock status after sale.

Add To Cart Modal
To sell "Medicine Type" products click on the "Medicine Type" product, in my case "A-Flox" is
a "Medicine Type" product.

After clicking on Medicine product you will get a popup modal.
Here you can see the current stock of Medicine products, Here you can see the combined stock
of the same product on two dates.
When you select a date you will only see the stock for that date.

Select a date from the Expiry Date field.
Here after selecting a date only stock of that date is shown.

Select Employee from the Employee field if this product sale Employee-wise, Change the price
if needed, LPP = Last Purchase Price of this product, WSP=Wholde Sale Price of this product,
Increase Quantity if you need, enter discount if you have permission after that hit "Add To
Cart" button to add this product in the cart.

After adding the products to the cart, the cart will look like the snapshot below.

After the sale you will see an invoice like the snapshot below.
Alternative names are used especially in Arab countries.
Warranties and guarantees can be found on the invoice.

Show Stock Before & After Sale
The number of stocks before sale is shown in the snapshot below, There are 50 pieces of
medicine of two different expiry dates 05/17/2024, 05/18/2024 respectively.

Here I have given 5 quantity sale entries of 05/17/2024 expiry date.
Current stock status after sale.
There are 50 pieces of medicine of two different expiry dates 05/17/2024, 05/18/2024
respectively, After sale of 5 medicines on 05/17/2024 current stock is 45 pcs of that date.

Add To Cart Modal
To sell "Installment Type" products click on the "Installment Type" product, in my case "LG
KS-Q18YNZA" is a "Installment Type" product.

After clicking on Installment product you will get a popup modal.
Here you will see the stock of installment products.
Enter the quantity in the quantity field, or increase the quantity by clicking the plus
button.
Select Employee from the Employee field if this product sale Employee-wise, Change the price
if needed, LPP = Last Purchase Price of this product, WSP=Wholde Sale Price of this product,
Increase Quantity if you need, enter discount if you have permission after that hit "Add To
Cart" button to add this product in the cart.

After adding the products to the cart, the cart will look like the snapshot below.

After the sale you will see an invoice like the snapshot below.
Alternative names are used especially in Arab countries.
Warranties and guarantees can be found on the invoice.
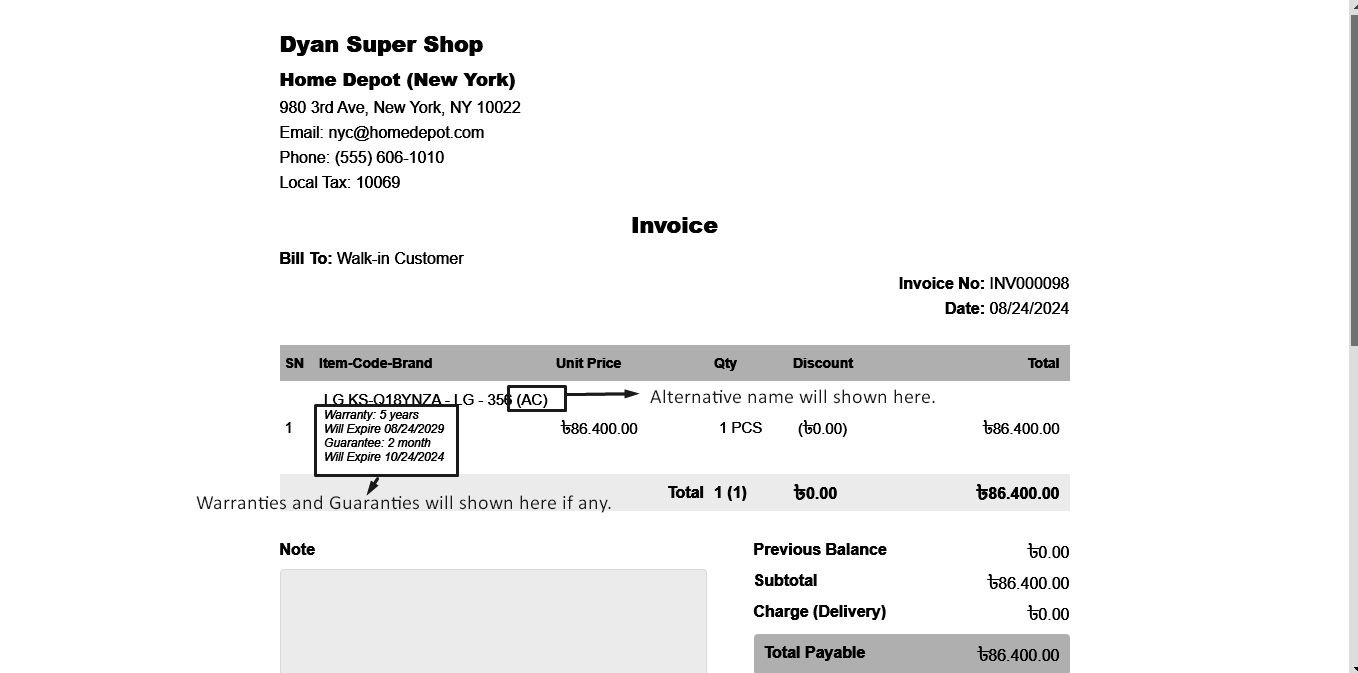
Show Stock Before & After Sale
The number of stocks before sale is shown in the snapshot below, As shown below 5 bundles =
60 pieces.

Here I have given 5 quantity sale entries.
Current stock status after sale.
Before selling 5 quantity the stock was 5,0 Bundle 0,0 PCS, and after selling 5 net quantity
the current stock is 4,0 Bundle 7,0 PCS.

Delivary Status Change
To change the delivery status of a sale go to the sale list and change the delivery status
from the sale list.
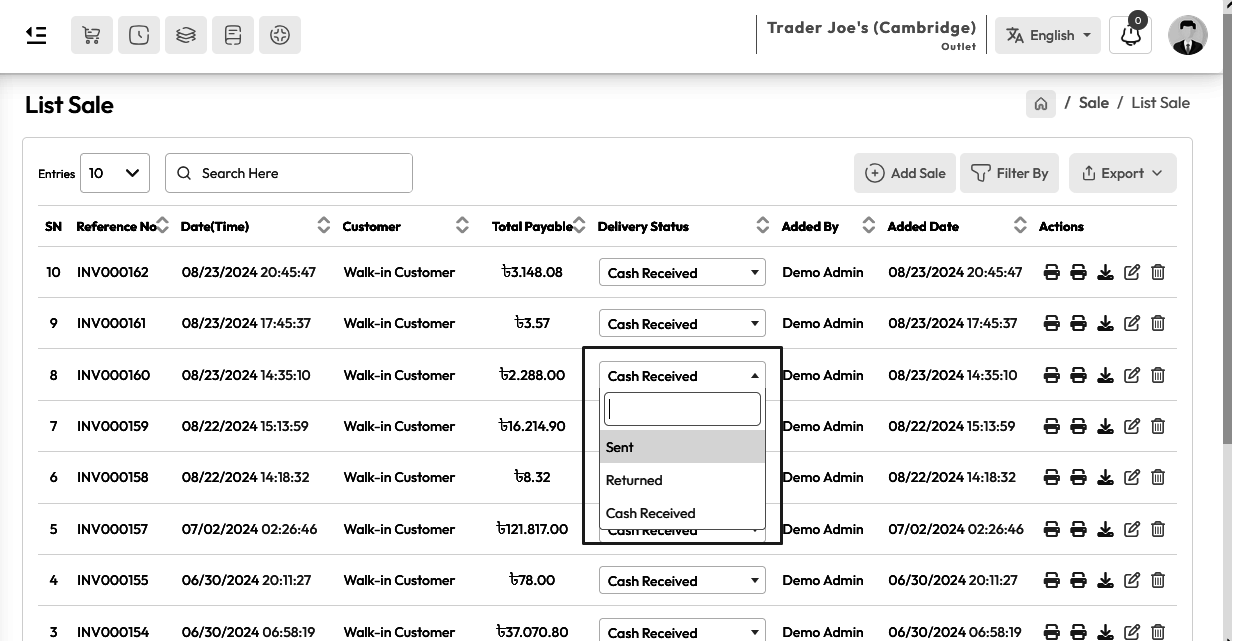
Print Sale Invoice
To Print an Invoice of a sale go to the sale list and click on the Print Invoice button.
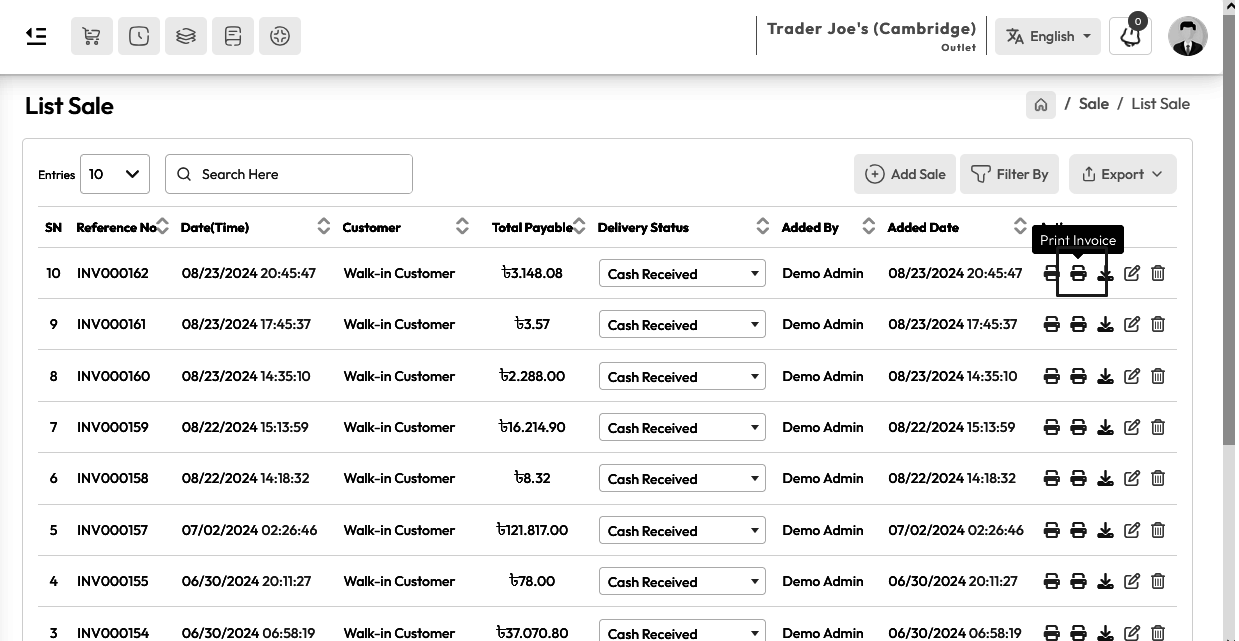
Download Sale Invoice
To Download the Invoice of a sale go to the sale list and click on the Download Invoice
button. After downloading the invoice you will receive a PDF of the sale. Of course, you
will find it in your browser's download location.
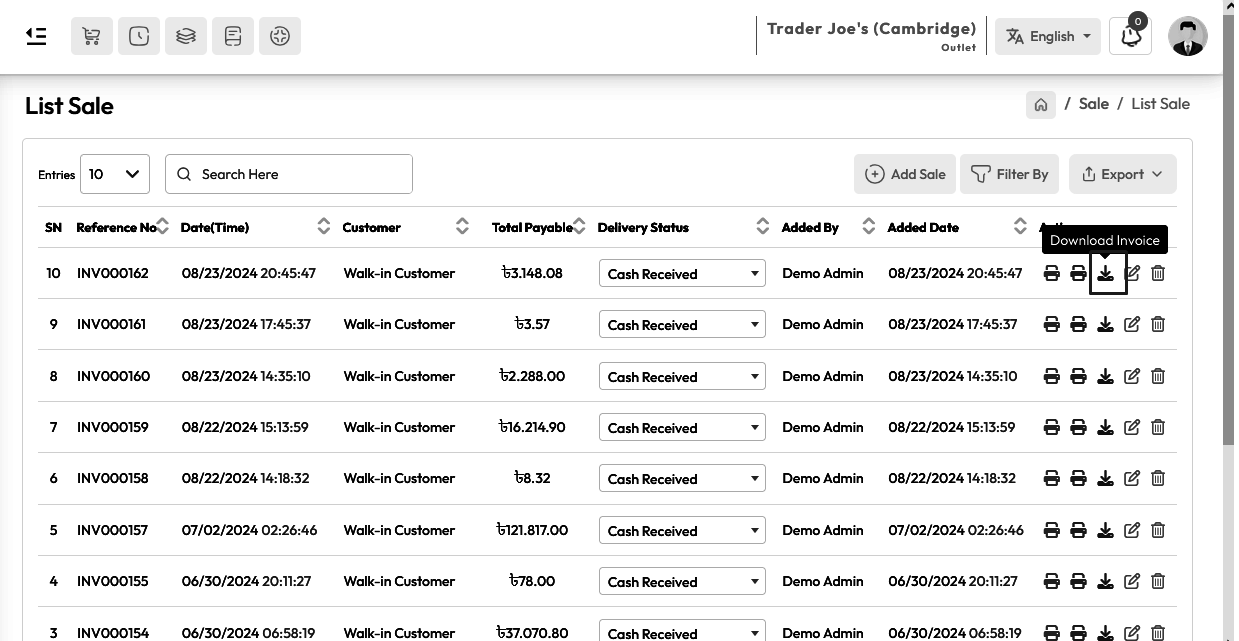
In my case my browser default download location is C:\Users\my-computer\Downloads

Add Delivery Partner
To create a Delivery Partner expand Sale Menu click on Add Delivery Partner menu from the
left sidebar.

Fillup the required field and hit the submit button
How it works with Sale, Stock and Accounts
Delivery partner has three statuses, Sent, Returned, Cash Received respectively.
When a delivery partner is selected from the POS screen, its default status will be "Sent"
When the status of the products is "Sent" the product will be removed from stock but no money
will be added to the account.
When the product is delivered, go to the sale list and change the delivery status "Sent" to
"Cash Received". When the status of the products is "Cash Received" the product will be
removed from stock and money will be added to the account.
When the product is Returned, go to the sale list and change the delivery status "Sent" to
"Returned". When the status of the products is "Returned" the product will be added in stock
and no money will be added to the account.

Email Configuration
To configure you email expand Setting Menu click on Email Setting menu from the left sidebar.
Click on "Configure Email" card to configure you email setting.
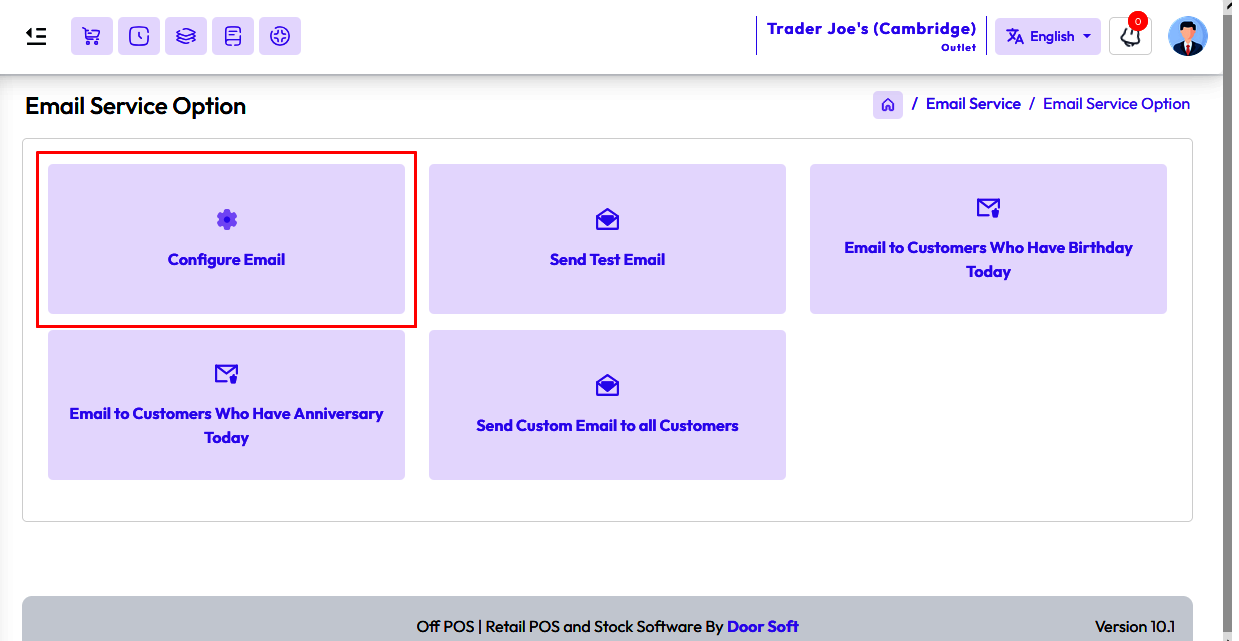
After clicking on "Configure Email" card you will see an interface below snapshot.
Select your "Email Service Type" here is 2 type Email Service 1. Sendinblue, 2.Gmail.
To configure your "Email Service" with Sendinblue fill up the required field with valid
information, like Username, Password, API Key.
NB: SMTP host, Port Address, Encryption don't need to be change.
You can Enable or Disable service by clicking "Status"
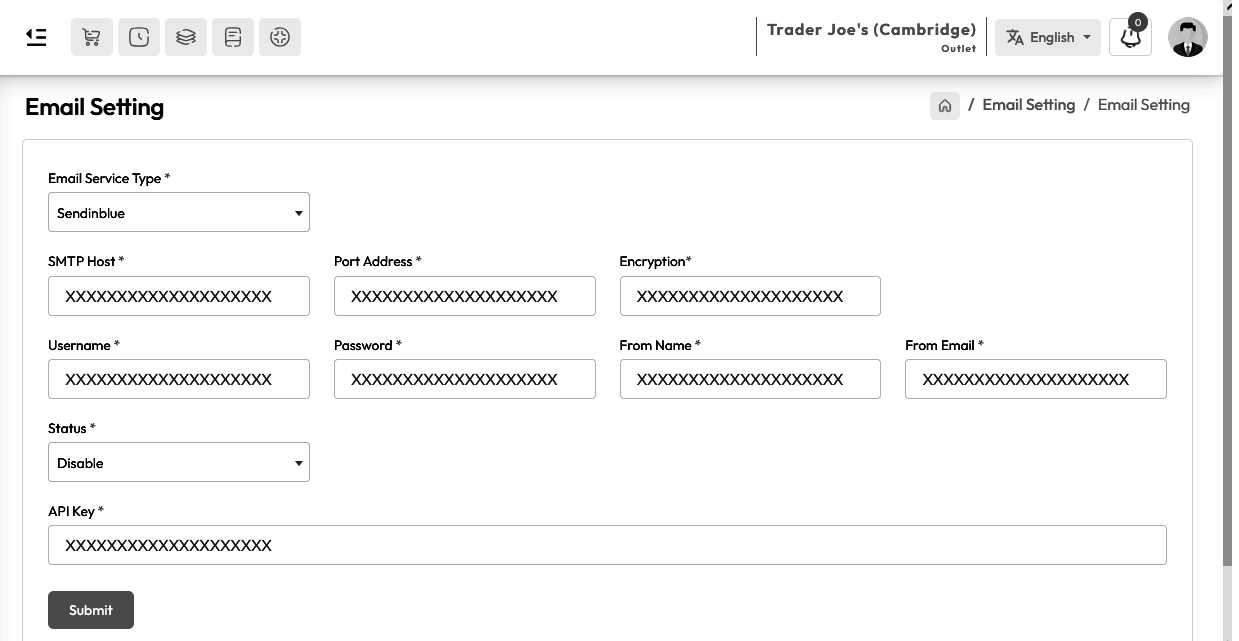
To configure your "Email Service" with Gmail fill up the required field with
valid information, like Username, Password.
NB: SMTP host, Port Address, Encryption don't need to be change.
You can Enable or Disable service by clicking "Status"

Send Test Email
To Send a Test Email expand Setting Menu click on Email Setting menu from the left sidebar.
Click on "Send Test Email" card to Send Test Email.

Enter a valid Email address in "Email" field, Enter message in "Message" field hit the submit
button to send a test mail.
NB: Message will not go to invalid email.

Email to Customer Who have Birtheday Today
To Send an email to "Who have Birthday Today" expand the Setting Menu and click on the Email
Setting menu from the left sidebar.
Click on the "Email to Customers who have birthday today" card to Send "Birthday email
message".

Just enter the message in the message field, the system will automatically send the message
to those who have birthday.
NB: Mail will not go to those whose email address is invalid.

Email to Customer Who have Anniversary Today
To Send an email to "Who have Anniversary Today" expand the Setting Menu and click on the
Email Setting menu from the left sidebar.
Click on the "Email to Customers who have Anniversary today" card to Send "Anniversary email
message".

Just enter the message in the message field, the system will automatically send the message
to those who have anniversary.
NB: Mail will not go to those whose email address is invalid.

Send Custom Email to all Customers
To Send an email to "Send Custom Email to all customers" expand the Setting Menu and click on
the Email Setting menu from the left sidebar.
Click on the "Send Custom Email to all customers" card to Send Bulk message or "Custom Email
to all customers".
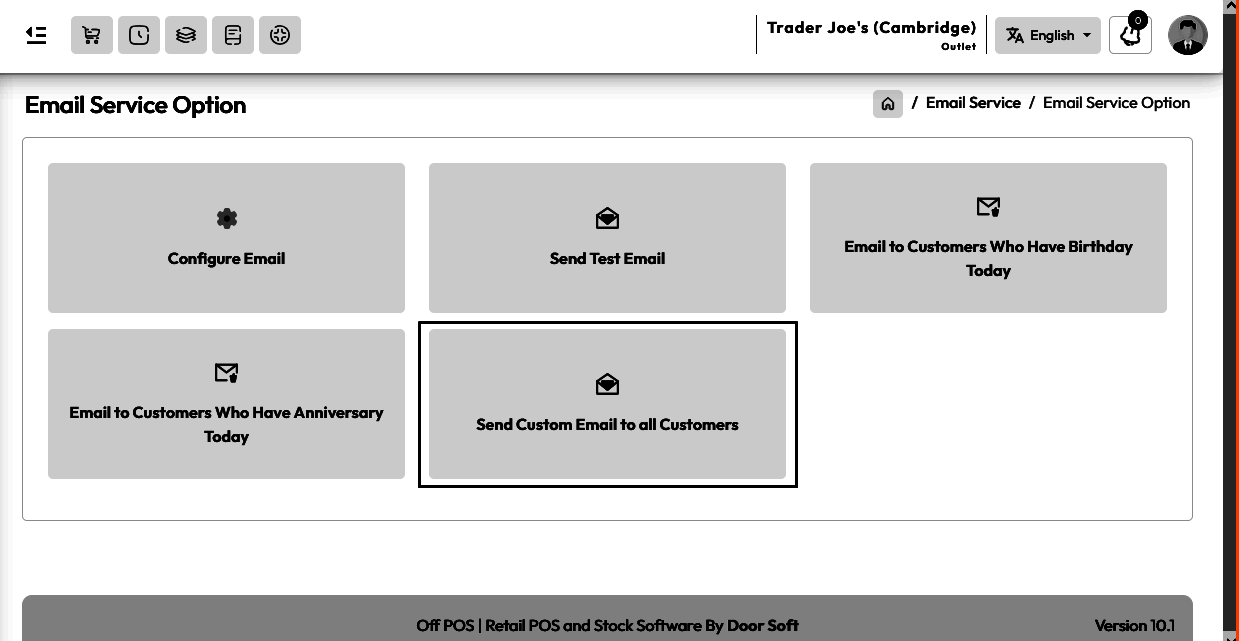
Just enter the message in the message field, the system will automatically send the message
to all customers.
NB: Mail will not go to those whose email address is invalid.

SMS Configuration
To configure you SMS expand Setting Menu click on SMS Setting menu from the left sidebar.
Click on "Configure SMS" card to configure you SMS setting.

After clicking on "Configure SMS" card you will see an interface below snapshot.
Select your "SMS Service Provider" here is 4 type Email Service 1. Twilo, 2.Mobishastra,
3.MiMSMS, 4.Text Local
To configure your "SMS Service Provider" with "Twilo" fill up the required
field with valid information, like SID, Toke, Twilo Number.
You can Enable or Disable service by clicking "Status"

To configure your "SMS Service Provider" with "Mobishastra" fill up the
required field with valid information, like Profile ID, Password, Sender ID, Country Code.
You can Enable or Disable service by clicking "Status"

To configure your "SMS Service Provider" with "MiMSMS" fill up the required
field with valid information, like API Key, Sender ID.
You can Enable or Disable service by clicking "Status"

To configure your "SMS Service Provider" with "Text Local" fill up the required
field with valid information, like Profile ID, API Key, Sender ID.
You can Enable or Disable service by clicking "Status"

Send Test SMS
To Send a Test SMS expand Setting Menu click on SMS Setting menu from the left sidebar.
Click on "Send Test SMS" card to Send Test SMS.
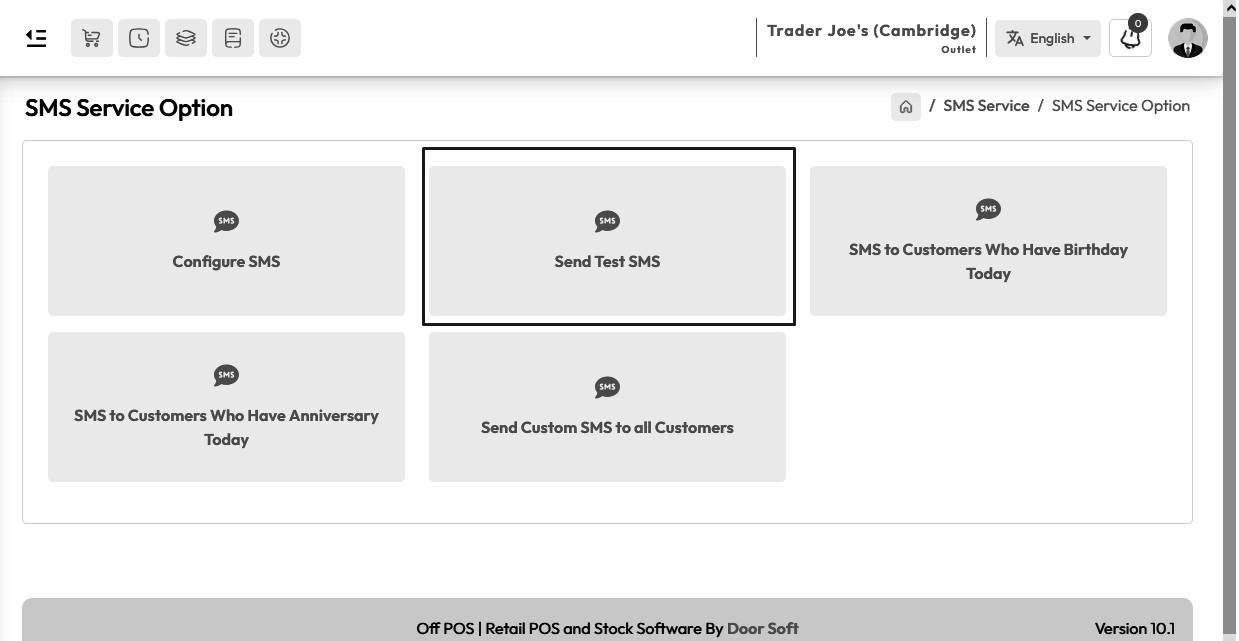
Enter a valid Phone Number in "Number" field, Enter message in "Message" field hit the submit
button to send a test SMS.
NB: Message will not go to wrong number.
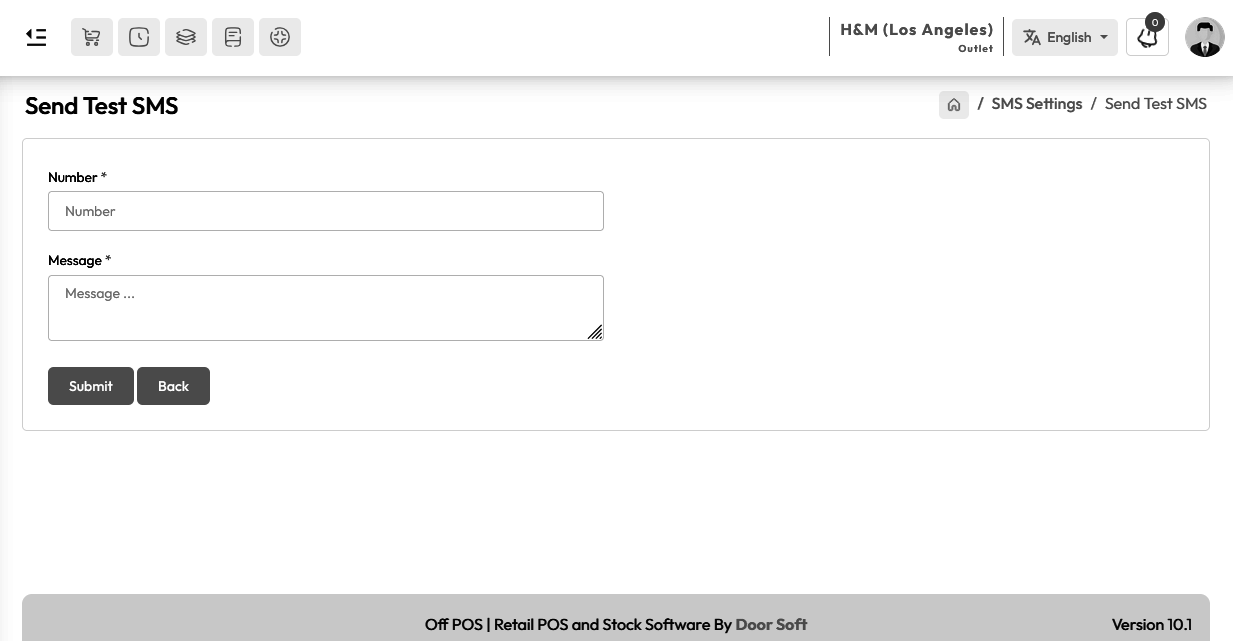
SMS to Customer Who have Birtheday Today
To Send a SMS to "Who have Birthday Today" expand the Setting Menu and click on the SMS
Setting menu from the left sidebar.
Click on the "SMS to Customers who have birthday today" card to Send "Birthday SMS message".

Just enter the message in the message field, the system will automatically send the message
to those who have birthday.
NB: SMS will not go to those whose number is invalid.

SMS to Customer Who have Anniversary Today
To Send an SMS to "Who have Anniversary Today" expand the Setting Menu and click on the SMS
Setting menu from the left sidebar.
Click on the "SMS to Customers who have Anniversary today" card to Send "Anniversary SMS
message".

Just enter the message in the message field, the system will automatically send the message
to those who have anniversary.
NB: SMS will not go to those whose Number invalid.

Send Custom SMS to all Customers
To Send an SMS to "Custom SMS to all customers" expand the Setting Menu and click on the SMS
Setting menu from the left sidebar.
Click on the "Custom SMS to all customers" card to Send Bulk message or "Send Custom SMS to
all customers".
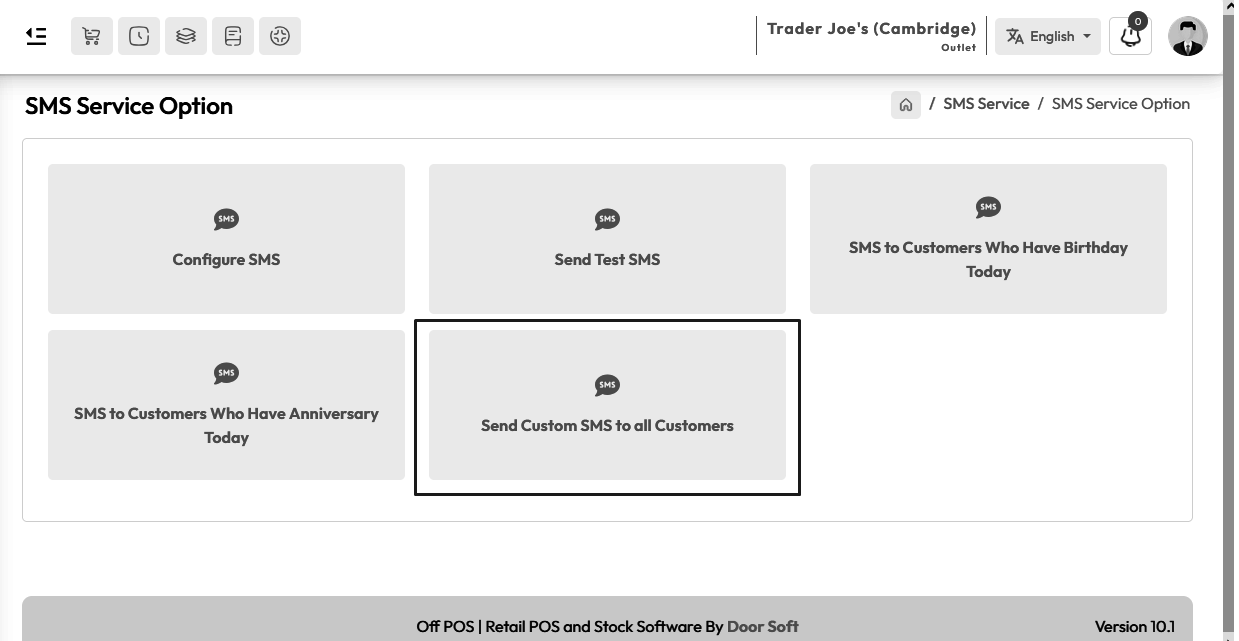
Just enter the message in the message field, the system will automatically send the message
to all customers.
NB: SMS will not go to those whose Number is invalid.

Payment Gateway Setting
To configure you Payment Gateway expand Setting Menu click on Payment Gateway menu from the
left sidebar.
There are two types of payment gateway settings, One is "Strip" another is "Paypal".
To setupe your Strip payment gateway Enter Valid Stripe Secret Key and Stripe Publishable
Key.
To setupe your Paypal payment gateway Enter Valid Client ID Key and Secrete Key.
Hit the submit button to save this configuration.

Payment Gateway Work in Sale
Whatsapp Setting
There are several steps to configure WhatsApp settings, the steps are given in order.
1. Sign up here to get
WhatsApp Appkey & WhatsApp Authkey.
After signing up here you can see below interface.
Find the My Devices menu from the left sidebar and click on it.
After clicking on the My Device menu, you will see a button called Create
Device on the right side, click on it.

After clicking the Create Device button, you will see an interface like below.
Enter your device name here and click on the Create Now button.
After creating a device you will see a QR code.
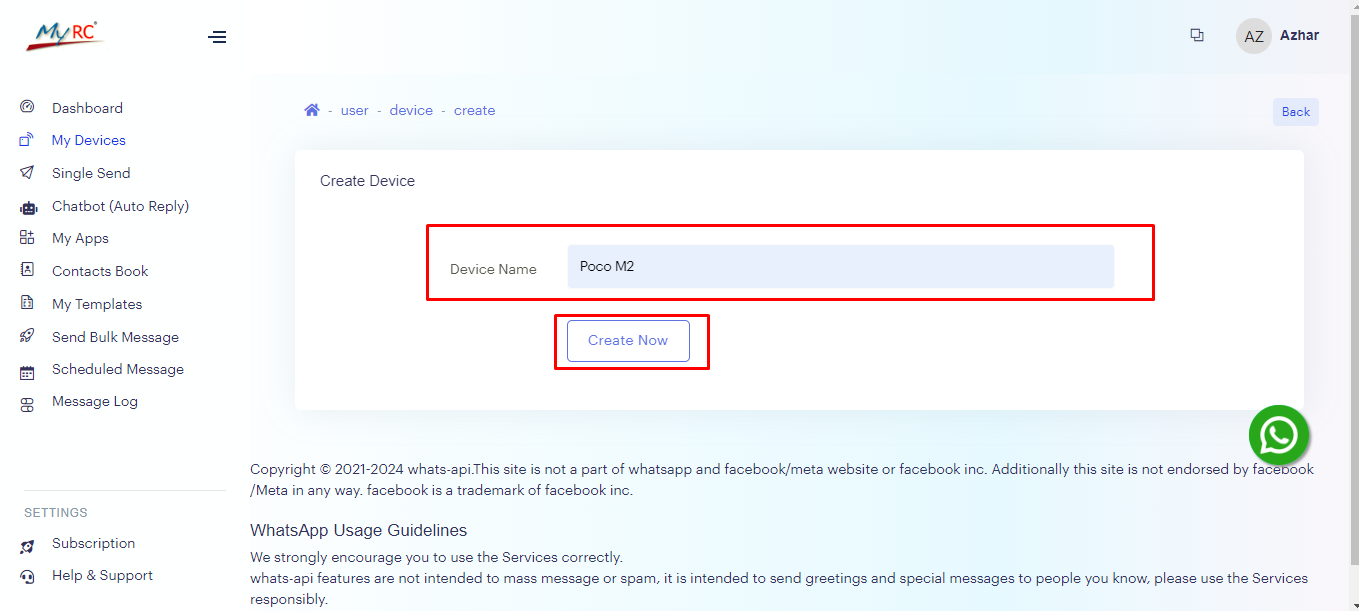

Go to WhatsApp Settings from mobile and link the device by clicking on "Linked Devices".
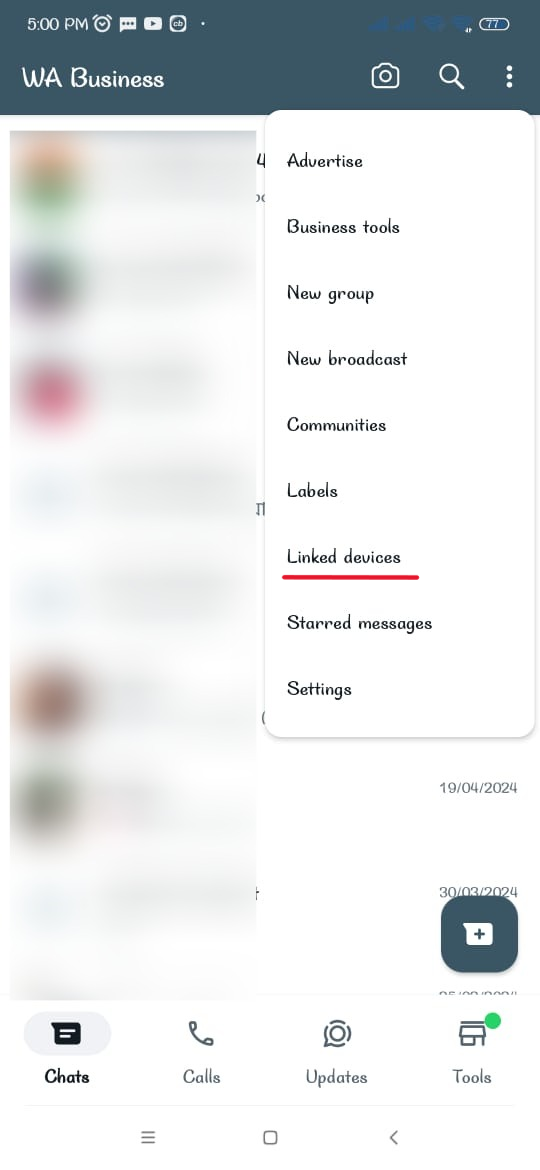
Find the My Apps menu from the left sidebar and click on it.
After clicking on the My Apps menu, you will see a button called Create App on
the right side, click on it.

After clicking the "Create App" button, you will see an interface like below.
Then select your linked device, enter the app name in the App Name field, enter the website
link and click the "Create Now" button.

After create a "New App" Then click on the App Name card, as shown in the snapshot below.
Click on "Integration" from the App Name card.

Then you will see an interface below.
Click on the php Tab.
After clicking that copy the appkey and authkey value. Copy only
values inside single quotations, not with single quotations.

To configure you WhatsApp Setting expand Setting Menu click on WhatsApp Setting menu from the
left sidebar.
Enter valid WhatsApp AppKey and WhatsApp AuthKey, Which is shown by configuring WhatsApp
earlier.
You can Enable or Disable Settings by clicking "WhatsApp Invoice Status"
Hit the submit button to save this configuration.

Whatsapp Work in Sale
To send a message on WhatsApp, you must check the Send Invoice Via Whatsapp option
from the finalize sale, otherwise the message will not go through.

Add Customer Group
To Add a new Customer Group expand Sale Menu click on Add Customer Group menu from the left
sidebar.

Fill up the required field and hit the submit button.
Add Customer
To Add a new Customer expand Sale Menu click on Add Customer menu from the left sidebar.

Fill up the required field and hit the submit button.
Opening Balance
The opening balance for a customer typically refers to any outstanding amount that the
customer owes before starting to use the POS system for transactions.
Enter the opening balance in the Opening Balance field. Select Debit if the customer has past
dues.
Enter the opening balance in the Opening Balance field. Select Credit if the customer has
received money in the past.

Credit Limit
A credit limit is an amount, It determines how much money due a customer can keep.
Suppose I give a credit limit of 100 for a customer. This means that the customer cannot owe
more than 100 money while selling the product to that customer.
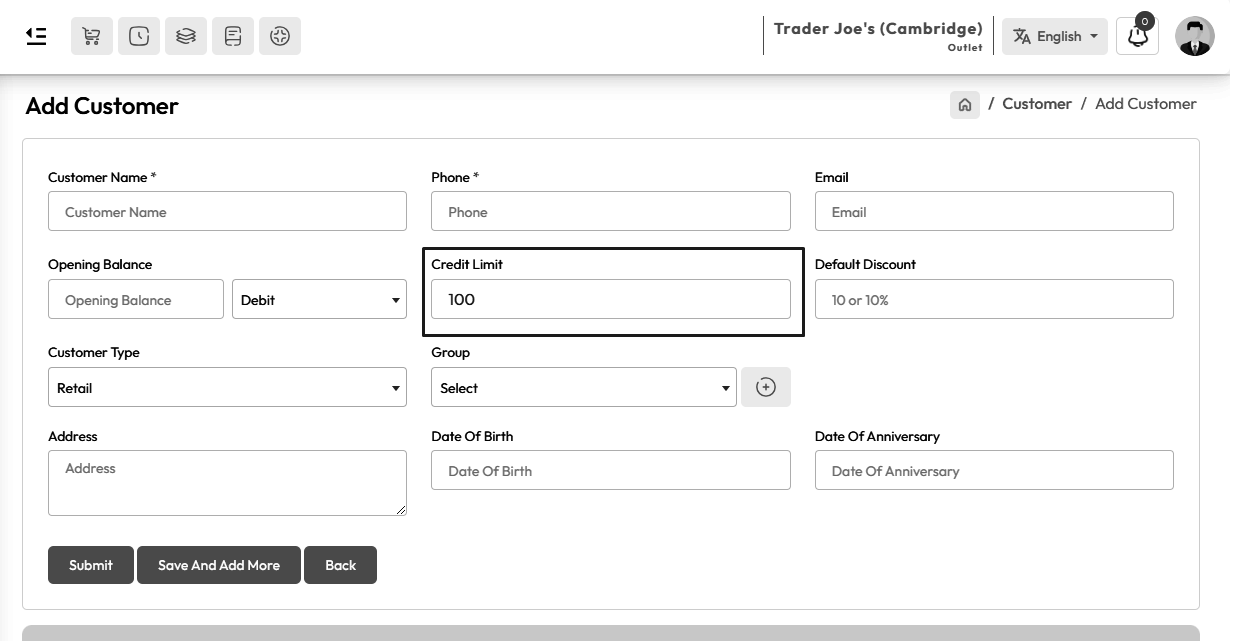
Credit limit example snapshot. In this snapshot you will be see a Notification "You cannot
keep more than 100.0 dues for this customer, Because credit limit is 100.0"

Default Discount
While adding customer when you enter a discount in the "Default Discount" field, it means
that customer will get that amount of discount on each product.

Here the below snapshot shows that 2% discount is being given to Mr.Alex
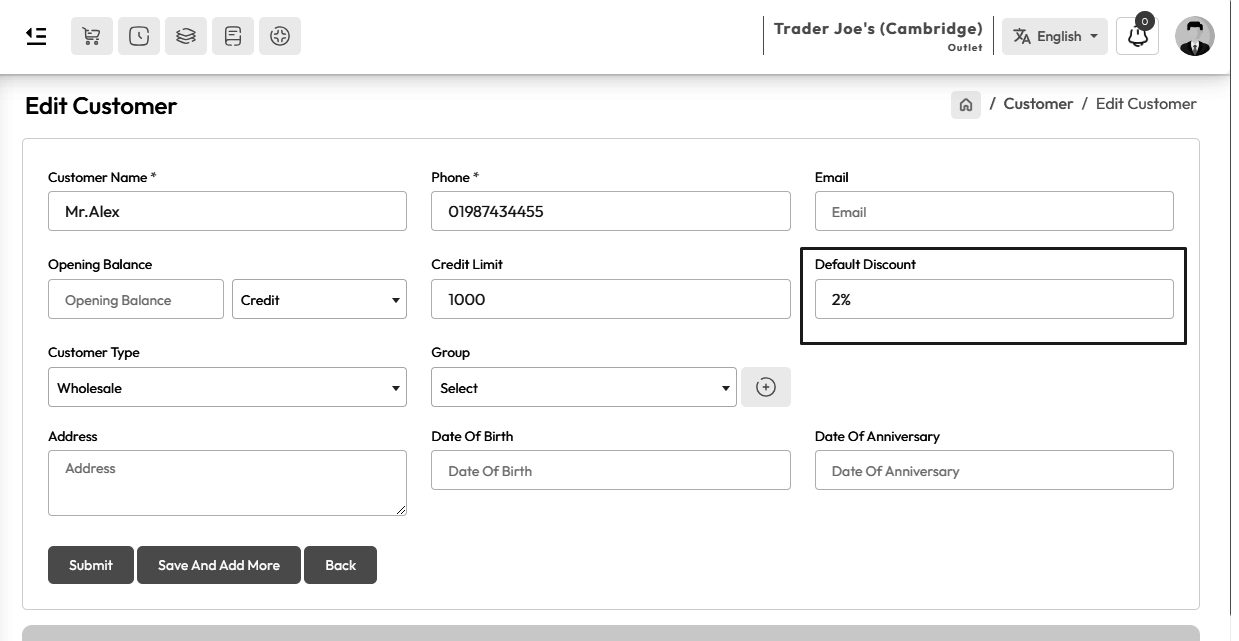
Here the below snapshot POS screen shows that he is getting 2% discount on each product.

Price Type
While adding customer you've see the "Customer Type" field two option one is Retail another
is Wholesale, when you select "Retail" option, it means that customer will get "Retails"
price while selling. When you select "Wholesale" option then customer will get "Wholesale"
price while selling.
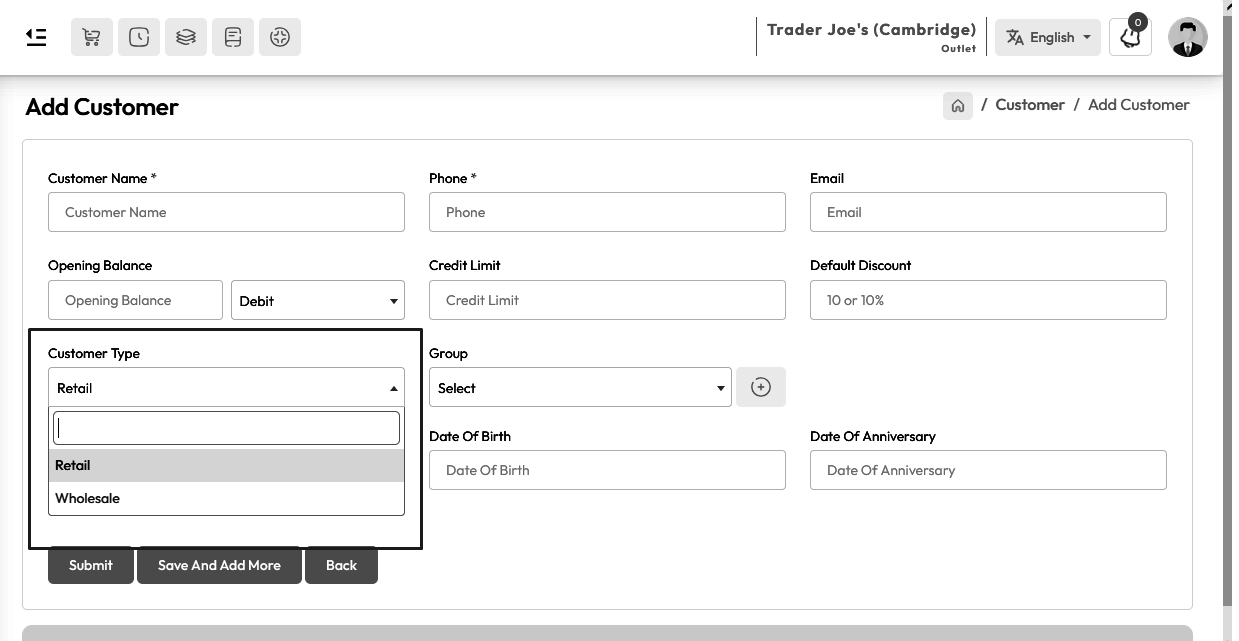
In the snapshot below you can see that I have set the "Retail" price for Mr.Alex.

In the snapshot below you can see that "Fogg Scent" product "Retail" price 900.

You can see in the below snapshot POS screen that the price of the "Fogg Scent" product is
900 if it is to be sold to Mr.Alex.

In the snapshot below you can see that I have set the "Wholesale" price for Mr.Alex.

In the snapshot below you can see that "Fogg Scent" product "Wholesale" price 890.

You can see in the below snapshot POS screen that the price of the "Fogg Scent" product is
890 if it is to be sold to Mr.Alex.

List Customer
To view List Customer Expand Sale Menu form the left sidebar, and click on List Customer
menu.
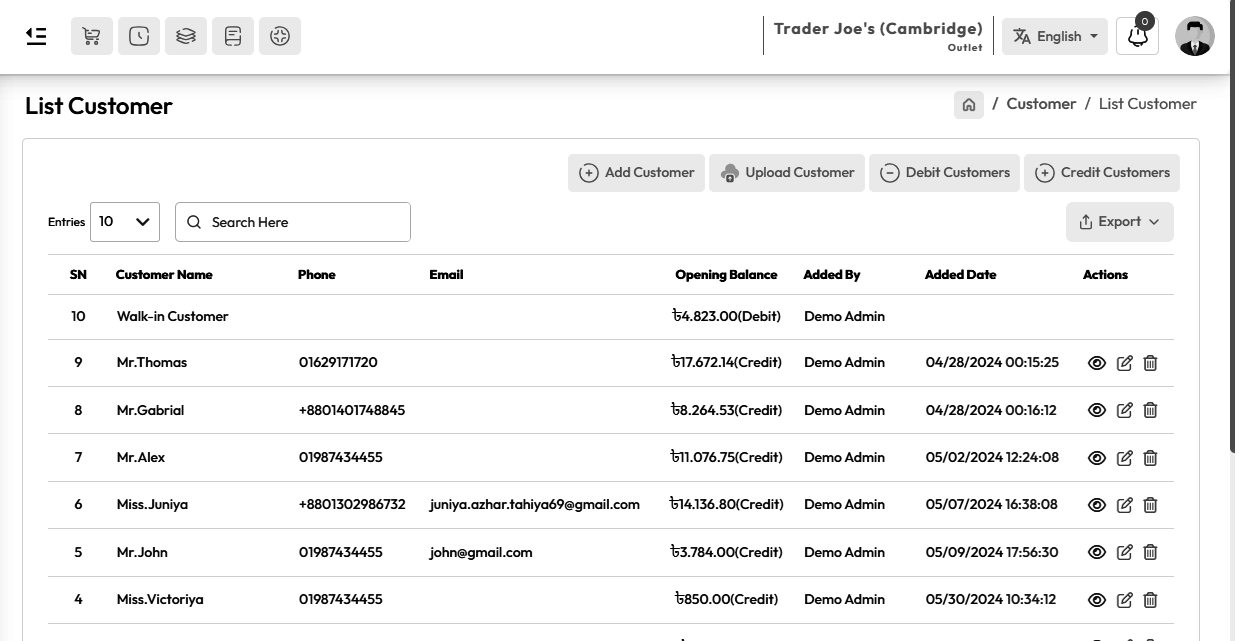
Debit Customer
To view Debit Customer Expand Sale Menu form the left sidebar, After clicking on List
Customer you will see a button on the right called Debit Customer, click on it.

After clicking on debit customer you will see a list of debit customers. example shown below
snapshot.

Credit Customer
To view Credit Customer Expand Sale Menu form the left sidebar, After clicking on List
Customer you will see a button on the right called Credit Customer, click on it.

After clicking on debit customer you will see a list of credit customers. example shown below
snapshot.

Bulk Customer Upload
To Customer Bulk Upload Expand Sale Menu from the left sidebar, Click on the List Customer
menu, and Click on "Upload Customer" button.

Download A Sample excel file by clicking "Download Sample" Button.

Check "Remove all previous data, before uploading new data" to delete all previous customers
while uploading new customers.
Leave it unchecked if you don't want to delete previous customers.

Read the excel file guidelines carefully.

After preparing excel file, upload the excell file.
Send SMS to All Due Customer
To send message to all debit customers go to debit customer list, select customers and click
"Send SMS Reminder To All Due Customer" button.
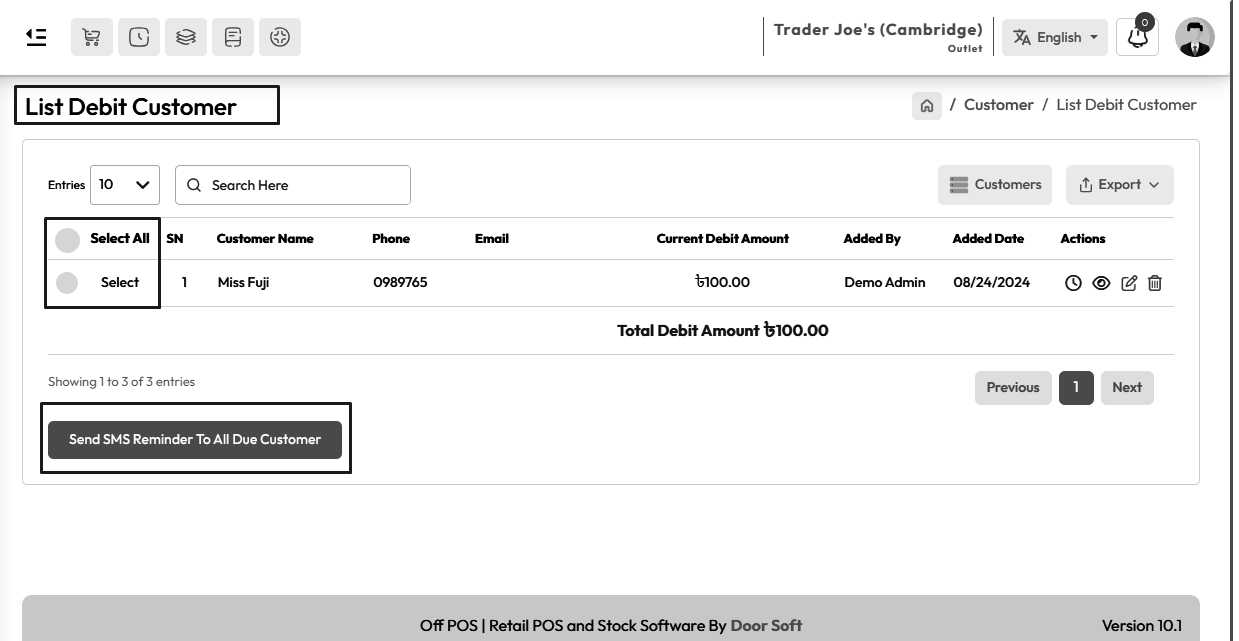
After clicking on "Send SMS Reminder To All Due Customer" button you will see a popup modal,
customize the message if you want after that click on "Send" button to send reminder.

You can send SMS or reminder to only 1 person if you want. click on "Send Payment Reminder"
button.

After clicking on "Send Payment Reminder" button you will get a popup modal, customize the
message if you want after that click on "Send" button to send reminder.

Add Customer Receive
To receive customer dues Expand Customer Receive Menu form the left sidebar, After that click
on "Add Customer Receive" menu.

Fill up the required field and hit the submit button.
Print Receive Receipt
To Print "Customer Due Receive" receipt expand the Customer Receive menu from the left
sidebar and click on "List Customer Receive" menu afer that click on the "Print Invoice"
button to print "Customer Due Receive"
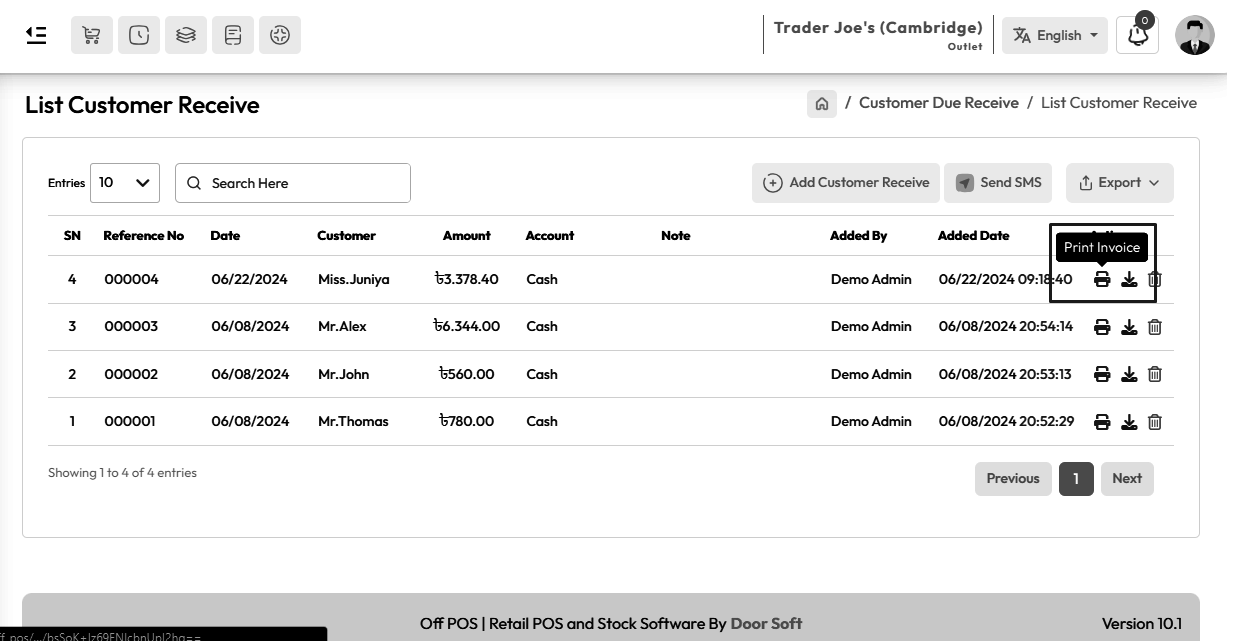
You can also download "Customer Due Receive" receipt by clicking "Download Invoice" button.
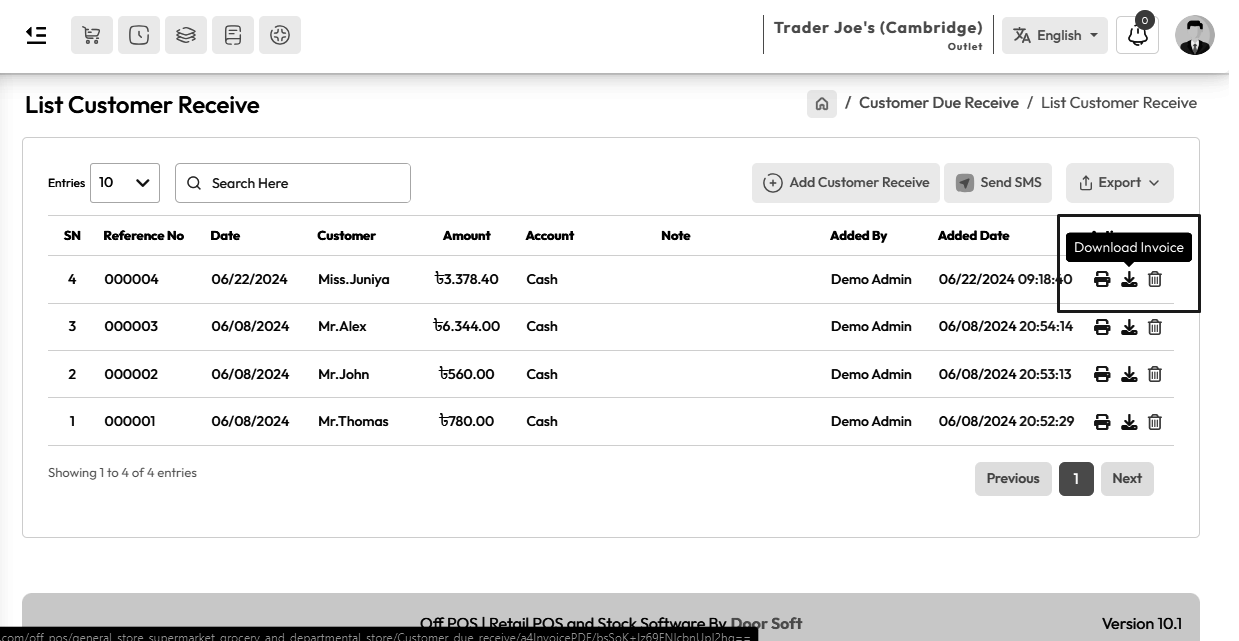
Customer Ledger
To view Customer Ledger Report Expand Report Menu and click Customer Ledger Report from the
left sidebar. select a date to view the report within a specified date if needed. select a
customer also you can select outlet from the outlet field to filter report according to
outlet.

Customer Balance Report
To view Customer Balance Report Expand Report Menu and click Customer Balance Report from the
left sidebar. select customer balance type if needed also you can see "Debit" and "Credit"
both customers.

Customer Receive Report
To view Customer Receive Report Expand Report Menu and click Customer Receive Report from the
left sidebar. select a date to view the report within a specified date if needed. select a
customer also you can select outlet from the outlet field to filter report according to
outlet.

Add Supplier
To Add a new Supplier expand Purchase Menu click on Add Supplier menu from the left sidebar.

Fill up the required field and hit the submit button.
Opening Balance
The opening balance for a supplier typically refers to any outstanding amount that the
supplier owes before starting to use the POS system for transactions.
Enter the opening balance in the Opening Balance field. Select Debit if the supplier has past
dues.
Enter the opening balance in the Opening Balance field. Select Credit if the supplier has
received money in the past.

List Supplier
To view List Supplier Expand Purchase Menu form the left sidebar, and click on List Supplier
menu.

Debit Supplier
To view Debit Supplier Expand Purchase Menu form the left sidebar, After clicking on List
Supplier you will see a button on the right called Debit Supplier, click on it.

After clicking on debit supplier you will see a list of debit supplier. example shown below
snapshot.

Credit Supplier
To view Credit Supplier Expand Purchase Menu form the left sidebar, After clicking on List
Supplier you will see a button on the right called Credit Supplier, click on it.

After clicking on debit supplier you will see a list of credit suppliers. example shown below
snapshot.

Bulk Supplier Upload
To Supplier Bulk Upload Expand Purchase Menu from the left sidebar, Click on the List
Supplier menu, and Click on "Upload Supplier" button.

Download A Sample excel file by clicking "Download Sample" Button.

Check "Remove all previous data, before uploading new data" to delete all previous suppliers
while uploading new suppliers.
Leave it unchecked if you don't want to delete previous suppliers.

Read the excel file guidelines carefully.

After preparing excel file, upload the excell file.
Add Supplier Payment
To pay supplier Expand Suppliery Payment Menu form the left sidebar, After that click on "Add
Supplier Payment" menu.

Fill up the required field and hit the submit button.
Print Payment Receipt
To Print "Supplier Payment" receipt expand the Suppliery Payment menu from the left sidebar
and click on "List Supplier Payment" menu afer that click on the "Print Invoice" button to
print "Supplier Payment" receipt

You can also download "Supplier Payment" receipt by clicking "Download Invoice" button.

Supplier Ledger
To view Supplier Ledger Report Expand Report Menu and click Supplier Ledger Report from the
left sidebar. select a date to view the report within a specified date if needed. select a
Supplier also you can select outlet from the outlet field to filter report according to
outlet.

Supplier Balance Report
To view Supplier Balance Report Expand Report Menu and click Supplier Balance Report from the
left sidebar. select Supplier balance type if needed also you can see "Debit" and "Credit"
both Suppliers.

Add Purchase Return
To "Purchase Return" a general product, click on the "Purchase Return" menu from the left
sidebar and click on the "Add Purchase Return" menu.
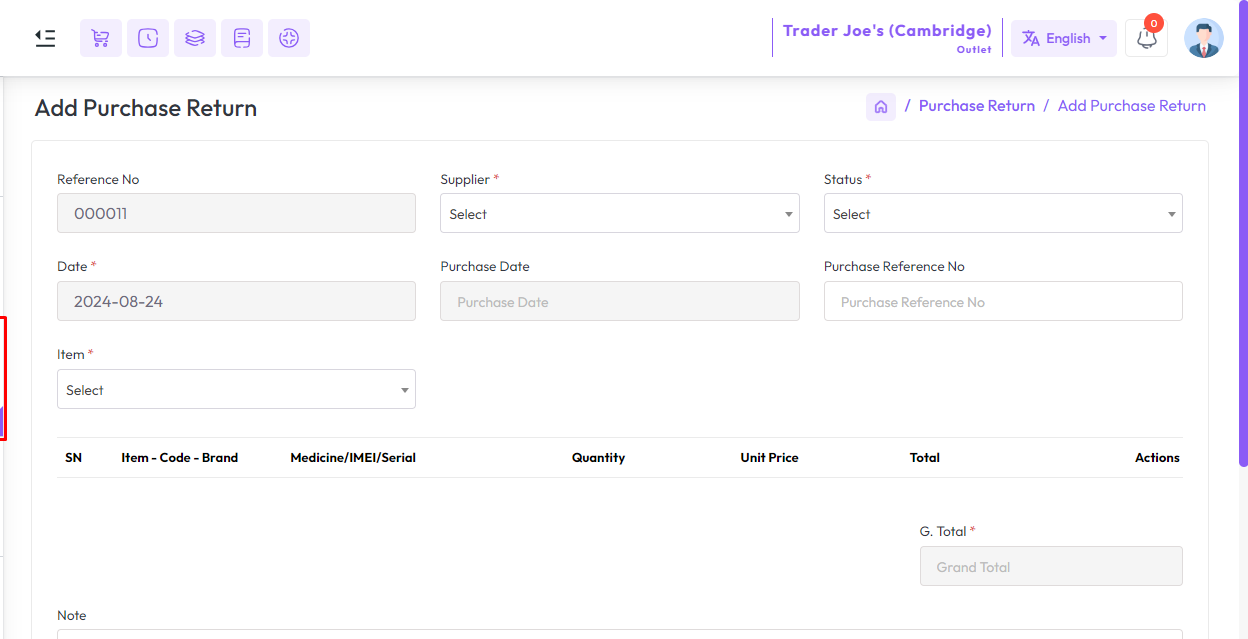
First select the supplier.
Then select Status, Here stocks and accounts work differently based on status.
If you select status "Taken by supplier product not returned" the product will be removed
from the stock and there will be no change in the account.
If you select status "Taken by supplier money returned" the product will be removed from the
stock and Money will be added to the account.
If you select status "Taken by supplier product returned" There will be no change in stock
and account.

While making the purchase return, when the "Status" is taken by supplier money return, you
will get an "Account" field, from the account field select an account through which the
"Purchase Return" money is being taken.

Expand the "Items" field and select a "General Type Product" In my case "Matador Ballpen" is
a General Type Product.

After selecting the "General Type" product you will see a popup modal, Enter the Quantity in
the Quantity field and enter the purchase return price in the Unit Price field.
Suppose you want to purchase return a product whose price per unit is 10
amount, So if you purchase return 5 quantity then just put 10 amount in unit field not
50 amount.
NB: You just put the single unit price of the product.
NB: The purchase return quantity must be entered in the sale unit.

After adding the products to the cart, the cart will look like the snapshot below.

Fill up the required field, After that hit the "Submit" button to save this purchase return.
List Purchase Return
To view a list of purchase return expand the "Purchase Return" menu from the left sidebar,
and click on the "List Purchase Return" menu.

Click on the "Print Invoice" and "Download Invoice" buttons from Actions to print and
download the "Purchase Return Invoice".
Purchase Return Report
To view the "Purchase Return Report" expand the "Report" menu from the left sidebar and click
on the "Purchase Return Report" menu.
Select a date to view the report within a specified date if needed. select a supplier also
you can select outlet from the outlet field to filter report according to outlet.
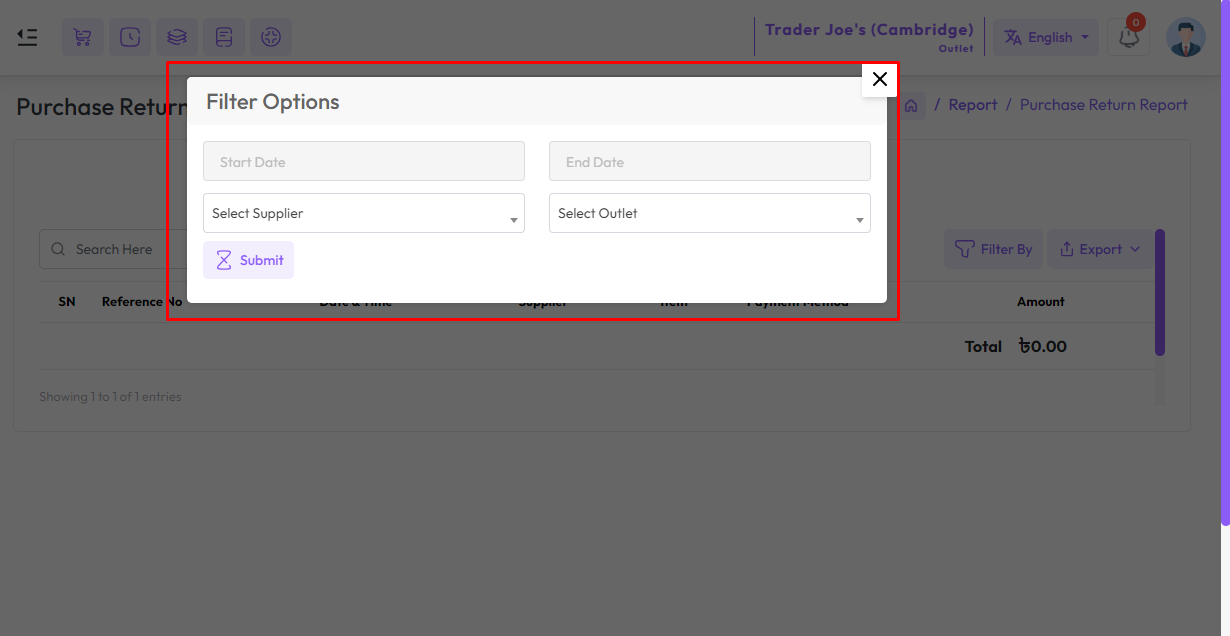
Add Purchase Return
To "Purchase Return" a variation product, click on the "Purchase Return" menu from the left
sidebar and click on the "Add Purchase Return" menu.
First select the supplier.
Then select Status, Here stocks and accounts work differently based on status.
If you select status "Taken by supplier product not returned" the product will be removed
from the stock and there will be no change in the account.
If you select status "Taken by supplier money returned" the product will be removed from the
stock and Money will be added to the account.
If you select status "Taken by supplier product returned" There will be no change in stock
and account.
While making the purchase return, when the "Status" is taken by supplier money return, you
will get an "Account" field, from the account field select an account through which the
"Purchase Return" money is being taken.
Expand the "Items" field and select a "Variation Type Product" In my case all shown in
snapshot are "Variation Type" products.

After selecting the "Variation Type" product you will see a popup modal, Enter the Quantity
in the Quantity field and enter the purchase return price in the Unit Price field.
Suppose you want to purchase return 10 pieces of "Aligori Pajam"
whose price per piece is 400 amount, then just put 400 amount in the unit field not 4000
amount.
NB: You just put the single unit price of the product.
NB: The purchase return quantity must be entered in the sale unit.
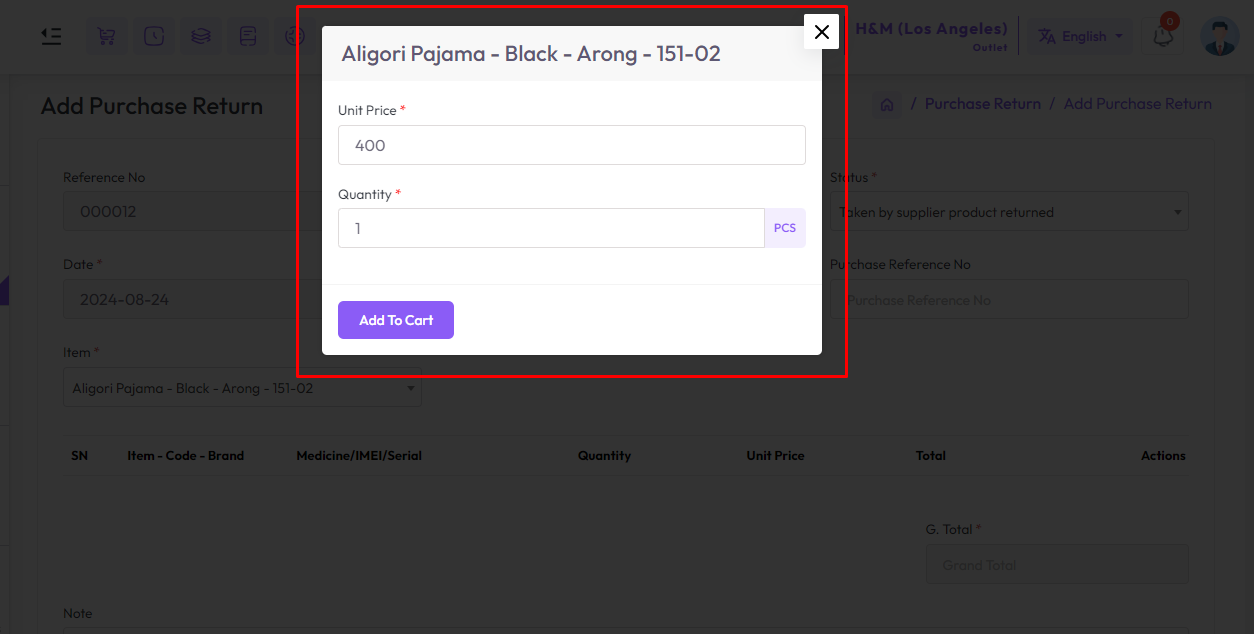
After adding the products to the cart, the cart will look like the snapshot below.

Fill up the required field, After that hit the "Submit" button to save this purchase return.
Add Purchase Return
To "Purchase Return" an IMEI product, click on the "Purchase Return" menu from the left
sidebar and click on the "Add Purchase Return" menu.
First select the supplier.
Then select Status, Here stocks and accounts work differently based on status.
If you select status "Taken by supplier product not returned" the product will be removed
from the stock and there will be no change in the account.
If you select status "Taken by supplier money returned" the product will be removed from the
stock and Money will be added to the account.
If you select status "Taken by supplier product returned" There will be no change in stock
and account.
While making the purchase return, when the "Status" is taken by supplier money return, you
will get an "Account" field, from the account field select an account through which the
"Purchase Return" money is being taken.
Expand the "Items" field and select a "IMEI Type Product" In my case "Samsung Galaxy Tab A8
(4G)" is a IMEI Type Product.

After selecting IMEI product you will get a popup modal, Enter the purchase price in the Unit
Price field.
Suppose you want to purchase return 3 pieces of IMEI product whose
price per piece is 8950 amount, for 2 pieces of IMEI product just put 8950 amount only
in the unit field not 17900 amount.
NB: You just put the single unit price of the product.
NB: The purchase return quantity must be entered in the sale unit.
Enter the quantity in the Quantity field for how many IMEIs you want to
purchase return, below field will be generated according to quantity number. Enter the IMEI
number in the IMEI field. Then click the Add to Cart button to add these items to the cart.

To increase the new IMEI field click on the plus button.

After adding the products to the cart, the cart will look like the snapshot below.

In the snapshot below you can see that there is another "Return IMEI" field below the "IMEI"
field. This means getting another "IMEI" instead of the one you are returning.
Note that this field is visible only when the "Status" is "Taken by
supplier product returned" otherwise it is not visible.

Fill up the required field, After that hit the "Submit" button to save this purchase return.
Add Purchase Return
To "Purchase Return" a serial product, click on the "Purchase Return" menu from the left
sidebar and click on the "Add Purchase Return" menu.
First select the supplier.
Then select Status, Here stocks and accounts work differently based on status.
If you select status "Taken by supplier product not returned" the product will be removed
from the stock and there will be no change in the account.
If you select status "Taken by supplier money returned" the product will be removed from the
stock and Money will be added to the account.
If you select status "Taken by supplier product returned" There will be no change in stock
and account.
While making the purchase return, when the "Status" is taken by supplier money return, you
will get an "Account" field, from the account field select an account through which the
"Purchase Return" money is being taken.
Expand the "Items" field and select a "Serial Type Product" In my case "LGC10LED4K" is a
Serial Type Product.

After selecting Serial product you will get a popup modal, Enter the purchase price in the
Unit Price field.
Suppose you want to purchase return 2 pieces of Serial product
whose price per piece is 140652 amount, for 2 pieces of Serial product just put 140652
amount only in the unit field not 280504 amount.
NB: You just put the single unit price of the product.
NB: The purchase return quantity must be entered in the sale unit.
Enter the quantity in the Quantity field for how many Serials you want to purchase return,
below field will be generated according to quantity number. Enter the Serial number in the
Serial field. Then click the Add to Cart button to add these items to the cart.

To increase the new Serial field click on the plus button.

After adding the products to the cart, the cart will look like the snapshot below.

In the snapshot below you can see that there is another "Return Serial" field below the
"Serial" field. This means getting another "Serial" instead of the one you are returning.
Note that this field is visible only when the "Status" is "Taken by
supplier product returned" otherwise it is not visible.
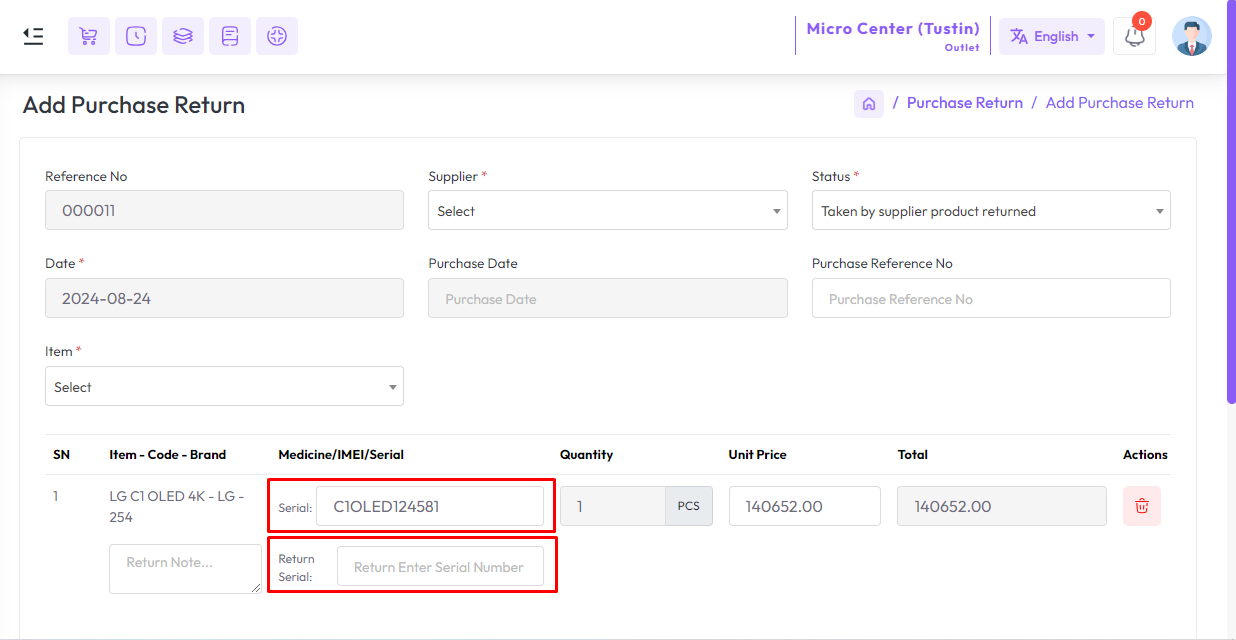
Fill up the required field, After that hit the "Submit" button to save this purchase return.
Add Purchase Return
To "Purchase Return" a medicine product, click on the "Purchase Return" menu from the left
sidebar and click on the "Add Purchase Return" menu.
First select the supplier.
Then select Status, Here stocks and accounts work differently based on status.
If you select status "Taken by supplier product not returned" the product will be removed
from the stock and there will be no change in the account.
If you select status "Taken by supplier money returned" the product will be removed from the
stock and Money will be added to the account.
If you select status "Taken by supplier product returned" There will be no change in stock
and account.
While making the purchase return, when the "Status" is taken by supplier money return, you
will get an "Account" field, from the account field select an account through which the
"Purchase Return" money is being taken.
Expand the "Items" field and select a "Medicine Type Product" In my case "Ace Syrup" is a
Medicine Type Product.

After selecting medicine product you will get a popup modal, Enter the purchase price in the
Unit Price field.
Suppose you want to purchase return quantities of 10, and 15 with
different expiry dates respectively, Then you enter the unit price of one quantity
only.
NB: You just put the single unit price of the product.
NB: The purchase return quantity must be entered in the sale unit.
Enter the quantity in the Quantity field from the left for how many medicines
you want to purchase, select an expiry date, the expiry date of which you want to purchase
the product. Then click the Add to Cart button to add these items to the cart.

To increase the new Medicine/expiry date and Quantity field click on the plus button.

After adding the products to the cart, the cart will look like the snapshot below.

In the snapshot below you can see that there is another "Return Serial" field below the
"Serial" field. This means getting another "Serial" instead of the one you are returning.
Note that this field is visible only when the "Status" is "Taken by
supplier product returned" otherwise it is not visible.

Fill up the required field, After that hit the "Submit" button to save this purchase return.
Add Purchase Return
To "Purchase Return" a installment product, click on the "Purchase Return" menu from the left
sidebar and click on the "Add Purchase Return" menu.
First select the supplier.
Then select Status, Here stocks and accounts work differently based on status.
If you select status "Taken by supplier product not returned" the product will be removed
from the stock and there will be no change in the account.
If you select status "Taken by supplier money returned" the product will be removed from the
stock and Money will be added to the account.
If you select status "Taken by supplier product returned" There will be no change in stock
and account.
While making the purchase return, when the "Status" is taken by supplier money return, you
will get an "Account" field, from the account field select an account through which the
"Purchase Return" money is being taken.
Expand the "Items" field and select a "Installment Type Product" In my case "LG GL-T402JDSY"
is a Installment Type Product.

After selecting the "Installment Type" product you will see a popup modal, Enter the Quantity
in the Quantity field and enter the purchase return price in the Unit Price field.
Suppose you want to purchase return a product whose price per unit
is 40000 amount, So if you purchase return 2 quantity then just put 40000 amount in unit
field not 80000 amount.
NB: You just put the single unit price of the product.
NB: The purchase return quantity must be entered in the sale
unit.

After adding the products to the cart, the cart will look like the snapshot below.

Fill up the required field, After that hit the "Submit" button to save this purchase return.
Add Sale Return
To add a sale return for a general product expand the "Sale Return" menu from the left
sidebar and click on the "Add Sale Return" menu.

Select customer first when making a sale return.
No data will be displayed in the sales invoice and item fields unless the
customer is selected. Because those fields are generated based on the customer.

After that, search for the invoice by invoice number, and select the invoice.

After selecting the invoice, the invoice items will be generated in the item field.
After that select the items you want to return one by one.

Then enter the return quantity and return unit price in the Return Quantity and Unit Price in
Return fields.

Then enter the paid amount in the Paid field. Select a payment method from the Account field,
then click the Submit button to save it.

List Sale Return
To view a list of sale returns expand the "Sale Return" menu from the left sidebar, and click
on the "List Sale Return" menu.

Click on the "Print Invoice" and "Download Invoice" buttons from Actions to print and
download the "Sale Return Invoice".
Sale Return Report
To view the "Return Report" expand the "Report" menu from the left sidebar and click on the
"Return Report" menu.
Select a date to view the report within a specified date if needed. select a customer also
you can select outlet from the outlet field to filter report according to outlet.

Add Sale Return
To add a sale return for a variation product expand the "Sale Return" menu from the left
sidebar and click on the "Add Sale Return" menu.
Select customer first when making a sale return.
No data will be displayed in the sales invoice and item fields unless the
customer is selected. Because those fields are generated based on the customer.
After that, search for the invoice by invoice number, and select the invoice.
After selecting the invoice, the invoice items will be generated in the item field.
After that select the items you want to return one by one.

Then enter the return quantity and return unit price in the Return Quantity and Unit Price in
Return fields.

Then enter the paid amount in the Paid field. Select a payment method from the Account field,
then click the Submit button to save it.

Add Sale Return
To add a sale return for an IMEI product expand the "Sale Return" menu from the left sidebar
and click on the "Add Sale Return" menu.
Select customer first when making a sale return.
No data will be displayed in the sales invoice and item fields unless the
customer is selected. Because those fields are generated based on the customer.
After that, search for the invoice by invoice number, and select the invoice.
After selecting the invoice, the invoice items will be generated in the item field.
After that select the items you want to return one by one.

Then enter the return quantity and return unit price in the Return Quantity and Unit Price in
Return fields.

Then enter the paid amount in the Paid field. Select a payment method from the Account field,
then click the Submit button to save it.

Add Sale Return
To add a sale return for a serial product expand the "Sale Return" menu from the left sidebar
and click on the "Add Sale Return" menu.
Select customer first when making a sale return.
No data will be displayed in the sales invoice and item fields unless the
customer is selected. Because those fields are generated based on the customer.
After that, search for the invoice by invoice number, and select the invoice.
After selecting the invoice, the invoice items will be generated in the item field.
After that select the items you want to return one by one.

Then enter the return quantity and return unit price in the Return Quantity and Unit Price in
Return fields.

Then enter the paid amount in the Paid field. Select a payment method from the Account field,
then click the Submit button to save it.

Add Sale Return
To add a sale return for a medicine product expand the "Sale Return" menu from the left
sidebar and click on the "Add Sale Return" menu.
Select customer first when making a sale return.
No data will be displayed in the sales invoice and item fields unless the
customer is selected. Because those fields are generated based on the customer.
After that, search for the invoice by invoice number, and select the invoice.
After selecting the invoice, the invoice items will be generated in the item field.
After that select the items you want to return one by one.

Then enter the return quantity and return unit price in the Return Quantity and Unit Price in
Return fields.

Then enter the paid amount in the Paid field. Select a payment method from the Account field,
then click the Submit button to save it.

Add Sale Return
To add a sale return for a installment type product expand the "Sale Return" menu from the
left sidebar and click on the "Add Sale Return" menu.
Select customer first when making a sale return.
No data will be displayed in the sales invoice and item fields unless the
customer is selected. Because those fields are generated based on the customer.
After that, search for the invoice by invoice number, and select the invoice.
After selecting the invoice, the invoice items will be generated in the item field.
After that select the items you want to return one by one.

Then enter the return quantity and return unit price in the Return Quantity and Unit Price in
Return fields.

Then enter the paid amount in the Paid field. Select a payment method from the Account field,
then click the Submit button to save it.

Dashboard
To view Dashboard click Dashboard menu from the left sidebar.
A Dashboard serves as a centralized hub for real-time data visualization and management. It
provides a comprehensive overview of key metrics and performance indicators essential for
business operations. A Dashboard includes Revenue chart, Low stock list, Customer receive
list, Supplier payment list, Monthly Sale Comparison, and financial analytics.

Add Promotion
To Add a new Promotion or Coupon expand Sale Menu click on Add Promotion menu from the left
sidebar.

Here various promotions or discounts can be given based on the type.
let's explain one by one.

Discount for an Item within date range.
A discount can be given on a specific item within a specific time frame.
Select "Discount" option from Type field enter a title in "Title" field, select Start Date
and End Date, select an "Item" from Items field, enter discount percentage or plain amount
in "Discount(Flat/Percentage)" field. after fill up required field hit the submit button.

Example of Discount for an Item within date range.

Discount on the entire sale within date range.
A discount can be given on the entire sale within a specific time frame.
Select "Discount coupon (on entire sale)" option from Type field enter a title in "Title"
field, select Start Date and End Date, enter a coupon code from "Coupon Code" field ( Coupon code must contain 2 letters followed by 2 numbers or vice
versa ) To verify the customer's coupon code is valid during the sale, enter
discount percentage or plain amount in "Discount(Flat/Percentage)" field. after fill up
required field hit the submit button.

Example of Discount on entire sale within date range.

Free Item on specific product within date range.
It can also offer Buy and Get offers within specified time periods.
Select the "Free Item" option from the Type field, enter a title in the "Title" field, select
Start Date and End Date, select an item from the "Buy" field, enter the number of products
to be purchased in the "Buy Quantity" field, select an item from "Get" field, enter the
number of products you will receive in the "Get Quantity" field. after fill up the required
field hit the submit button.

Example of Free Item offer within date range.

Edit Promotion
To edit a Promotion or Coupon expand Sale Menu click on List Promotion menu from the left
sidebar. after that click on the edit button from action.

Edit promotion will look like below snapshot, edit the information as per your requirement
and click submit button.

How to promotion work in POS
Discount for an Item in POS Item Modal
If you click on the product on which the Promotion and Discount has been given, its title
will be shown in the modal.
Earlier you saw that 50% discount was given on this product.

Discount for an Item in POS Item Cart

Discount on entire sale in POS
First, add the product to the cart.
Then click on the marked place to apply the coupon discount.

Then enter the coupon code and click the submit button, then you will see that the discount
will be applied on each item.

Here you will see that 7% discount has been applied on each product, which we have already
shown by creating discounts.

Free Item in POS Item Modal
If you click on a product that has a buy and get offer on it, you will see a title like this
on the modal.

You will see here that buy 5 products get one item free.
You may have seen earlier that we have created a free item promotion where buying 5 Coca-Cola
you will get 1 Coca-Cola free.

Loyalty Setting
To setting loyalty point expand Setting menu Menu click on "Setting" menu from the left
sidebar.
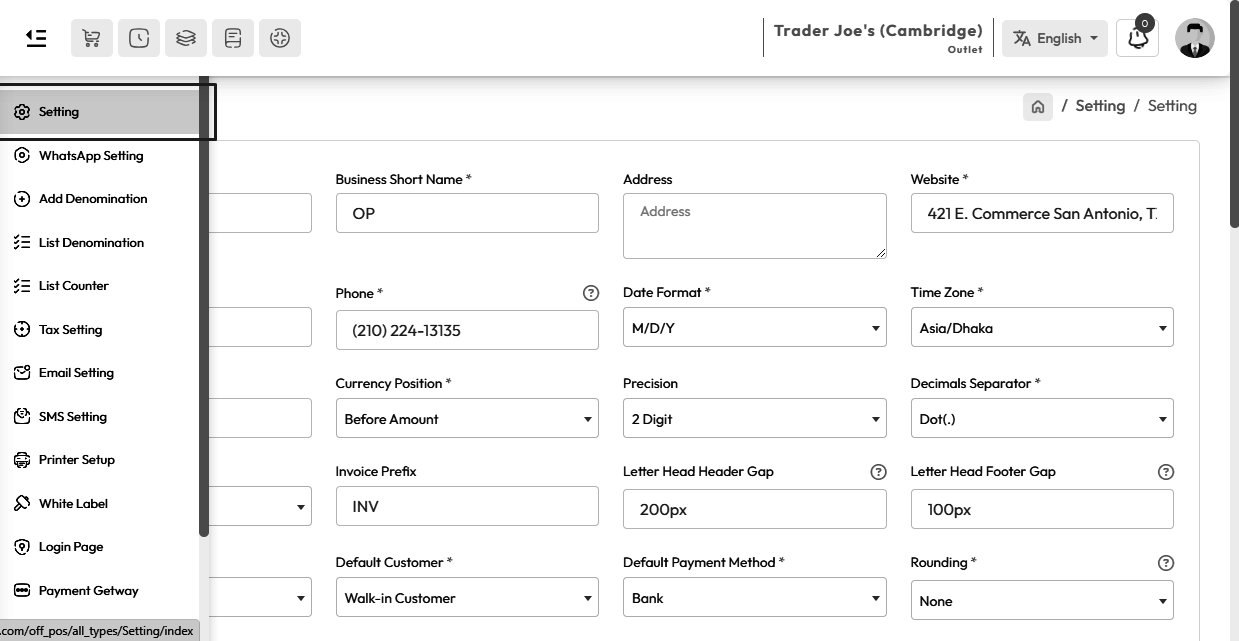
Select Enable from the Loyalty Points field to keep loyalty points enabled
Select Disable from the Loyalty Points field to keep loyalty points disable
Minimum Loyalty Point to Redeem: Define the Minimum Loyalty Point to Redeem.
Loyalty Point Rate: Define 1 loyalty point is equal to how much money as per your currency.

Loyalty Point for Each Item
To setup Loyalty Point for each "Item" expand Item/Product menu click on Add Item or if the
item already exist goto List Item click on the edit button, enter loyalty point in "Loyalty
Point" field, When you sell a product, customers will earn loyalty points assigned to the
product.

Customer Loyalty Account
Here it is seen that Loyalty Point is set to 10 for Nido product.

When the product was sold for the first time, 10 Points were added to the customer's account.

Here is the example of below snapshot How many loyalty points earn the customer.

Redeem Loyalty Point
Customers need to earn a minimum 40 loyalty points for redeem as per our setting.
Let’s finish the last order then this customer will earn 10 loyalty points. And then place
another order to redeem loyalty points and other’s payment method.

Available Loyalty Point Report
To view Available Loyalty Point Report Expand Report Menu and click Available Loyalty Point
Report from the left sidebar. select a date to view the report within a specified date if
needed. select a customer also you can select outlet from the outlet field to filter report
according to outlet.

Usage Loyalty Point Report
To view Usage Loyalty Point Report expand Report Menu and click Usage Loyalty Point Report
from the left sidebar. select a date to view the report within a specified date if needed.
select a customer also you can select outlet from the outlet field to filter report
according to outlet.

Add Installment Customer
To add a new "Installment Customer" expand the "Installment Sale" menu from the left sidebar
and click on the "Add Installment Customer" menu.
To sell installment products for security reasons a customer must need a customer photo,
customer NID, present address, permanent address, and work address also it must be
accompanied by a guarantor's name, phone number, present address, permanent address, and
work address, So whenever the customer buys the product in installments, he must bring this
information with him.

Fill up the required field and hit the submit button.
List Installment Customer
To view a list of installment customers expand the "Installment Sale" menu from the left
sidebar, and click on the "List Installment Sale" menu.

Click on the "Edit" and "Details" buttons from Actions to edit and view the customre
informations.
Add Installment Sale
To add a new "Installment Sale" expand the "Installment Sale" menu from the left sidebar and
click on the "Add Installment Sale" menu

First select a customer then select the product you want to sell.
Enter number of installment in "Number of Installment" field then enter percentage of
interest in "Percentage of Interes" field.
More about Percentage of Interest In installment products, the
percentage of interest refers to the additional amount charged on the principal loan amount
over the installment period. This interest rate is applied to each installment payment made
by the borrower. It represents the cost of financing the purchase over time and is typically
determined based on factors such as the borrower's creditworthiness.

Enter down payment amont in "Down Payment" field.
More about Down Payment A down payment in installment product sales is an initial
partial payment made by the customer at the time of purchase. It is a percentage of the
total purchase price and is paid upfront before the installment plan begins. The purpose of
a down payment is to reduce the amount of financing required for the purchase and to provide
assurance to the seller that the customer is committed to completing the purchase. Down
payments vary depending on the seller's policies.
Installment duration refers to the period of time over which an
installment plan extends. It represents the length of time during which the buyer will make
regular payments to repay the total purchase amount, including any interest or financing
charges. The installment duration is typically determined by the seller or lender and may
vary depending on factors such as the type of product being purchased, the buyer's financial
situation, and the terms of the installment agreement. Shorter installment durations result
in higher installment payments but lower overall interest costs, while longer durations lead
to lower installment payments but higher total interest costs.
Enter the duration number in the "Installment Duration" field and click the
Next button.

A sample of installment sale shown below snapshot

A sample of installment sale shown below snapshot

A sample of installment sale shown below snapshot
Here are the generated Installments.

Fill up the required field and hit the submit button.
List Installment Sale
To view a list of installment sales expand the "Installment Sale" menu from the left sidebar,
and click on the "List Installment Sale" menu.

Click on the "Print Invoice" and "Download Invoice" buttons from Actions to print and
download the "Installment Sale Invoice".
Installment Collection
To view the Installment Collection expand the "Installment Sale" menu form the left sidebar,
and click on the "Installment Collection" menu.

First select a customer from whom you want to collect installment payments.

After selecting the customer, you will see the invoice of that customer in the "Select
Installment" field on the right side, select the desired invoice, and click on the submit
button.

After selecting the customer and invoice and submitting, you will see the installment lists
of that invoice.
Edit the installment for which you want to receive payment.

After clicking the edit button you will see an interface like below snapshot.
Enter the amount in the Paid Amount field, and select a payment method from the Account
field, then click the Submit button.

List Due Installment
To view a list due of installment expand the "Installment Sale" menu from the left sidebar,
and click on the "List Due Installment" menu.

Here you can filter by those who have due within 3 days, 7 days, 15 days.

Send SMS to all Due Customers
To send the message to the customers who hvae due, select them and click on the submit
button.

Installment Report
To view the "Installment Report" expand the "Report" menu from the left sidebar and click on
the "Installment Report" menu.
Select a customer after selecting the customer you will see the list of invoices in the
invoice field as per the customer.

Then select a status and click on submit button.

Installment Due Report
To view the installment due reports expand the "Report" menu from the left sidebar and click
on the "Installment Due Report" menu.
Select a customer, select outlet from the outlet field to filter report according to outlet.

Add Servicing
To add a new "Servicing" item expand the "Warranty/Servicing" menu from the left sidebar and
click the "Add Servicing" menu.

Fill up the required field and hit the submit button.
Edit Servicing
To edit any change or update the servicing delivery status expand "Warranty/Servicing" menu
click on "List Servicing" menu from the left sidebar. click on edit button from action after
clicking that you will see an interface below snapshot, Make modifications as needed..

Fill up the required field and hit the submit button.
List Servicing
To view a list of servicing expand the "Warranty/Servicing" menu from the left sidebar, and
click on the "List Servicing" menu.
Also you can change Delivery Status from List Servicing, change status from status column.

Click on the "Print Invoice" and "Download Invoice" buttons from Actions to print and
download the "Servicing Invoice".

Warranty Checking by customer or customer invoice
To check the product's warranty, expand the Warranty/Checking menu, and click on the
"Warranty Checking" menu.

Select a customer from the customer field or search customer by customer name or mobile
number from customer field.

After selecting a customer, you will see all the invoices of that customer in the "Sales
Invoice" field on the right side.
And click the desired invoice from the "Sales Invoice" field, and check the warranty and
guarantee of the product.

Below is a snapshot of the invoice.

Add Warranty Products
To add a new "Warranty Products" item, expand the "Warranty/Servicing" menu from the left
sidebar and click the "Add Warranty Products" menu.

Fill up the required field and hit the submit button.
Edit Warranty Products
To edit a Warranty Product status or any changes expand "Warranty/Servicing" menu click on
the "List Warranty Product" menu from the left sidebar, after clicking that click on edit
button from action.

Edit the information as needed.
- After sending to vendor select Send to Vendor status.
- After received from vendor select Received from Vendor status.
- After delivered to customer select Delivered to Customer status.

Fill up the required field and hit the submit button.
Servicing Report
To view the "Servicing Report" expand the "Report" menu from the left sidebar and click on
the "Servicing Report" menu.
Select a date to view the report within a specified date if needed. select a employee if
needed, select status if needed, also you can select outlet from the outlet field to filter
report according to outlet.

Add Income Category
To add a new "Income Category" expand the "Income" menu from the left sidebar and click the
"Add Income Category" menu.

Fill up the required field and hit the submit button.
Add Income
To add a new "Income" expand the "Income" menu from the left sidebar and click the "Add
Income" menu.
Here the category is income category, where money is being earned.

Fill up the required field and hit the submit button.
Income Report
To view the "Income Report" expand the "Report" menu from the left sidebar and click on the
"Income Report" menu.
Select a date to view the report within a specified date if needed. select a income category
also you can select outlet from the outlet field to filter report according to outlet.

Add Expense Category
To add a new "Expense Category" expand the "Expense" menu from the left sidebar and click the
"Add Expense Category" menu.

Fill up the required field and hit the submit button.
Add Expense
To add a new "Expense" expand the "Expense" menu from the left sidebar and click the "Add
Expense" menu.
Here the category is expense category, where money is being expense.

Fill up the required field and hit the submit button.
Expense Report
To view the "Expense Report" expand the "Report" menu from the left sidebar and click on the
"Expense Report" menu.
Select a date to view the report within a specified date if needed. select a Expense
category also you can select outlet from the outlet field to filter report according to
outlet.

Add Salary
To generate Salary expand the "Salary/Payroll" menu from the left sidebar after that click on
the "List Salary/Payroll" menu.

Select the month for which you want to generate salary.

Select the year for which you want to generate salary.

Select the employees whose salary you want to generate.
Enter the amount in the Addition field to add an additional amount to the salary.
Enter the amount in the Subtraction field to subtract the amount to the salary.
Then select the account from which you want to pay salary, and hit the submit button to
generate salary.

List Salary
To view a list of salaries expand the "Salary/Payroll" menu from the left sidebar, and click
on the "List Salary/Payroll" menu.

Click on the "Print Invoice" and "Download Invoice" buttons from Actions to print and
download the "Salary Invoice".
Salary Report
To view the "Salary Report" expand the "Report" menu from the left sidebar and click on the
"Salary Report" menu.
Select a month or year to view the report within a specified month or year if needed. select
outlet from the outlet field to filter report according to outlet.

Add Quotation
To send a new quotation expand the "Quotation" menu from the left sidebar after that click on
the "Add Quotation" menu.
From the Item field, you select one by one the items you want to send to the quotation.

Fill up the required field and hit the submit button.
-
Click on the "Save and Add More" button to save the quotation and create a new one.
-
Click on "Save and Download" button to save and download the quotation.
-
Click on the "Save and Email" button to save the quotation and send it to the
customer's email.
-
Click on "Save and Print" button to save and print the quotation.

List Quotation
To view a list of quotations expand the "Quotation" menu from the left sidebar, and click on
the "List Quotation" menu.

Click on the "Print Invoice" and "Download Invoice" buttons from Actions to print and
download the "Quotation Invoice".
Add Transfer
To transfer "General Product" from one outlet to another, expand the Transfers menu from the
left sidebar, after that click the Add Transfer menu.

Select the outlet from which you are going to send.

Select the outlet you want to send to.

Send products shipping status.
From the Sender Outlet the status can only select Draft and Send.
If the status "Draft" that means the product will not be reduced from the stock, the product
will not go to another outlet.
If the status "Send" that means the quantity of the product will not be reduced from the
stock, but it will be sent to another outlet. When it is received from other outlet i.e.
received status will be reduced from stock and added to other outlet's stock.
If the status "Received" that means the product will be reduced from the stock, the product
will received by another outlet.

Select a product of "General Type" from the Item field that you want to transfer.

After selecting a general item you will get a popup modal, Enter the quantity in the Quantity
field for how many quantities you want to transfer, Then click the Add to Cart button to add
this item to the cart.

After adding the products to the cart, the cart will look like the snapshot below.
Below snapshot shows that some products from Uttara outlet are sent to Mirpur outlet.
Fill up the required field and hit the submit button.

After going to another outlet where it is going with an alert, here you can add it to your
outlet by receiving the status.

Edit Transfer
To edit a Transfer expand Transfer Menu click on List Transfer menu from the left sidebar.
Click on the Edit Button to edit this Transfer

By going to Edit, you can edit the transfer information, change from outlet to outlet, and
change status.

List Transfer
To view a list of transfers expand the "Transfer" menu from the left sidebar, and click on
the "List Transfer" menu.

You can change transfer status from List Transfer if you want.
Add Transfer
To transfer "Variation Product" from one outlet to another, expand the Transfers menu from
the left sidebar, after that click the Add Transfer menu.
Select the outlet from which you are going to send.
Select the outlet you want to send to.
Send products shipping status.
From the Sender Outlet the status can only select Draft and Send.
If the status "Draft" that means the product will not be reduced from the stock, the product
will not go to another outlet.
If the status "Send" that means the quantity of the product will not be reduced from the
stock, but it will be sent to another outlet. When it is received from other outlet i.e.
received status will be reduced from stock and added to other outlet's stock.
If the status "Received" that means the product will be reduced from the stock, the product
will received by another outlet.
Select a product of "Variation Type" from the Item field that you want to transfer.

After selecting a variation item you will get a popup modal, Enter the quantity in the
Quantity field for how many quantities you want to transfer, Then click the Add to Cart
button to add this item to the cart.

After adding the products to the cart, the cart will look like the snapshot below.
The below snapshot shows that some products from the Uttara outlet are sent to the Mirpur
outlet.
Fill up the required field and hit the submit button.

After going to another outlet where it is going with an alert, here you can add it to your
outlet by receiving the status.
Add Transfer
To transfer "IMEI Product" from one outlet to another, expand the Transfers menu from the
left sidebar, after that click the Add Transfer menu.
Select the outlet from which you are going to send.
Select the outlet you want to send to.
Send products shipping status.
From the Sender Outlet the status can only select Draft and Send.
If the status "Draft" that means the product will not be reduced from the stock, the product
will not go to another outlet.
If the status "Send" that means the quantity of the product will not be reduced from the
stock, but it will be sent to another outlet. When it is received from other outlet i.e.
received status will be reduced from stock and added to other outlet's stock.
If the status "Received" that means the product will be reduced from the stock, the product
will received by another outlet.
Select a product of "IMEI Type" from the Item field that you want to transfer.

After selecting IMEI item you will get a popup modal, Enter the quantity in the Quantity
field for how many IMEIs you want to transfer, below field will be generated according to
quantity number. Enter the IMEI number in the IMEI field. Then click the Add to Cart button
to add these items to the cart.

To increase the new IMEI field click on the plus button.

After adding the products to the cart, the cart will look like the snapshot below.
The below snapshot shows that some products from the Uttara outlet are sent to the Mirpur
outlet.
Fill up the required field and hit the submit button.

After going to another outlet where it is going with an alert, here you can add it to your
outlet by receiving the status.
Add Transfer
To transfer "Serial Product" from one outlet to another, expand the Transfers menu from the
left sidebar, after that click the Add Transfer menu.
Select the outlet from which you are going to send.
Select the outlet you want to send to.
Send products shipping status.
From the Sender Outlet the status can only select Draft and Send.
If the status "Draft" that means the product will not be reduced from the stock, the product
will not go to another outlet.
If the status "Send" that means the quantity of the product will not be reduced from the
stock, but it will be sent to another outlet. When it is received from other outlet i.e.
received status will be reduced from stock and added to other outlet's stock.
If the status "Received" that means the product will be reduced from the stock, the product
will received by another outlet.
Select a product of "Serial Type" from the Item field that you want to transfer.

After selecting Serial item you will get a popup modal, Enter the quantity in the Quantity
field for how many Serials you want to transfer, below field will be generated according to
quantity number. Enter the Serial number in the Serial field. Then click the Add to Cart
button to add these items to the cart.

To increase the new Serial field click on the plus button.

After adding the products to the cart, the cart will look like the snapshot below.
The below snapshot shows that some products from the Uttara outlet are sent to the Mirpur
outlet.
Fill up the required field and hit the submit button.

After going to another outlet where it is going with an alert, here you can add it to your
outlet by receiving the status.
Add Transfer
To transfer "Medicine Product" from one outlet to another, expand the Transfers menu from the
left sidebar, after that click the Add Transfer menu.
Select the outlet from which you are going to send.
Select the outlet you want to send to.
Send products shipping status.
From the Sender Outlet the status can only select Draft and Send.
If the status "Draft" that means the product will not be reduced from the stock, the product
will not go to another outlet.
If the status "Send" that means the quantity of the product will not be reduced from the
stock, but it will be sent to another outlet. When it is received from other outlet i.e.
received status will be reduced from stock and added to other outlet's stock.
If the status "Received" that means the product will be reduced from the stock, the product
will received by another outlet.
Select a product of "Medicine Type" from the Item field that you want to transfer.

After selecting Medicine item you will get a popup modal, Select the date for which you want
to make a transfer, Enter the quantity in the Quantity field from the right for how many
medicines/expiry you want to transfer, Then click the Add to Cart button to add these items
to the cart.

To increase the new expiry date & quantity field click on the plus button.

After adding the products to the cart, the cart will look like the snapshot below.
The below snapshot shows that some products from the Uttara outlet are sent to the Mirpur
outlet.
Fill up the required field and hit the submit button.

After going to another outlet where it is going with an alert, here you can add it to your
outlet by receiving the status.
Add Transfer
To transfer "Installment Product" from one outlet to another, expand the Transfers menu from
the left sidebar, after that click the Add Transfer menu.
Select the outlet from which you are going to send.
Select the outlet you want to send to.
Send products shipping status.
From the Sender Outlet the status can only select Draft and Send.
If the status "Draft" that means the product will not be reduced from the stock, the product
will not go to another outlet.
If the status "Send" that means the quantity of the product will not be reduced from the
stock, but it will be sent to another outlet. When it is received from other outlet i.e.
received status will be reduced from stock and added to other outlet's stock.
If the status "Received" that means the product will be reduced from the stock, the product
will received by another outlet.
Select a product of "Installment Type" from the Item field that you want to transfer.

After selecting a installment item you will get a popup modal, Enter the quantity in the
Quantity field for how many quantities you want to transfer, Then click the Add to Cart
button to add this item to the cart.

After adding the products to the cart, the cart will look like the snapshot below.
The below snapshot shows that some products from the Uttara outlet are sent to the Mirpur
outlet.
Fill up the required field and hit the submit button.

After going to another outlet where it is going with an alert, here you can add it to your
outlet by receiving the status.
Add Damage
Expand the Damage menu from the left sidebar and click the Add Damage menu to enter damage
entries for "General Products".

Select a product of "General Type" from the Item field that you want to damage.

After selecting a general item you will get a popup modal, Enter the quantity in the Quantity
field for how many quantities you want to damage, Then click the Add to Cart button to add
this item to the cart.

Enter here Loss Amount and damage quantity.

Damage Report
To view the "Damage Report" expand the "Report" menu from the left sidebar and click on the
"Damage Report" menu.
Select a date to view the report within a specified date if needed. select a Responsible
person also you can select outlet from the outlet field to filter report according to
outlet.

Add Damage
Expand the Damage menu from the left sidebar and click the Add Damage menu to enter damage
entries for "Variation Products".
Select a product of "Variation Type" from the Item field that you want to damage.

After selecting a variation item you will get a popup modal, Enter the quantity in the
Quantity field for how many quantities you want to damage, Then click the Add to Cart button
to add this item to the cart.

Enter here Loss Amount and damage quantity.

Add Damage
Expand the Damage menu from the left sidebar and click the Add Damage menu to enter damage
entries for "IMEI Products".
Select a product of "IMEI Type" from the Item field that you want to damage.

After selecting IMEI item you will get a popup modal, Enter the quantity in the Quantity
field for how many IMEIs you want to damage, below field will be generated according to
quantity number. Enter the IMEI number in the IMEI field. Then click the Add to Cart button
to add these items to the cart.

To increase the new IMEI field click on the plus button.

Enter here Loss Amount.

Add Damage
Expand the Damage menu from the left sidebar and click the Add Damage menu to enter damage
entries for "Serial Products".
Select a product of "Serial Type" from the Item field that you want to damage.

After selecting Serial item you will get a popup modal, Enter the quantity in the Quantity
field for how many Serials you want to damage, below field will be generated according to
quantity number. Enter the Serial number in the Serial field. Then click the Add to Cart
button to add these items to the cart.

To increase the new Serial field click on the plus button.

Enter here Loss Amount.

Add Damage
Expand the Damage menu from the left sidebar and click the Add Damage menu to enter damage
entries for "Medicine Products".
Select a product of "Medicine Type" from the Item field that you want to damage.

After selecting Medicine item you will get a popup modal, Select the date for which you want
to make a damage, Enter the quantity in the Quantity field from the right for how many
medicines/expiry you want to damage, Then click the Add to Cart button to add these items to
the cart.

To increase the new expiry date & quantity field click on the plus button.

Enter here Loss Amount and damage quantity.

Add Damage
Expand the Damage menu from the left sidebar and click the Add Damage menu to enter damage
entries for "Installment Products".
Select a product of "Installment Type" from the Item field that you want to damage.

After selecting a installment item you will get a popup modal, Enter the quantity in the
Quantity field for how many quantities you want to damage, Then click the Add to Cart button
to add this item to the cart.

Enter here Loss Amount and damage quantity.

Add Item
To add a new "Fixed Asset" item, expand the "Fixed Asset" menu from the left sidebar and
click the "Add Item" menu.

Fill up the required field and hit the submit button.
Add In Stock
To add a new "Stock In" item, expand the "Fixed Asset" menu from the left sidebar and click
the "Add Stock In" menu.

Select the item whose stock you are going to increase.
Fill up the required field and hit the submit button.
Add Stock Out
To add a new "Stock Out" item, expand the "Fixed Asset" menu from the left sidebar and click
the "Add Stock Out" menu.

Select the item whose stock you are going to decrease.
Fill up the required field and hit the submit button.
Register Report
To view the "Register Report" expand the "Report" menu from the left sidebar and click on the
"Register Report" menu.
Registers play a vital role in streamlining the checkout process, improving
customer service, and maintaining accurate records of sales activities in retail
environments. They serve as the frontline interface between businesses and their customers,
facilitating efficient and secure transactions while enabling businesses to track sales
performance and make informed decisions.
The register consists of an opening ledger and a closing ledger. So that the register can
keep track of how much is left after buying and selling.
- Select an employee from the Employee field.
- After selecting the employee, you will see all the reports of this employee on the
right side.
Note: All reports that have been closed will appear in the report list. Open
registers will not appear in register list.

How to Close Register?
Click the Register Details button, if the register is open you will see an interface similar
to the snapshot below, and click Close Register. If the register is open then you won't see
such an interface.

Z Report
To view the "zReport" expand the "Report" menu from the left sidebar and click on the
"zReport" menu.
A "Z" report is a report that shows all the transactions of a business for a particular day.
Like Sales and Tax Summary, Payment method-wise Summary, Item-wise Summary, Purchases,
Expenses, Supplier Summary, Customer Receive etc.

Daily Summary Report
To view the "Daily Summary Report" expand the "Report" menu from the left sidebar and click
on the "Daily Summary Report" menu.
The purpose of the Daily Summary Report is to offer a quick overview of the day's business
activities to management, helping them to assess performance, identify trends, and make
informed decisions. It serves as a valuable tool for monitoring daily sales targets.
Select a date, select an outlet if needed.

Profit Loss Report
To view the "Profit Loss Report" expand the "Report" menu from the left sidebar and click on
the "Profit Loss Report" menu.
Profit and Loss Report, also known as an Income Statement, is a financial statement that
summarizes the revenues, expenses, and resulting profits or losses of a business over a
specific period, typically a month or year. The Profit and Loss report provides valuable
scenarios into the financial performance of the business.
Revenue: This section of the report lists all the income generated by the business
during the reporting period. Revenue sources may include sales of products or services, as
well as any other sources of income such as Tax, Delivery/Service, Installment Sale(Delivery
Charge + Percentage of Interest), Income, Servicing, Sale Returned etc. earned.
Cost of Sale: This section includes all the direct costs associated with producing or
acquiring the products or services sold by the business.
Gross Profit: Gross profit is calculated by subtracting the "Cost of Sale" from the
total revenue. It represents the amount of money the business has earned from its core
operations after accounting for the direct costs of producing product or delivering
services. Gross Profit = Revenue - Cost of Sale.
Other Expenses: This section includes all the indirect costs incurred by the business
in its day-to-day operations. The Other Expenses may include expense, salaries, and any
other expenses not directly tied to the production of goods or services.
Net Profit: Net profit is the final result after subtracting all Other Expenses from
the gross profit.
It represents the overall profitability of the business during the reporting period. If the
expenses exceed the gross profit, the result is a net profit. Net Profit = Gross Profit -
Other Expenses.

Select the option from "Costing Method" field to view the report based on the "Average
Costing of last 3 Purchase" or the "Last Purchase Price".

Below snapshot shows a method to calculate "Gross profit" and "Net profit".

Price History Report
To view the "Price History Report" expand the "Report" menu from the left sidebar and click
on the "Price History Report" menu.
A price history report is a report that provides detailed information on the price of a
product, such as purchases price, sales price, purchase return price, sale return price,
damages price etc.

Cash Flow Report
To view the "Cash Flow Report" expand the "Report" menu from the left sidebar and click on
the "Cash Flow Report" menu.
A cash flow report describes a system's cash payment method of transactions.
Select a date to view the report within a specified date if needed. select outlet from the
outlet field to filter report according to outlet.


